Getting started
Sign in and get oriented with the dashboard.
Welcome to SnapFlow — the fastest way to get event photos from your camera to your clients. This guide walks you through the whole workflow: create an event (we call it an album), get photos in straight from your camera, cull and rate, let SnapFlow recognise the people in your shots, and share a polished gallery — often before the event is even over.
This first chapter does just two things: gets you signed in, and shows you around the home screen so nothing later feels strange.
Two apps, one account
SnapFlow has a web app (in your browser, at snap-flow.org) and a free desktop sync app for your Mac. Throughout this manual, steps are tagged Web or Desktop app so you always know which one a step happens in. There's also an iOS app — see Getting started on iPhone. One login works everywhere.
Create your account
If this is your first time, you need an account. It takes about a minute and the Free plan costs nothing. Web
- Open snap-flow.org. In the top-right corner, click Start free. — the Create your account page opens. (Already have an account? Click Sign in instead and skip to Sign in.)
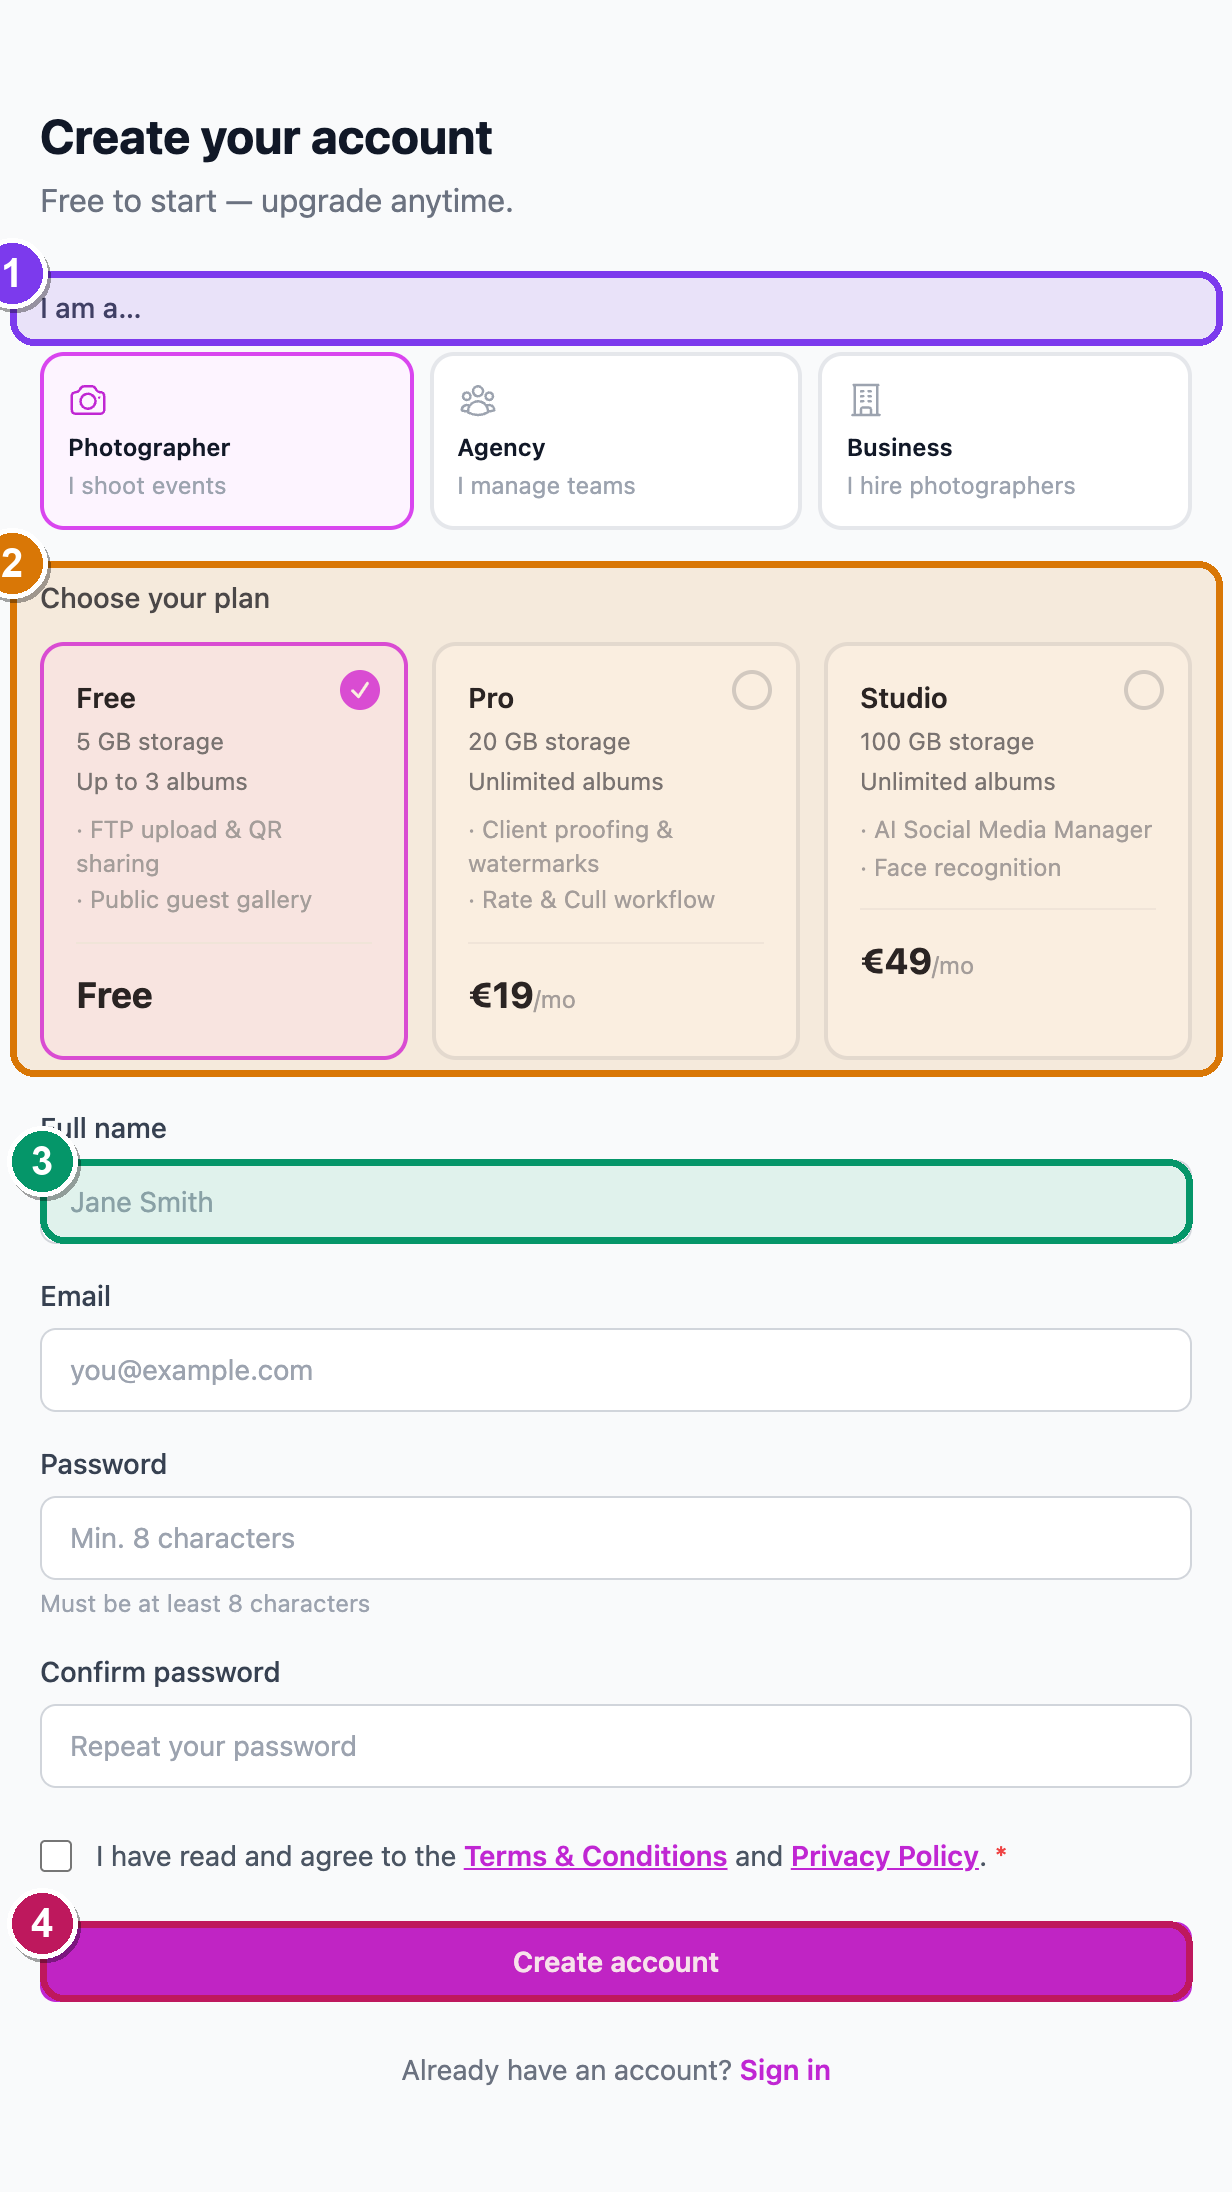 The Create your account page. ① the I am a… picker — leave it on Photographer (that's you if you shoot events; Agency and Business are for teams and companies). ② the Choose your plan cards — Free, Pro and Studio. ③ your details: Full name, Email, Password, Confirm password. ④ the Create account button at the bottom.
-
Leave the I am a… picker on Photographer. — the plan cards below it read Choose your plan.
-
Pick a plan card. Free lets you try the core workflow (3 albums, 5 GB of storage). Pro adds unlimited albums, more storage, RAW upload, fast culling and client proofing. Studio adds the AI layer — face and number recognition, AI captions and the social-media suite. — the card you click gets a blue border and a tick.
-
Fill in Full name, Email, Password (at least 8 characters) and Confirm password. — when the two passwords match, a small green Passwords match line appears under the second box.
-
Tick the box agreeing to the Terms & Conditions and Privacy Policy. — the box must be ticked or the form won't submit.
-
Click the button at the bottom. — on the Free plan it reads Create account and takes you straight in. On a paid plan it reads Continue to payment → and sends you to checkout first; once payment lands you'll get a confirmation email with a sign-in link.
Start free, upgrade later
You can start on Free and upgrade any time from Account & settings. Your albums and photos carry over — nothing is lost. The desktop sync app and camera FTP upload work on every plan, even Free.
Confirm your email
After your first sign-in, look out for a confirmation email from SnapFlow and click the link inside. Until you do, a yellow strip sits across the top of your dashboard: "Please verify your email address — check your inbox for a link from SnapFlow." Client notifications stay switched off until it's verified. Lost the email? Click Resend email on the right of that yellow strip.
Sign in
Already registered? Here's how to get back in. Web
- Open snap-flow.org and click Sign in (top right). — the Welcome back sign-in page opens.
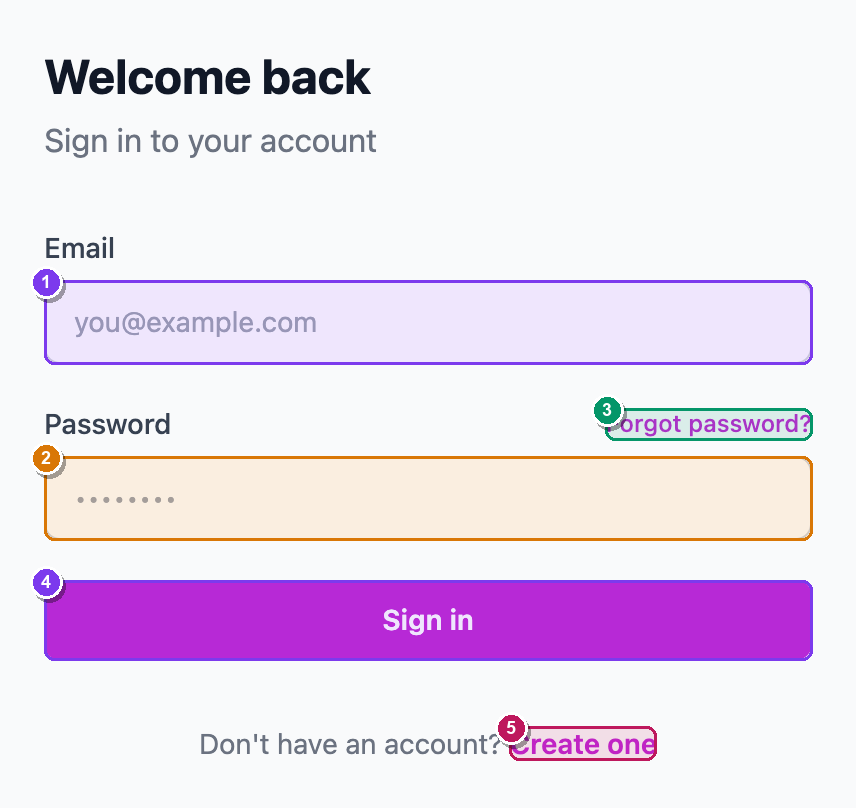 The sign-in page. ① the Email box. ② the Password box. ③ the Forgot password? link, just above the password box. ④ the blue Sign in button. ⑤ the Create one link at the bottom, for when you don't have an account yet.
-
Type your address into Email. — your cursor sits ready in the box.
-
Type your password into Password. — the characters show as dots.
-
Click Sign in. — you land on your dashboard, the My Albums screen.
Forgot your password?
On the sign-in page, click Forgot password? (just above the password box) and follow the email link to set a new one. The only links on the sign-in page are Forgot password? and, at the very bottom, Create one — there's no "verify email" link here; that lives on your dashboard after you sign in (see the note above).
Look around your dashboard
After you sign in you land on My Albums — your home base. Every event you shoot lives here as an album (a folder for one event's photos). Web
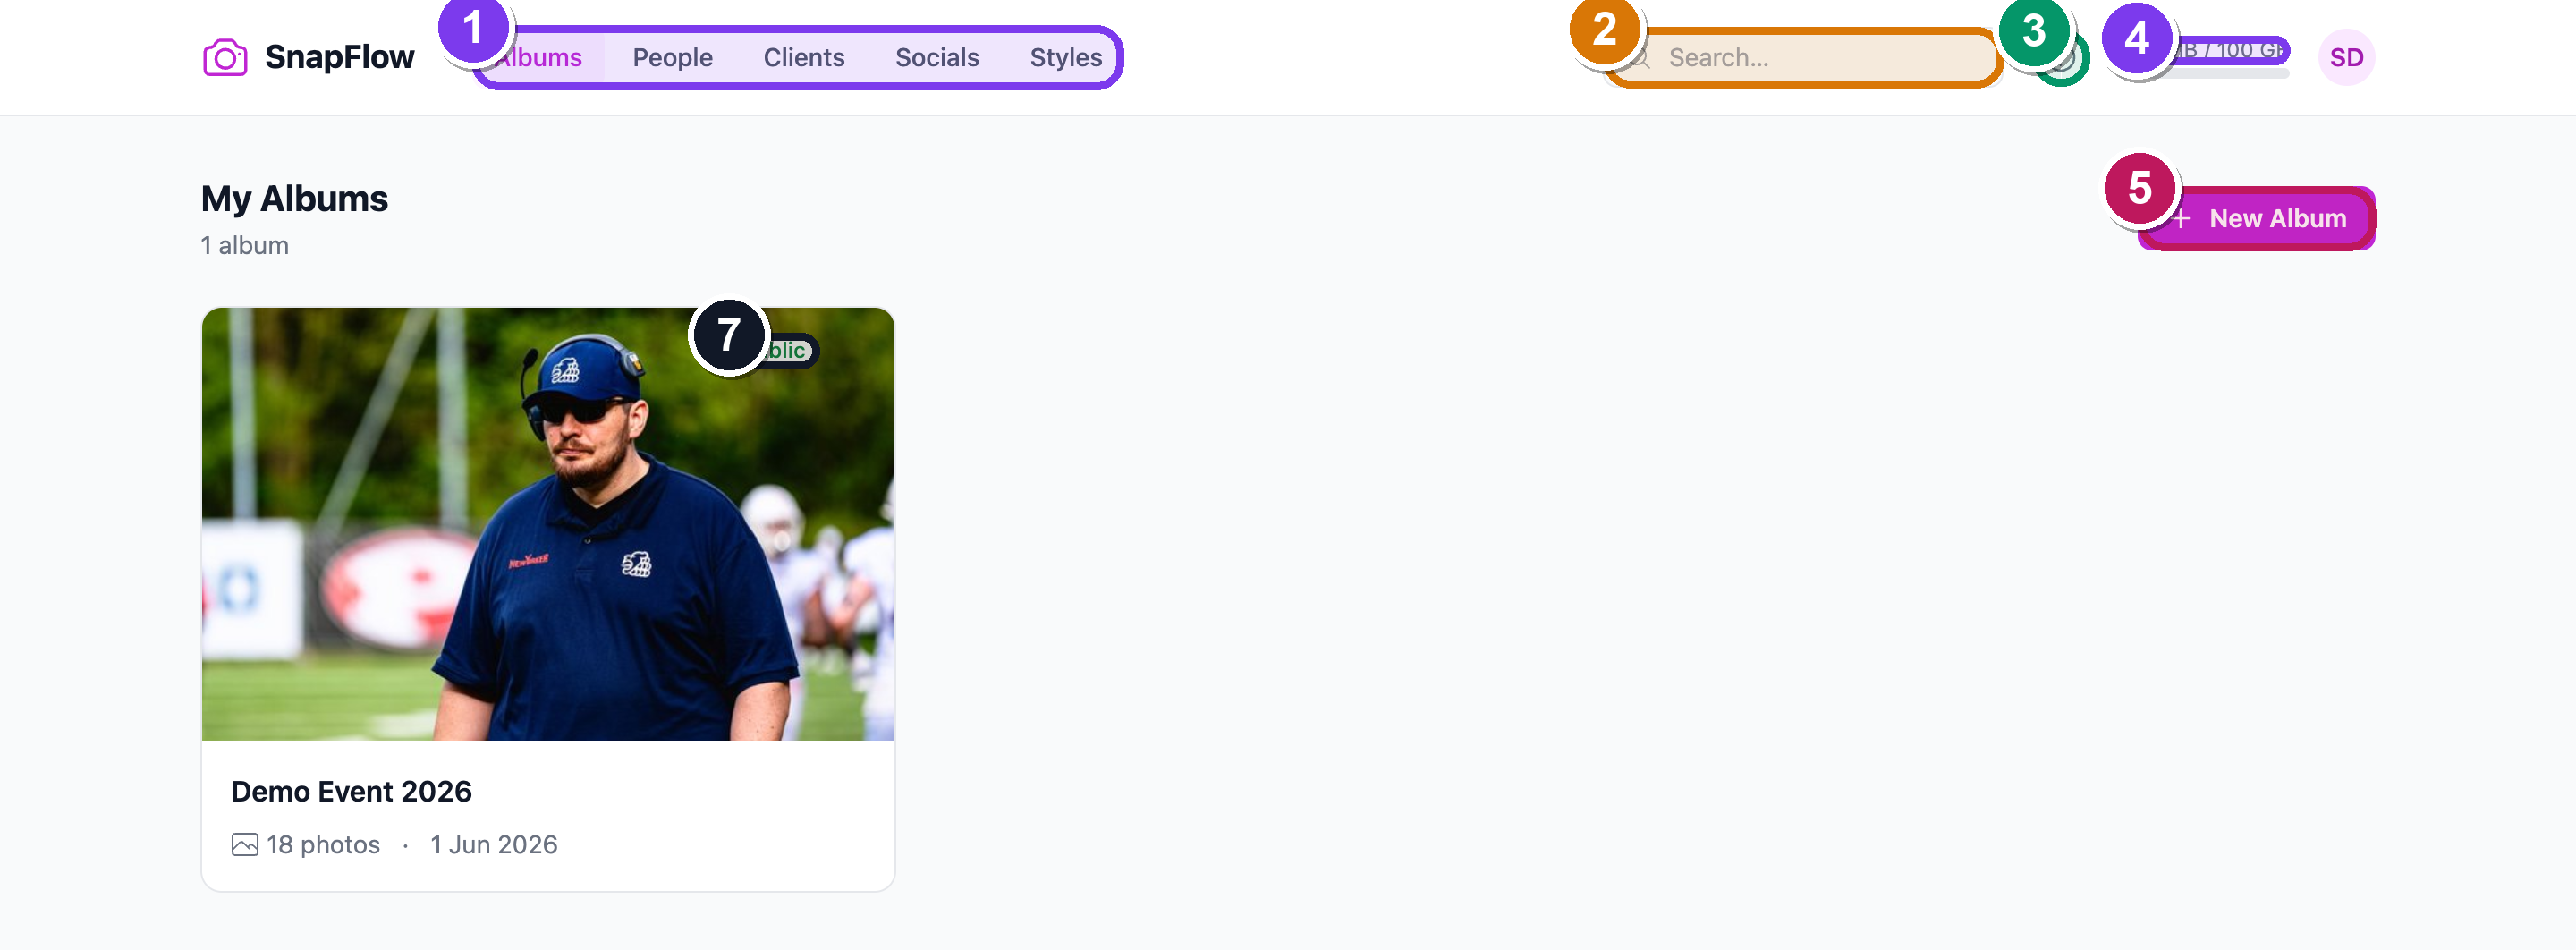 Your home screen. ① the top navigation: Albums · People · Clients · Socials · Styles. ② the Search… box. ③ the Help (?) icon. ④ the storage bar (used / total). ⑤ the New Album button. ⑥ the Sort dropdown and the grid / pipeline view toggle. ⑦ an album card with its clickable Public / Private pill in the top-right corner.
Take a moment to find each part — you'll use all of them later.
The top navigation
The bar across the top is how you move between the big areas of SnapFlow. Which items you see depends on your plan:
- Albums — always here. This is your home screen (the My Albums grid).
- People — your recognised athletes and teams across every event. Appears on plans with face or athlete recognition (Studio and recognition plans). See Recognising people.
- Clients — the people and companies you shoot for. Always here. See Clients for how they tie into galleries.
- Socials — Instagram (and TikTok) posting. Appears on Pro and up. See Instagram & socials.
- Styles — reusable colour "looks" you can apply to a whole album. Appears on Studio (and corporate plans with the styles feature).
Don't see People, Socials or Styles?
They're hidden until your plan includes them — that's normal, not a bug. Upgrade from Account & settings and they appear. Albums and Clients are always there.
The toolbar (top-right)
- Search… — finds albums, photos and people as you type. Type at least two characters and a dropdown groups the matches; press Enter to open the full search page. It's on the right of the top bar on wide screens and tucks away on narrow ones.
- Help (?) — the question-mark icon opens this manual (
/help) any time. - Storage bar — a thin used / total bar showing how much of your plan's storage you've filled. It turns amber as you near your limit and red when you're out of room.
- Avatar (the round circle with your initials) — click it for Settings and Sign out. See Account & settings.
The album grid
- New Album (top right of the grid) starts a new event. That's the next chapter — Creating an album.
- Sort (dropdown above the grid) reorders your albums — for example by date or name.
- Grid / pipeline toggle (the two little buttons next to Sort) switches between a plain photo grid and a pipeline view that groups albums by stage. Solo photographers usually keep the grid; the choice is remembered in your browser.
- Each album card shows the event name, a cover image, the photo count, and a Public / Private pill in the top-right corner. That pill is a button — click it to flip the album between public and private right there, without opening it.
- Archived — hidden a few old albums to tidy your grid? They go to the
archived view. Open it from the Archived link above the grid (the web
address ends in
?archived=1). From there you can Unarchive any album to bring it back.
Storage full?
If you ever fill your storage, a red strip appears at the top: "Storage full — new uploads are blocked. Upgrade your plan to continue." New photos are silently skipped until you free up space or upgrade, so keep an eye on the storage bar. See Account & settings to change plans.
Where to next
You're signed in and you know your way around. Here's the natural path from here:
- Create your first album — set up an event and turn on the features you need.
- Get photos in — drag-and-drop in the browser, or set your camera to upload over FTP.
- Cull and rate — keep the good frames, drop the rest.
- Share a gallery — a public, QR-linked gallery for your guests.
Prefer to work from your Mac with SD-card import and Lightroom round-tripping? Install the SnapFlow desktop sync app. Shooting on your phone? See Getting started on iPhone.