Create an album (event)
Set up an event, its gallery, QR code and FTP credentials.
In SnapFlow, every event you shoot is an album. Creating one gives you a private workspace for the photos, a public gallery link with its own QR code, and — if you switch it on — unique FTP credentials so your camera can upload straight into it.
This chapter gets you from an empty dashboard to a live album with photos in it. It covers creating the album, the album page where you work, your QR code, and a quick pointer to the deeper settings. (Jargon note: a workflow is just a feature you turn on per album — live delivery, proofing, face detection, and so on.)
Create your first album
You start on the dashboard. (The dashboard is your home screen, titled My Albums, listing every album you own as a card.)
- From the dashboard, click New Album (top-right, blue). — the New Album page opens. It has two cards: a Workflows card at the top and an Album details card below it.
- Scroll to the Album details card and type a name in the Album name
field (it has a red
*, so it's required). — for example Sarah & Tom Wedding. - Click Create album (bottom-left, blue). — SnapFlow builds the album and drops you on its album page.
That's the whole minimum. Everything else on this form is optional and can be changed later.
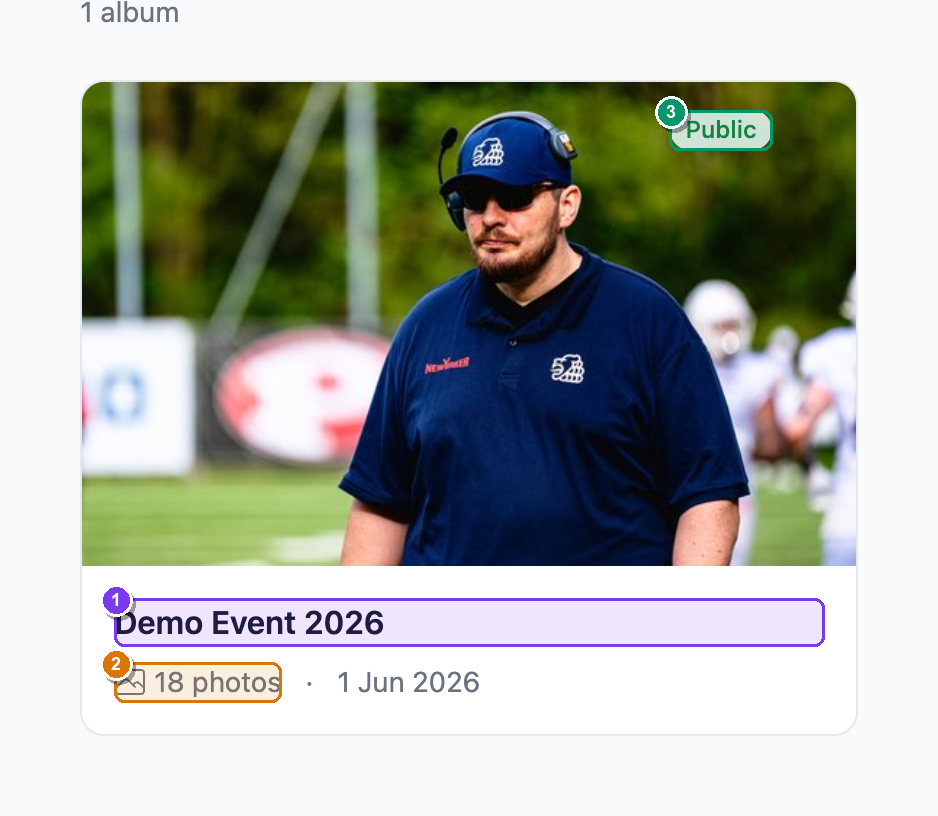 Your dashboard, titled My Albums. Each card shows ① the cover photo and name, ② the photo count, and ③ a Public / Private pill — click the pill to flip the gallery between public and private right here, no need to open settings. The blue New Album button sits top-right.
The name is required
If you click Create album with the Album name field empty, SnapFlow sends you back to the form with a red message: "Album name is required." Type a name and try again.
The optional bits on the create form
You don't have to touch any of these, but they save you a trip to settings later:
- Workflows (top card) — tick the features this album needs up front: Live delivery, Sneak peek, Rate & Cull, People detection, AI metadata, Watermark thumbnails, Client proofing, Finals delivery, and FTP camera upload (this last one is ticked by default). Greyed-out rows with an Upgrade, Pro, or Studio pill need a higher plan. Each feature has its own chapter later.
- Event date and Shoot type — pick the kind of shoot (Wedding, Portrait, Sports, and so on). If you choose Sports, an Advanced AI detection chip grid appears so you can name the exact sport(s) — this tunes what the AI looks for (race numbers, liveries, helmets, kit).
- Photo metadata defaults (the collapsible Photo metadata defaults row) — fill in Credit line, Copyright, City, State / region, Country, ISO code, and Venue / sub-location once, and every photo in this album inherits them in Lightroom and Bridge. See Metadata for how this cascade works.
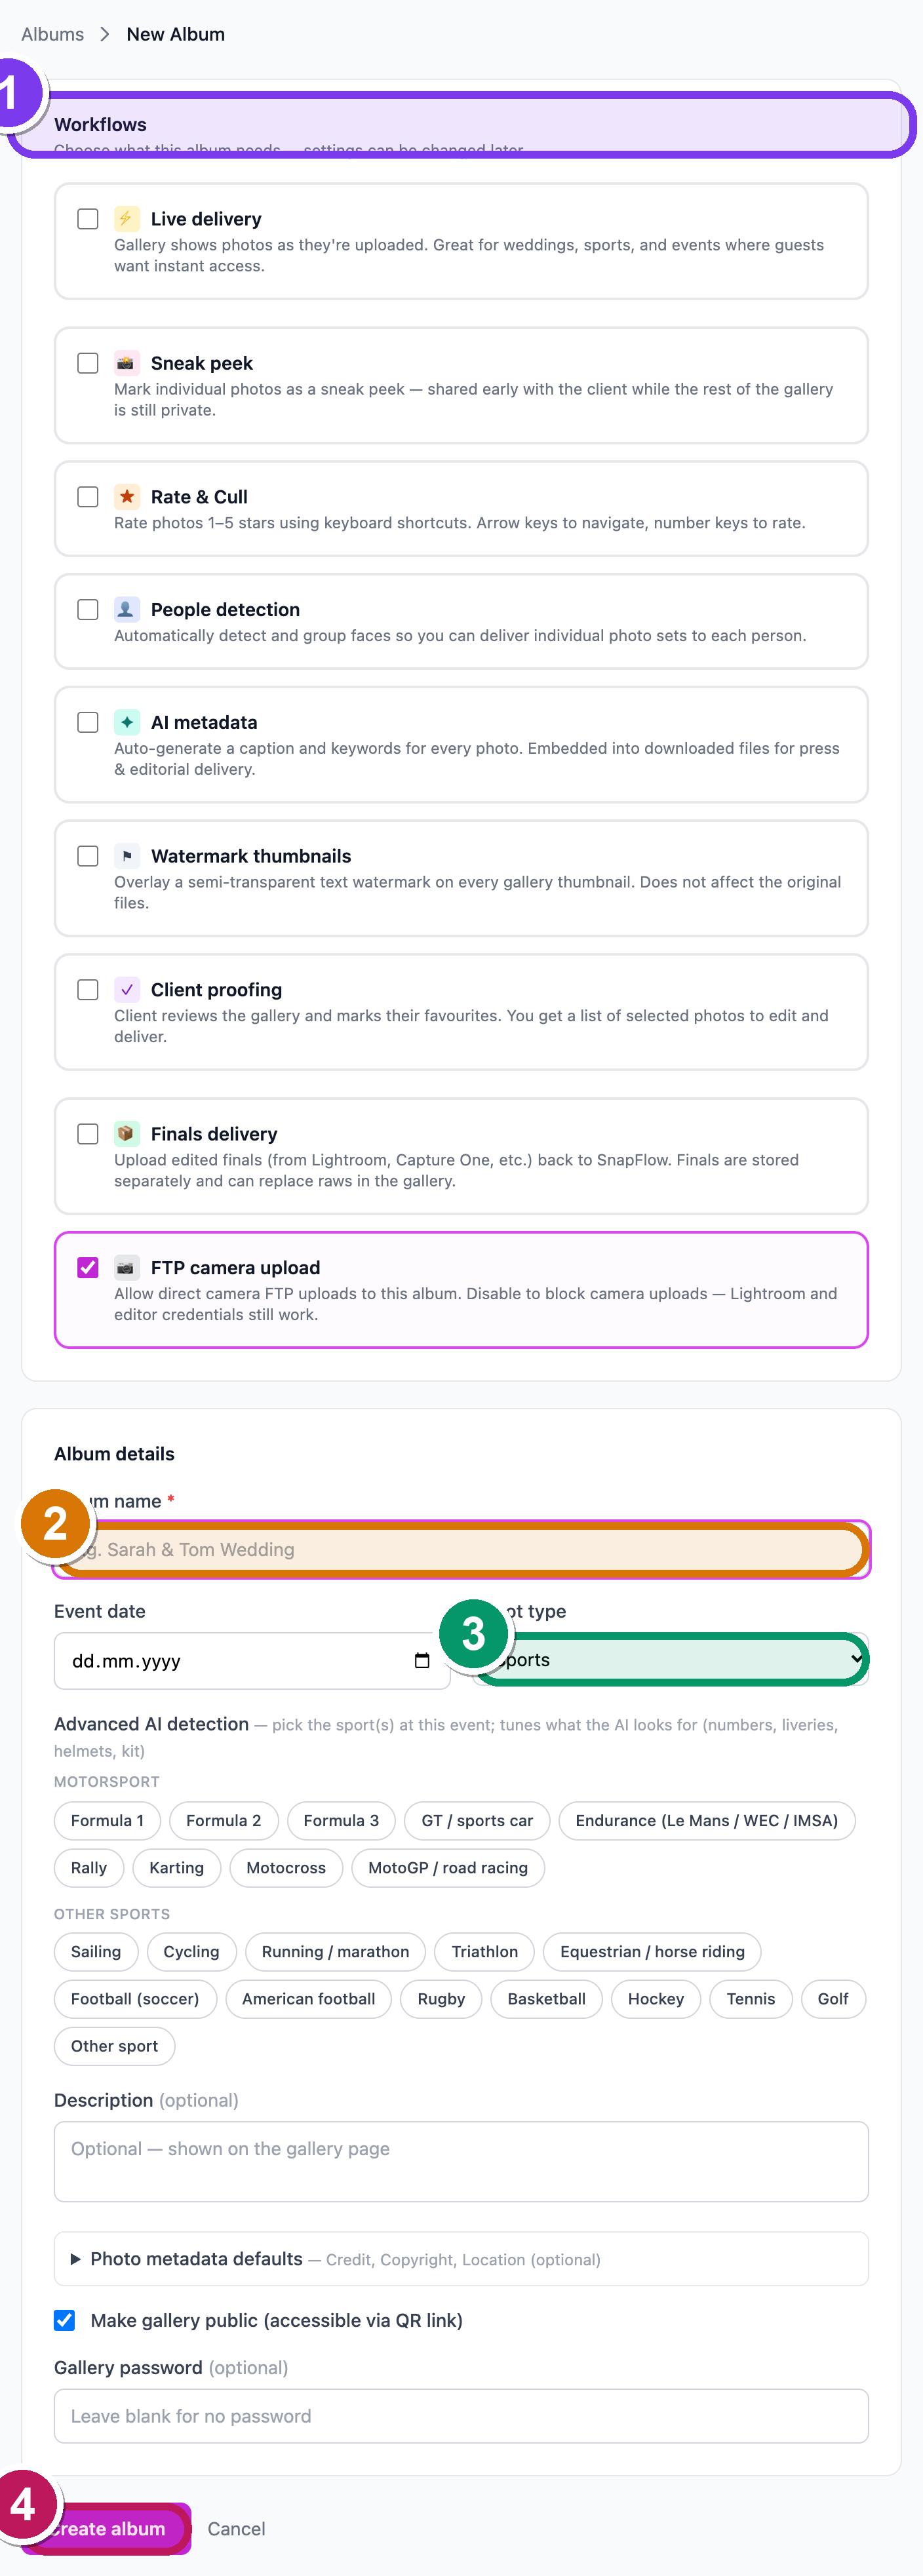 The New Album page. ① the Workflows card (tick what this album needs), ② the required Album name field with its red
 *, ③ the Shoot type dropdown with the Advanced AI detection sport chips below it, and ④ the blue Create album button.
What SnapFlow sets up for you
When you click Create album, SnapFlow automatically generates a unique public gallery URL and a print-ready QR code for it, and prepares the storage folders for your originals and thumbnails — no extra steps.
Your FTP password (only if FTP is on)
FTP credentials let your camera (or a tethering app) upload straight into the album. They're only created when the FTP camera upload workflow is ticked (it is, by default).
If FTP is on, the moment your new album opens you'll see a green banner: "Album created — save your FTP password now / This is the only time it will be shown." with the password in a box right below it. The FTP Upload Credentials panel also opens automatically just under the album header, showing Host, Port, and Username.
- Copy the password from the green banner immediately. — SnapFlow only keeps a scrambled (hashed) copy, so it can't show it to you again.
- Lost it later? Open More ▾ (top-right) → FTP credentials. — the FTP Upload Credentials panel opens.
- In that panel, click Reset password. — SnapFlow generates a fresh password and shows it once (the old one stops working immediately).
The password flashes once
The FTP password is shown a single time, in the green banner right after you create the album. Copy it then. There's no way to read it back — only to Reset password for a new one.
Full camera-upload and FTP details are in Upload photos.
The album page
The album page is where you'll spend most of your time. Reach it any time by clicking the album's card on the dashboard.
At the very top sits the event name with a Public or Private badge, the
event date, photo count, and the gallery link (/gallery/<slug>). If
recognition is switched on, the face count next to it is a clickable link
straight to the People page. Below the name is a row of action buttons:
- View Gallery — opens the public gallery in a new tab (this button reads Preview instead when the album is private).
- Download All — appears once the album has photos; grabs everything as a ZIP.
- Embed — appears only for public galleries with no password; opens a modal with copy-paste snippets to embed the gallery on a blog.
- More ▾ — a drop-down holding setup, settings, and tools (see below).
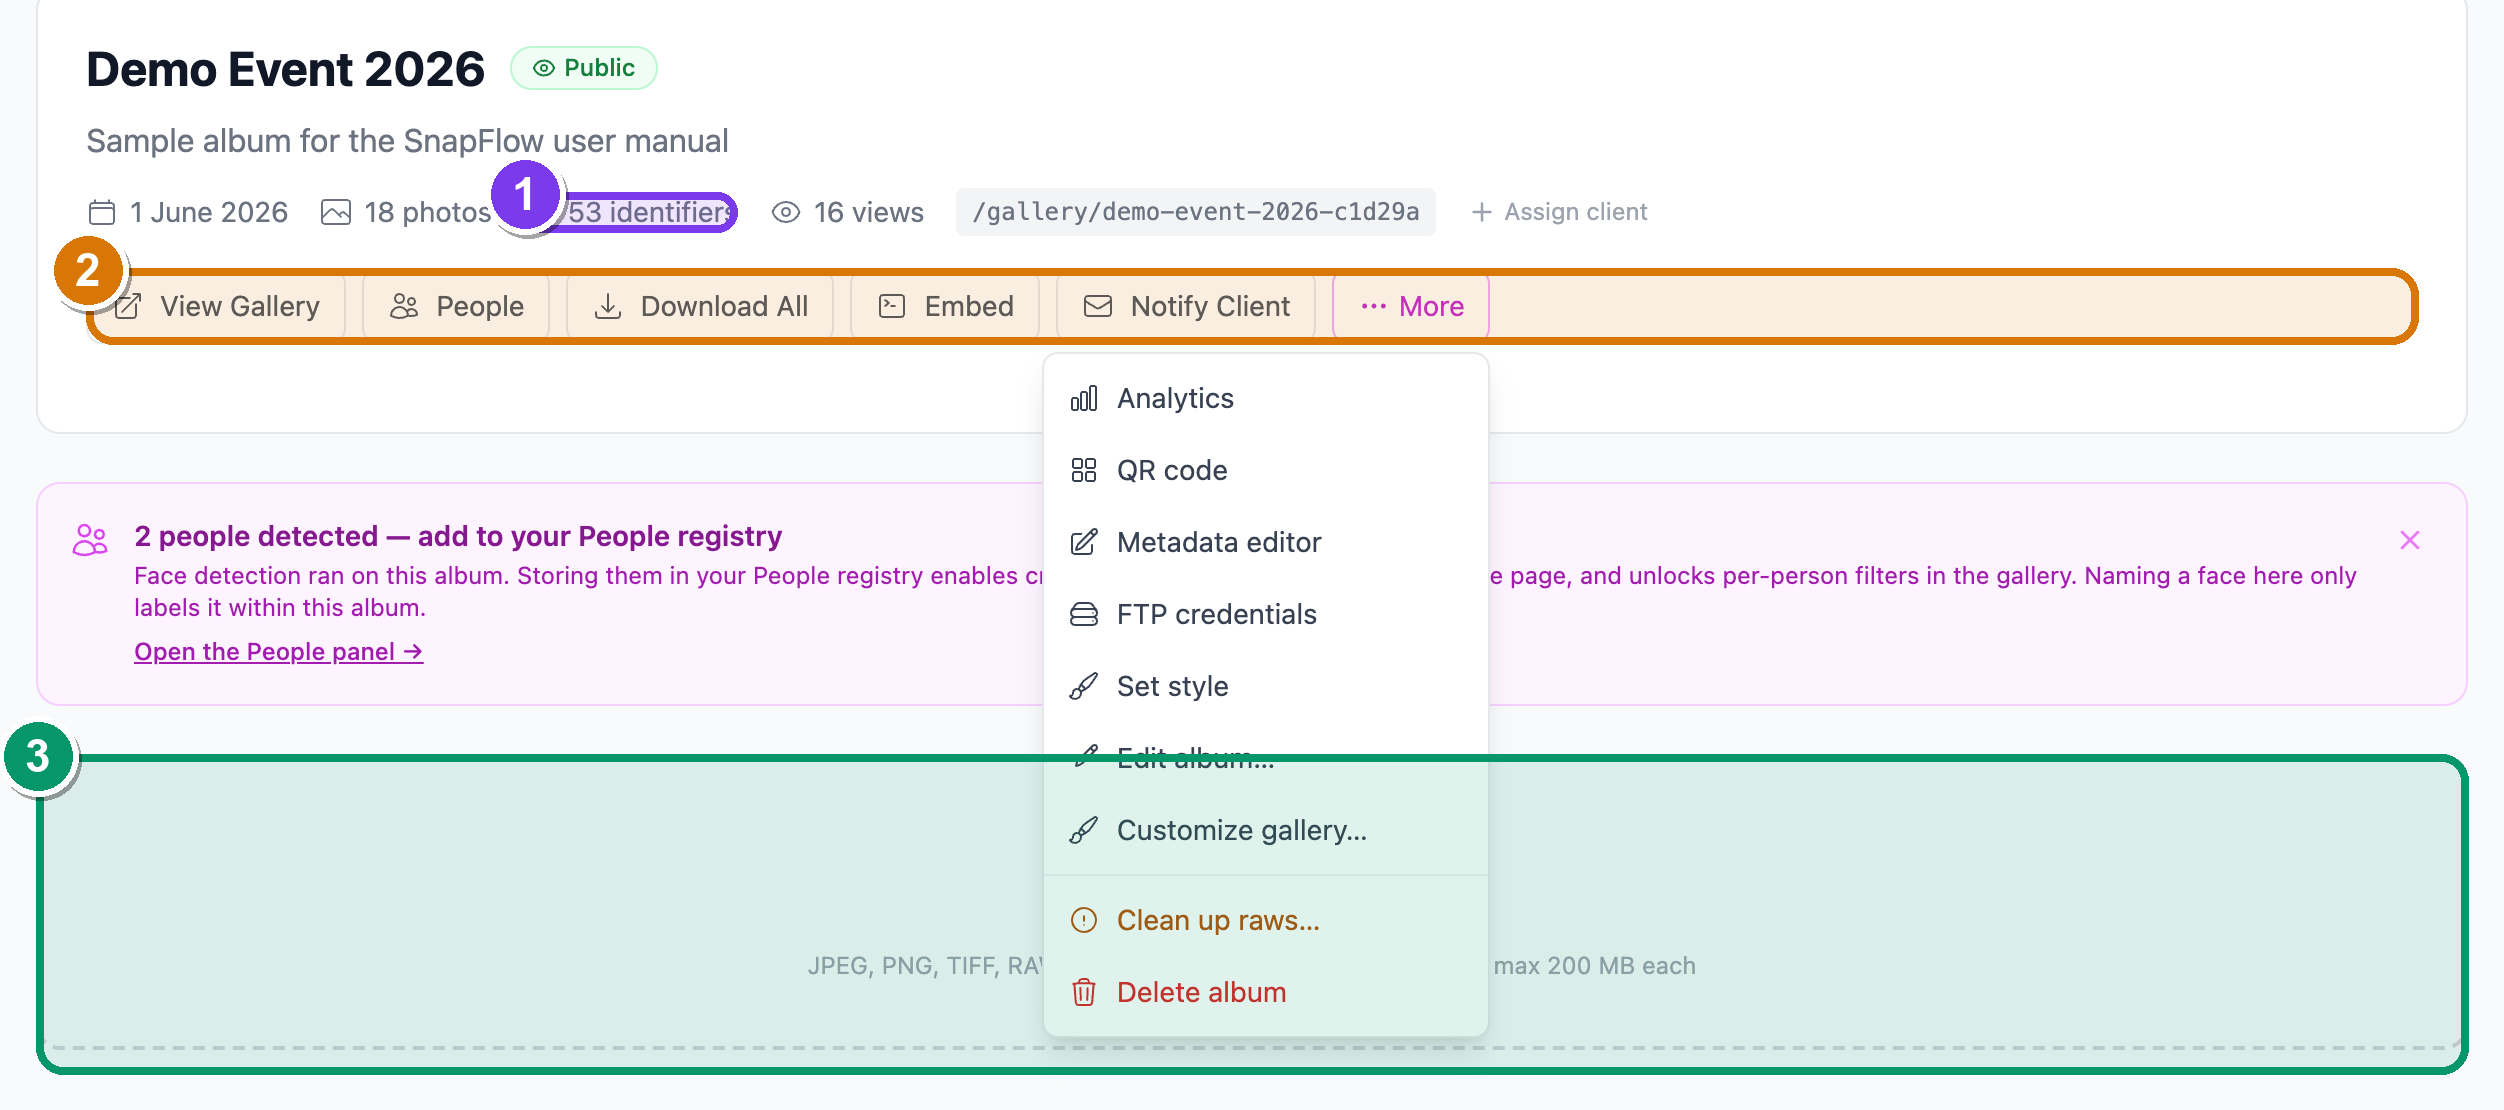 The album page during the upload phase. ① the header counts — the face count is a clickable link to People; ② the action row — View Gallery, Download All, Embed, and the More ▾ menu (shown open); ③ the Drop photos here or browse zone with its format sub-line; ④ the blue Upload photos button.
What's in the More ▾ menu
Click More ▾ (top-right of the album page) to open it. The items appear in this order:
- Rate & cull — opens the full-screen culling view → Cull & rate.
- Analytics — gallery view stats in a pop-up.
- QR code — the print-ready QR page (see below).
- Metadata editor — the spreadsheet-style IPTC editor → Metadata.
- FTP credentials — the FTP Upload Credentials panel (and Reset password).
- Set style (or Style: …) — apply an Album Style; only shows on plans with styles.
- Edit album… — opens the full settings page (this is your settings screen).
- Customize gallery… — opens the gallery designer (look, layout, branding).
- Clean up raws… — bulk-removes raw-phase photos after you've delivered.
- Delete album — removes the album and all its photos.
Two different 'edit' words
Edit album… is for settings (how the album behaves). Customize gallery… is for gallery design (how it looks to guests). They're different screens — don't mix them up.
Adding photos
Below the buttons is the upload zone — a dashed box reading Drop photos here or browse, with a sub-line listing the formats it accepts (JPEG, PNG, TIFF, and — on Pro/Studio plans — RAW like CR2/NEF/ARW/DNG, up to the size limit per file).
- Drag photos onto the Drop photos here or browse box (or click it to pick files). — the files queue up and a blue Upload photos button appears.
- Click Upload photos. — the photos process and fill the grid below; the header counts update as they finish.
Your camera can also send photos in over FTP — see Upload photos for both routes. From each photo card in the grid you can rate it, set it as the album cover, or open it full-screen.
Album settings
For anything beyond the basics — gallery theme, downloads, expiry, password, privacy, and the full Workflows panel — open the settings page:
- On the album page, click More ▾ (top-right) → Edit album…. — the Edit album page opens as two columns.
This is a big screen with its own chapter. Rather than repeat it here, see Album settings for every control. In short, the left column holds the album's name, shoot type, AI detection, metadata defaults, and Agency delivery; the right column holds the Workflows card, Gallery visibility, the Client card, Privacy & Processing (Strip GPS, Watermark thumbnails), and Timed Release — then Save changes at the bottom.
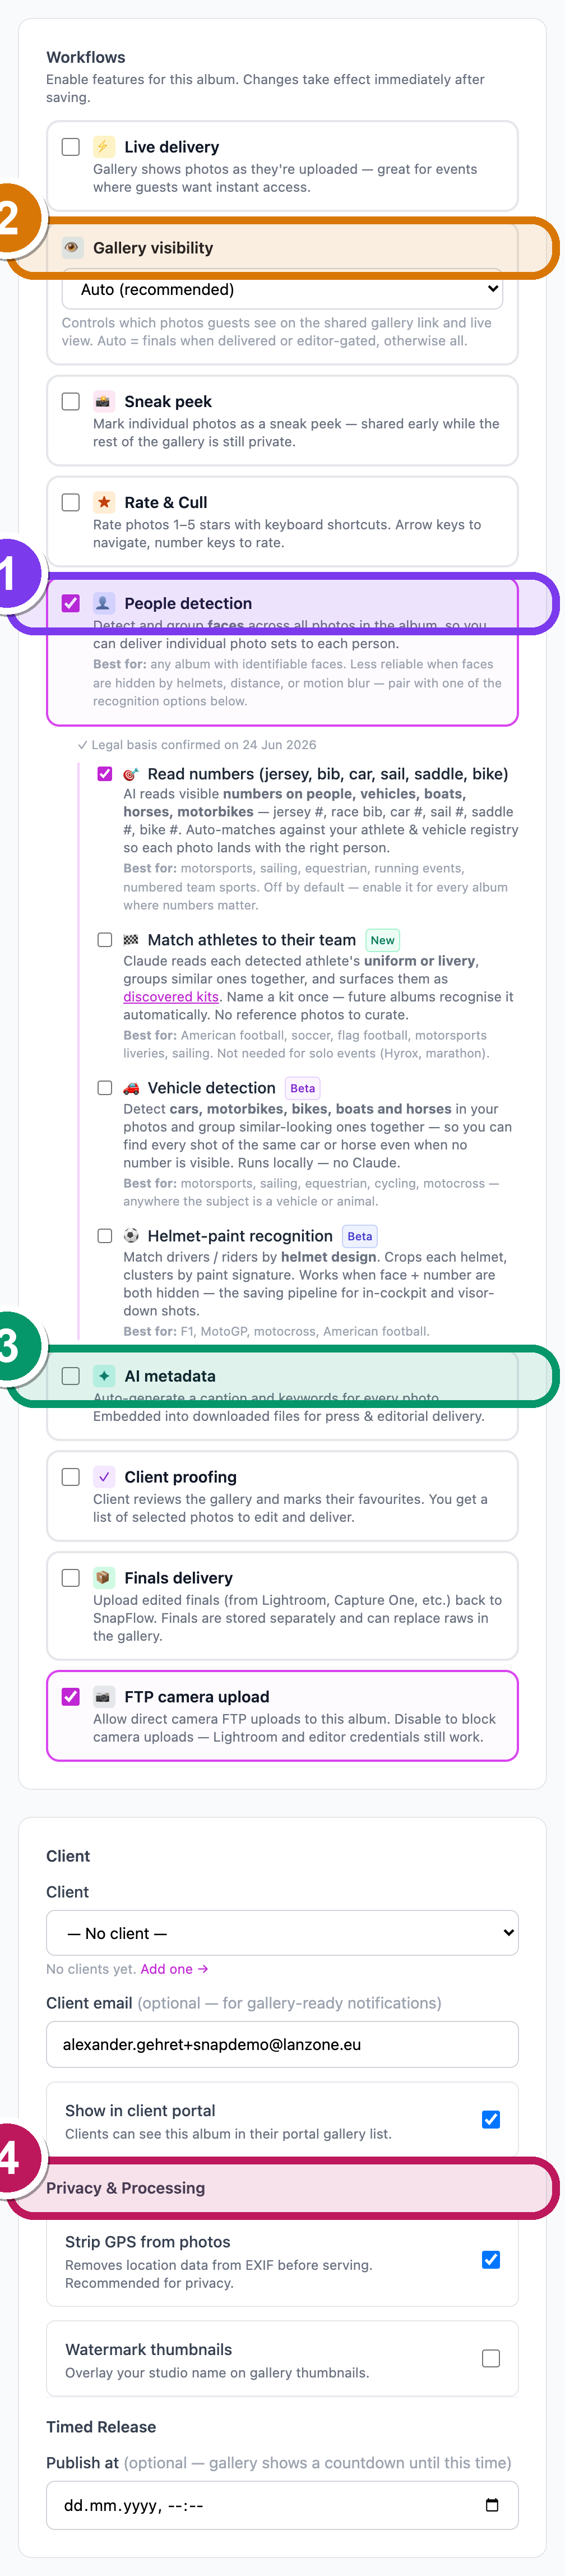 The Edit album page. ① the Workflows card with People detection ticked — note the amber "I have a legal basis to process biometric data in this album." consent box that appears; ② the standalone Gallery visibility card; ③ the standalone AI metadata toggle (Studio); ④ Privacy & Processing with Strip GPS from photos and Watermark thumbnails (plus its Watermark text field and the "Apply watermark to N existing photo(s)" backfill line).
A few things worth knowing before you go there:
- Downloads is a set of radio buttons: No downloads / Web resolution (2000px) / Original full resolution (the default is Original full resolution).
- Gallery theme offers Classic, Hero, Dark, and Magazine — but Dark and Magazine are premium-locked (a paid plan unlocks them).
- The recognition features (faces, race numbers, teams) live under People detection in the Workflows card. See Recognise people.
Your QR code
Every album has a print-ready QR code that points to its public gallery — ideal for a sign at the event or a card you hand out.
- On the album page, click More ▾ → QR code. — the QR page opens, showing the code and the gallery address under it.
- Click Download PNG. — SnapFlow saves the QR image to your computer.
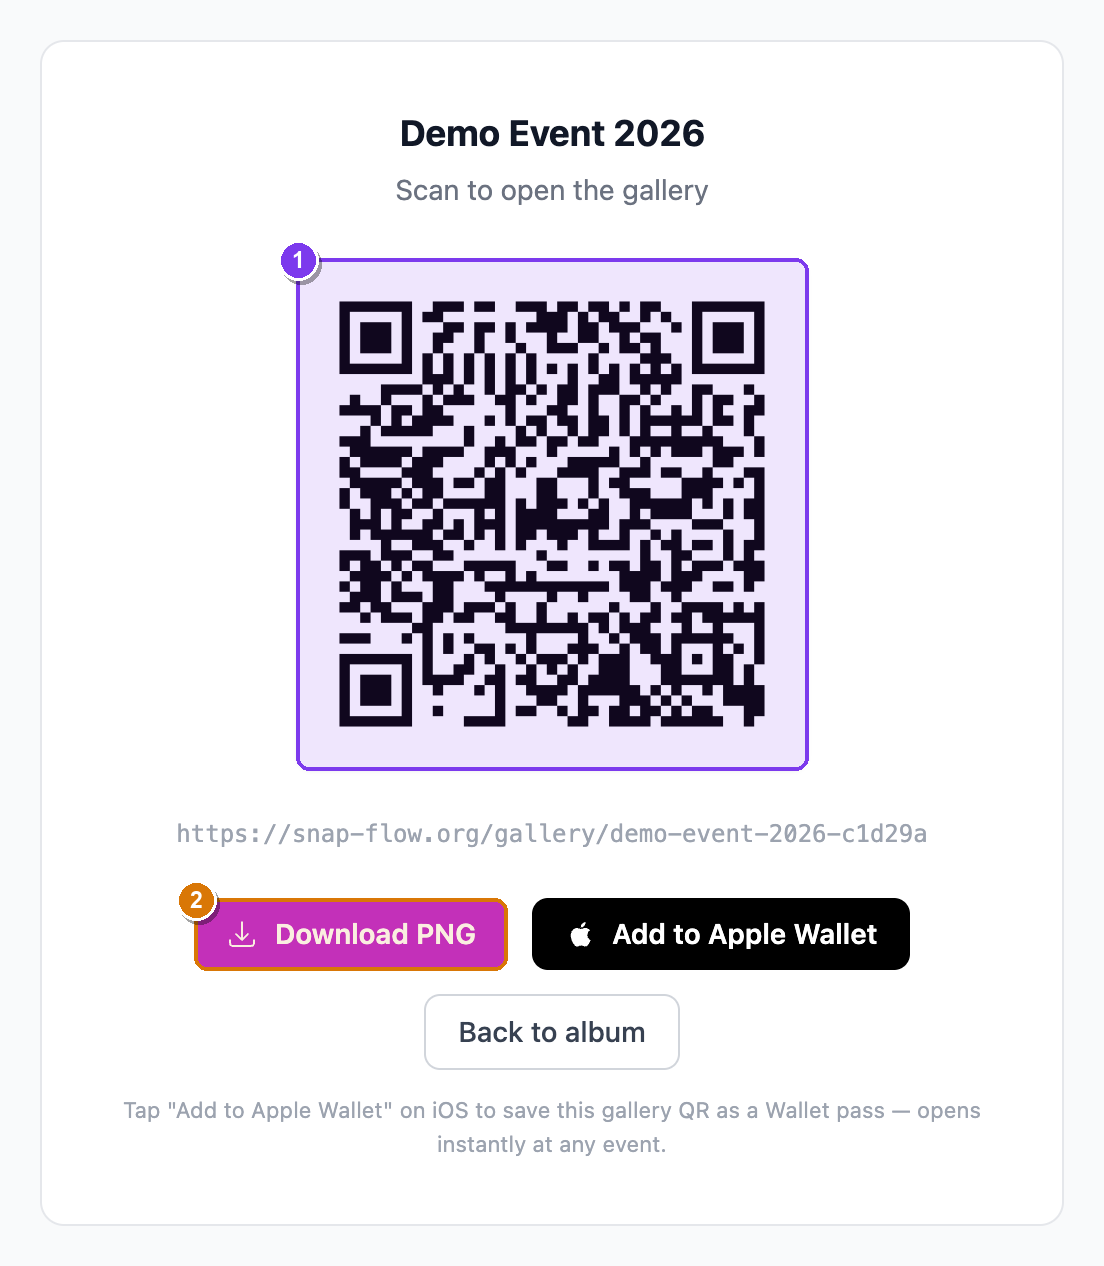 The QR code page. ① the print-ready QR image (it points at your public gallery), and ② the Download PNG link — click it to save the file for a poster, print, or thank-you card.
Drop the PNG onto a poster, a print, or a thank-you card. Guests scan it and land straight in your gallery.
Re-print after a slug change
The QR code follows the album's gallery address. If you ever rename the album in a way that changes its address, download a fresh QR — the old print will point at the old link.