Getting photos in
Web drag-drop, live FTP from your camera, or the desktop sync app.
SnapFlow gives you three ways to get photos into an album. Pick whichever fits your shoot — they all land in the same place and are processed the same way (thumbnails, EXIF read, auto-rotation, and any recognition you've turned on):
- Drag-and-drop on the web — quickest for a handful of files.
- Straight from your camera over FTP — photos appear in your gallery live while you shoot. (FTP = a standard way for a camera to push files to a server.)
- The SnapFlow Sync desktop app — for big sets you'll cull and edit on a Mac.
Not sure which? Jump to Which one should I use? at the bottom.
Drag-and-drop on the web Web
This is the easiest way to get a few photos up. You do it right on the album page.
- From the dashboard (My Albums), click the album you want to upload to. — the album page opens. Near the top is a dashed box (the upload zone) labelled Drop photos here or browse.
- Drag your photos onto that box, or click browse to pick files from your computer. — the small grey line under the box tells you what's accepted: "JPEG, PNG, TIFF, RAW (CR2/NEF/ARW/DNG/RAF/RW2/ORF) · max 200 MB each."
- A blue Upload photos button appears at the bottom-right of the zone. Click it. — a spinner runs, then the box turns green: "N files queued for processing."
- The green box also says "Photos will appear below once processed. Refresh the page to see them." and offers an Upload more button. — drop another batch, or reload the page to watch the photos show up in the grid.
Web uploads don't auto-refresh
The grid does not update on its own after an upload. Once you see the green "N files queued for processing" message, your files are safe — just reload the album page (or click Upload more) to see them appear.
What file types are accepted
SnapFlow accepts JPEG, PNG, TIFF and WebP, plus RAW files. The full list of RAW types it takes is:
CR2, CR3, NEF, NRW, ARW, SRF, DNG, RAF, RW2, ORF, PEF, SRW
(The short line under the drop zone only lists the common ones to save space — the uploader actually accepts every type above.) Maximum file size is 200 MB each.
RAW needs Pro or Studio
RAW upload is a Pro/Studio feature. On the Free plan a RAW file is still accepted into the queue, but it gets parked with the note "RAW uploads require a Pro plan or higher" and never finishes processing. Upgrade your plan, then re-upload it. (See Account, storage & billing.)
A bad file doesn't sink the whole batch
If one file is the wrong type or damaged, only that file is flagged ("Unsupported or unreadable file type") — the rest of the batch still processes normally. Re-export the offending file and upload it again.
Straight from your camera over FTP Web setup
This is the SnapFlow superpower. Many modern cameras can upload over FTP (a standard file-transfer protocol) as you shoot, so frames appear in your gallery live during the event — guests can scan the QR code and watch photos roll in.
Each album gets its own FTP username and password, created automatically. Find them on the album page in the FTP Upload Credentials panel.
Step 1 — turn camera uploads on for the album
- On the album page, click More ▾ (top-right) → Edit album…. — the Edit album page opens in two columns.
- In the right-hand Workflows card, find FTP camera upload and tick it. — the helper text reads "Allow direct camera FTP uploads to this album. Disable to block camera uploads — Lightroom and editor credentials still work."
- Click Save changes (bottom of the page). — the album will now accept frames from your camera.
If the toggle is off, the camera is rejected
With FTP camera upload unticked, your camera's login is refused with the message "FTP upload is disabled for this album." This setting only blocks camera FTP — your Lightroom Export and Editor Finals logins keep working.
Step 2 — read the credentials
Back on the album page, the FTP Upload Credentials panel shows three fields you type into your camera:
- Host — the address of the SnapFlow FTP server (this is your SnapFlow site's hostname).
- Port — 21.
- Username — the album's auto-generated FTP login.
The password only flashes once, in green, when it's first created (with FTP camera upload enabled) or right after a reset: "New password — save it now, it won't be shown again." Copy it into your camera straight away.
Lost it? You can't view an old password again — generate a fresh one with the Reset password link in the same panel.
- In the FTP Upload Credentials panel, click Reset password. — a confirm box asks "Generate a new FTP password? The old one will stop working immediately."
- Click OK. — a new green password appears. Enter it into your camera.
Resetting locks out the old password instantly
The moment you reset, the previous password stops working. If your camera is mid-event with the old password saved, update it on the camera before you shoot again.
Camera settings that matter
- Passive mode, data ports 60000–60100.
- FTPS (explicit TLS) is supported and recommended (TLS = the same encryption that secures websites). Plain FTP also works for cameras that can't accept a self-signed certificate.
- Set the camera's Port to 21 and Host to the value shown in the panel.
One album's login can never reach another
Because credentials are per-album, an event's FTP login can only ever see that event's photos.
Bringing a second shooter (or an editor)
An album can issue extra FTP logins beyond the main camera one. Under the FTP panel, the Add credential picker offers:
- 📷 Photographer — a second login for another shooter on the same event.
- ✏️ Editor Finals — appears only when Final Delivery is enabled. This login routes edited shots straight into the live gallery (see Live delivery).
There's also a separate Export from Lightroom / Capture One credential lower on the page, used by the Lightroom plugin and Capture One's built-in FTP export — see the desktop section below.
The desktop sync app Desktop app
For studio work — pulling RAWs into Lightroom or Capture One, culling fast, and pushing finished selects back — install the SnapFlow Sync desktop app (macOS). It's a free companion app you download once.
You'll find the downloads on your Profile page (avatar → Profile) and also under Settings → Integrations.
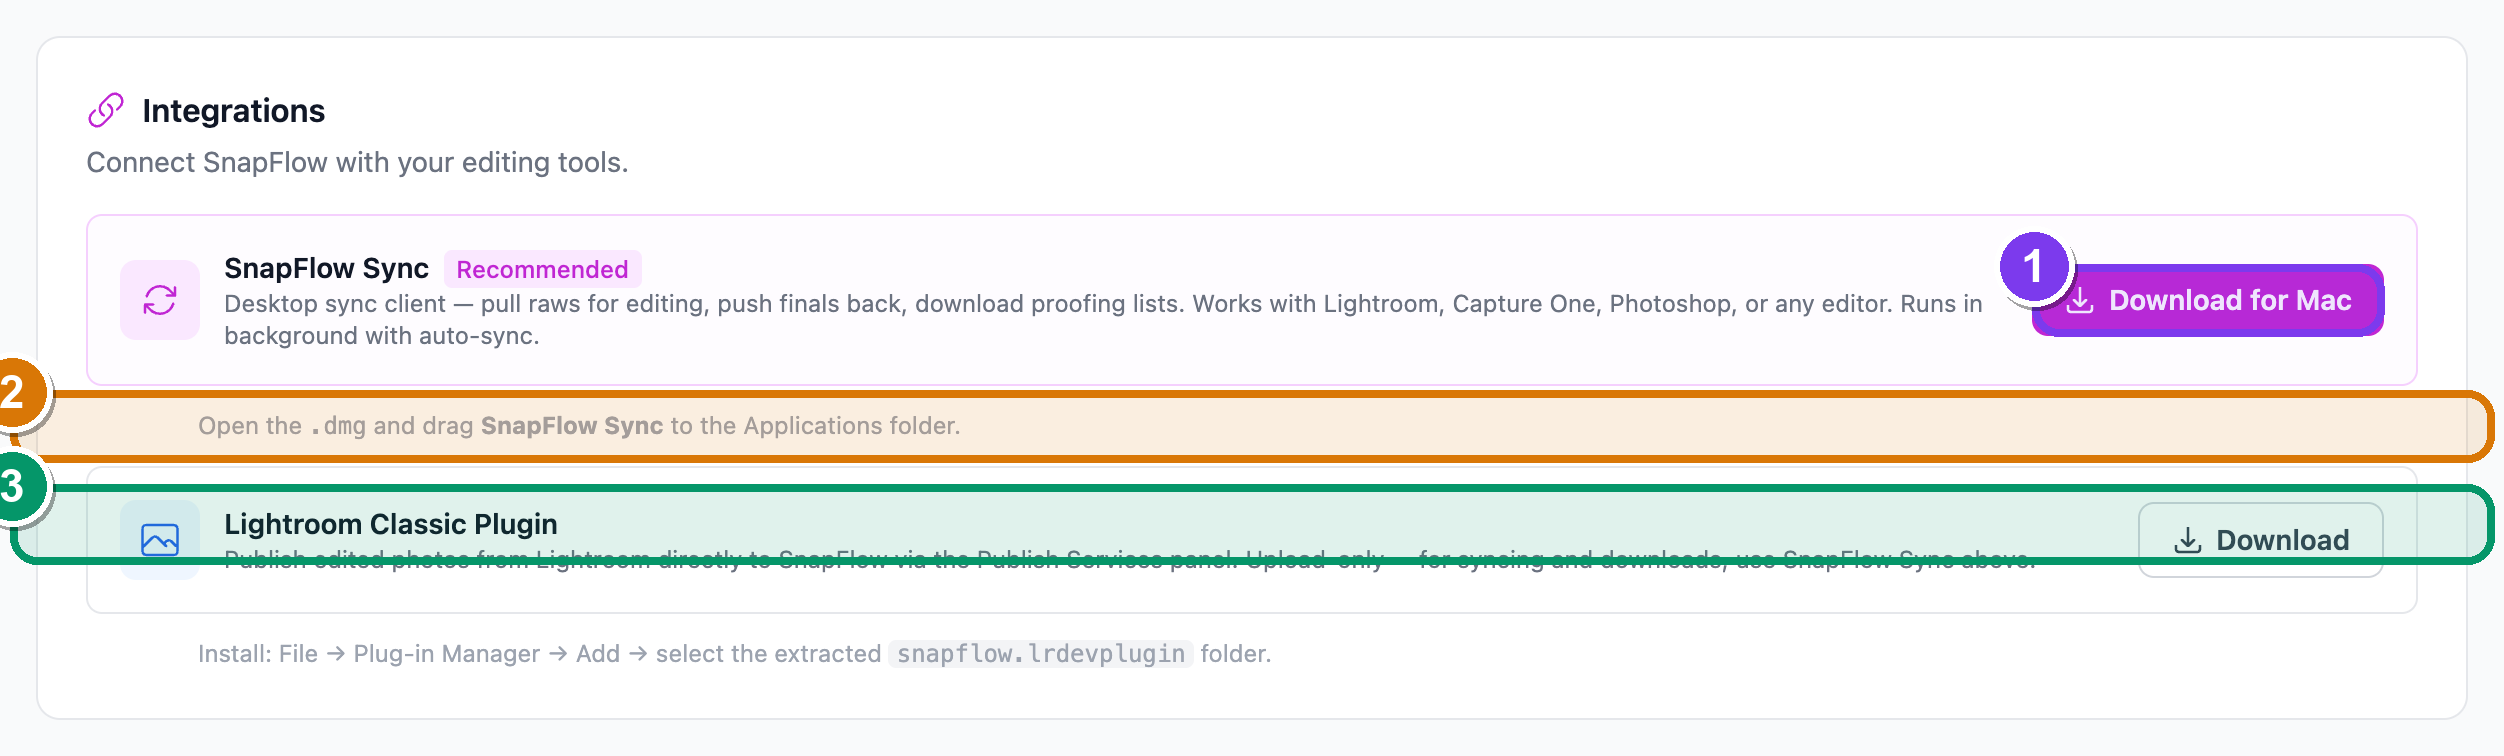 The Integrations card on your Profile page. ① SnapFlow Sync (marked with a
Recommended pill) and its blue Download for Mac button. ② The helper line
"Open the .dmg and drag SnapFlow Sync to the Applications folder." ③ The
Lightroom Classic Plugin card with its Download button below.
The Integrations card on your Profile page. ① SnapFlow Sync (marked with a
Recommended pill) and its blue Download for Mac button. ② The helper line
"Open the .dmg and drag SnapFlow Sync to the Applications folder." ③ The
Lightroom Classic Plugin card with its Download button below.
To install SnapFlow Sync:
- On the Profile page (or Settings → Integrations), find the SnapFlow
Sync card — it carries a Recommended pill. Click Download for Mac. — a
.dmgfile downloads. - Open the
.dmgand drag SnapFlow Sync to the Applications folder (exactly as the helper line says). — the app is now installed; launch it and sign in with your SnapFlow email and password.
To add the Lightroom plugin (publish edits straight from Lightroom Classic):
- On the same card list, find Lightroom Classic Plugin and click Download. — a zip downloads; unzip it.
- In Lightroom Classic, go to File → Plug-in Manager → Add and select the extracted snapflow.lrdevplugin folder. — Lightroom can now publish edited photos to SnapFlow via its Publish Services panel.
The desktop app is a whole track of its own — SD-card import, two-way sync, fast culling, on-device RAW develop, and the Lightroom metadata round-trip all live there. Don't follow those steps here; start with Install the desktop app and work through that track.
Where the FTP details live too
The FTP credential fields you set up above are also summarised on your account. For account-wide details (storage, plan, the camera-profile active album), see Account, storage & billing.
Photos not showing up?
The usual causes, and what each one means:
- Web uploads don't auto-refresh — you saw "N files queued for processing" but the grid looks empty. Reload the album page; the photos appear once they finish processing.
- "Unsupported or unreadable file type" — the file isn't a JPEG/PNG/TIFF/WebP/RAW, or it's damaged. Re-export and try again. The rest of the batch is unaffected.
- "RAW uploads require a Pro plan or higher" — RAW upload is Pro/Studio only. Upgrade, then re-upload the RAW.
- "Storage full — new uploads are blocked. Upgrade your plan to continue." — this red banner shows on your dashboard home when you've hit your plan's storage cap. While you're over the cap, new uploads are quietly skipped during processing (you won't get a per-photo error). Free some space or upgrade — see Account, storage & billing.
- Camera FTP rejected with "FTP upload is disabled for this album." — tick FTP camera upload in the album's Workflows card (and Save changes).
- Camera FTP rejected for any other reason — confirm the camera has the current password (a reset invalidates the old one instantly), that Port is 21, and that the camera is in passive mode.
Which one should I use?
Shooting live? Use FTP so guests see photos during the event. Editing a big set afterwards on a Mac? Use the SnapFlow Sync desktop app. Just need a few photos up quickly? Drag-and-drop on the web.