Sharing
QR codes and links for albums, people and teams, plus Wallet passes.
iOS
This chapter is about handing someone a gallery from your phone. SnapFlow can turn a whole album — or just one person, or one team — into a QR code (a square barcode anyone can scan with their camera) and a plain link. You can then AirDrop it, message it, or print it, all without leaving the app.
There are two things you can share from iOS:
- A gallery — an album, a single person, an unnamed face cluster, or a team. This is the QR-and-link flow.
- Individual photos — one photo from the loupe (the big single-photo view), or a handful you pick in the grid.
We cover both below.
Share a gallery (QR code & link)
Every gallery share opens the same screen — a screen titled Share with a big QR code, the share link underneath, and a blue Share button. What changes is how you get there. Here is the path for each kind of gallery.
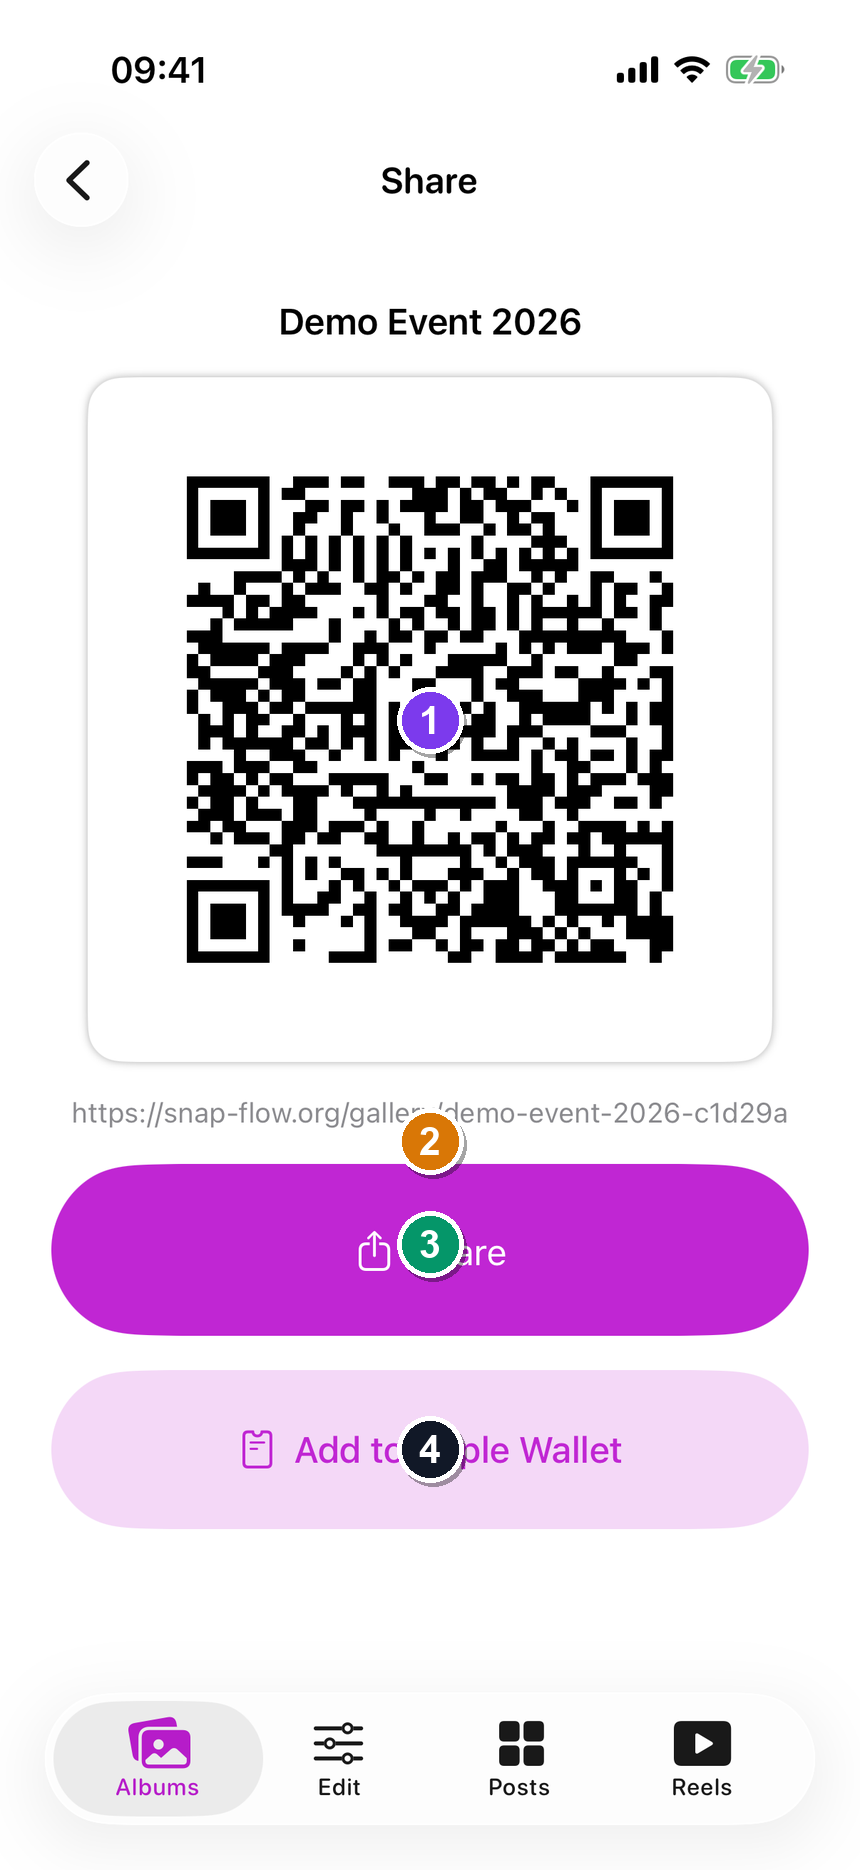 The Share screen for an album. ① the scannable QR code, ② the gallery link (tap it to open it), ③ the blue Share button that opens the iOS share sheet, ④ Add to Apple Wallet (only shows when your account and device support it — see below).
Share a whole album
- Open the Albums tab → tap an album. — the album opens on the photo grid.
- In the top-right corner, tap the QR icon (the little square-barcode glyph). — the Share screen opens with the album's QR code and its
/gallery/…link. - Tap Share. — the iOS share sheet slides up. SnapFlow hands it three things: the QR image, the link, and the album title. Pick AirDrop, Messages, Mail, Save Image (to print the QR later), or anything else in the sheet.
Scan to test
Point another phone's camera at the QR code on screen. A tap-to-open banner appears with the gallery link — that's exactly what your guests will see.
Share one person
A person is a named face (a face cluster you've put a name to). Sharing a person gives the recipient a gallery filtered to just that person's photos in this album.
- Open the album → tap a face on the People strip (or open the People area and tap a face). — the person's detail screen opens with their photos.
- Tap Share (the button with the share glyph). — the Share screen opens
with a QR code and a
/gallery/…/persons/…link for that one person. - Tap Share again on that screen to send it. — the share sheet hands over the QR image, the person link, and a title like "Sarah James — Race Day".
Named vs unnamed
If the face cluster has a name, the link is a person link. If it's still an unnamed cluster (a group of the same face you haven't named yet), the very same Share button gives you a cluster link instead — same screen, same steps. See Recognition on iOS for naming faces.
Share an unnamed cluster
You don't have to name a face before you share it.
- Open the album → open a face cluster that has no name yet. — its detail screen opens.
- Tap Share. — the Share screen opens with a QR + link scoped to that cluster's photos.
- Tap Share to send it. — the share sheet hands over the QR image, the cluster link, and a title.
Share a team
A team is a group of athletes SnapFlow has grouped together (e.g. by kit or by the people you've added). Sharing a team gives one gallery covering every photo of any team member in this album.
- Open the album. — if any teams were found, a Teams strip appears with one chip per team.
- Tap a team chip (the rounded pill with the team name). — the Share screen
opens with that team's QR code and a
/gallery/…/teams/…link. - Tap Share to send it. — the share sheet hands over the QR image, the team link, and a title like "Firecats — Race Day".
No team chip?
The Teams strip only appears once team grouping has found at least one team in the album. Turn on Match athletes to their team for the album and run recognition first — see Recognition on iOS.
Apple Wallet passes
iOS
For an album only, you may also see an Add to Apple Wallet button on the Share screen. It builds a scannable pass that the recipient keeps in their Apple Wallet, so they get one-tap access to the gallery without hunting for a link.
- On an album's Share screen, tap Add to Apple Wallet. — a brief spinner shows while SnapFlow fetches the pass, then Apple's Add Pass screen appears.
- Tap Add (top-right of Apple's screen). — the pass lands in the Wallet app.
When the Wallet button appears
Add to Apple Wallet only shows when both of these are true:
- Your account has Wallet passes enabled (your server reports it), and
- your device can add passes (an iPhone with Wallet — iPads without Wallet hide the button).
If you don't see the button, one of those isn't met. The QR code and Share link still work for everyone.
Wallet is album-only on iOS
The Add to Apple Wallet button appears for an album only. Person, team, and cluster shares give you a QR + link (no Wallet pass). Person and team Wallet passes are a web-only feature today; on iPhone, use the QR or link for those.
Share individual photos
Sometimes you just want to send one or two finished frames, not a whole gallery.
One photo from the loupe
The loupe is the big single-photo view you get when you tap a photo in the grid.
- In an album, tap a photo. — it opens full-screen in the loupe.
- Tap the Share icon in the top bar (the share glyph). — SnapFlow makes a public share link for that one photo, then the iOS share sheet opens with the link ready to send.
Share link vs Save to Photos
The loupe's Share button creates a link you can send (it works even for someone without the app). The separate Save to Photos button next to it downloads the actual image file into your iPhone's Photos library. Use Share to hand someone a link; use Save to Photos to keep the file.
Several photos at once
- In the album grid, press and hold any photo (about half a second). — the grid enters select mode: a blue ring and a check appear on the photo you held.
- Tap more photos to add them. — a bar appears at the bottom showing N selected.
- In that bottom bar, tap the Share glyph. — SnapFlow makes a share link for each selected photo, then opens the iOS share sheet with all the links at once. AirDrop, message, or mail them together.
- When you're done, tap Done to leave select mode. — the grid returns to normal.
The bottom bar in select mode. ① N selected count, ② the star menu (bulk-rate), ③ the reject (✗) button, ④ the Share glyph that bundles a link for every selected photo into one share sheet, ⑤ Done to exit select mode.
Up to a point
Select mode is also where you bulk-rate or reject photos — the same bar carries a star menu and a reject (✗) button. Sharing simply hands the links to the system share sheet; nothing is posted or made public beyond the link itself.
That's everything you can share from the phone. For setting a gallery's privacy, password, or expiry — and for the desktop and web sharing tools — see Albums on iOS and the web chapter Galleries & sharing.