Metadata tools
Inspector, IPTC presets, photographer profiles, keywords, code replacements.
Desktop app
The desktop app carries a full set of IPTC/metadata tools (IPTC is the standard that newsrooms and agencies use to read credit, caption and keywords straight out of a photo file). So you can stamp credit, copyright, captions and keywords into your files before they leave your Mac. Everything you set here is the same data the web shows — change it in one place and it appears in the other.
This chapter covers four jobs:
- The Lightroom round-trip — how edits you make in Lightroom flow into SnapFlow, and how SnapFlow's tags flow back out.
- The photo inspector — typing caption and keywords on one photo.
- The Stationery Pad — stamping IPTC onto a whole batch at once.
- The Metadata stage — where you manage your reusable pieces (typing shortcuts, photographer profiles).
Where things live now
The reusable tools (code replacements, photographer profiles, the Stationery Pad) are not under Settings. They live on the Metadata stage — press ⌘6 or click Metadata in the bottom stage bar. IPTC presets live in the album's edit modal. The sections below name the exact path for each.
The Lightroom round-trip
If you edit your RAWs in Lightroom Classic, SnapFlow keeps your metadata in sync both ways — automatically. There is no toggle to turn this on; it is always on.
A sidecar is a small companion file (the .xmp next to your .ARW/.NEF/.CR2)
that Lightroom uses to store your edits, keywords, rating and colour label
without touching the original RAW. SnapFlow reads and writes that same sidecar.
Here is what travels, in plain terms:
- Lightroom → SnapFlow. When you keyword, caption, rate or colour-label a
photo in Lightroom and save the sidecar, SnapFlow's sync reads the
.xmpand pulls your caption, keywords (including slash-hierarchy keywords), star rating and colour label into the photo's record. - SnapFlow → Lightroom. When you type metadata in SnapFlow (the inspector, the Stationery Pad, or album defaults), SnapFlow writes its IPTC, keywords, rating and colour label back out to the sidecar — so opening the photo in Lightroom shows your SnapFlow tags.
The five colour labels match Lightroom's: Red, Yellow, Green, Blue and Purple.
You'll see it in the Sync strip
On the album page in the Library stage (⌘1), the one-line Sync summary spells this out: "Metadata (.xmp) always syncs both ways — Lightroom edits flow back, SnapFlow tags flow out." Receive (Pull raws / Pull proofed) and Send (Push raws / Push finals) are toggles; the metadata round-trip is not — it rides along with whatever you sync. See Sync your albums for the full Receive/Send picture.
For the full end-to-end story — how a tag travels from your camera, through Lightroom, into the file your agency finally downloads — see Metadata workflows.
The photo inspector
The inspector is the right-hand sidebar that shows one photo's details. To open it: Library (⌘1) → open your album → click a photo → the inspector fills the right side.
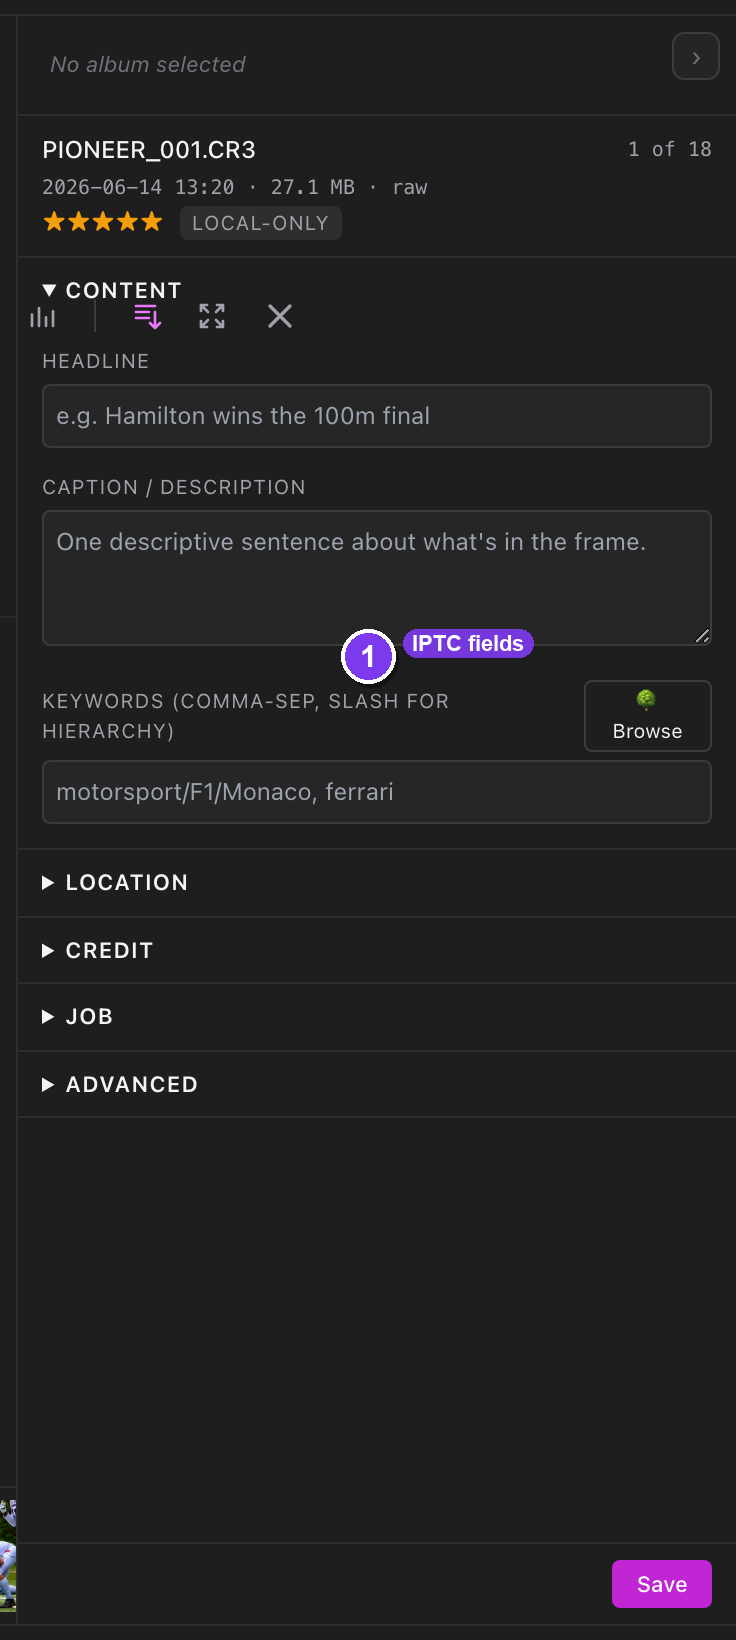 The photo inspector for an album with AI metadata on. ① the Headline, Caption and Keywords fields; ② the ✨ Generate button next to each field (writes that one field for you); ③ the ✨ All button (writes headline + caption + keywords for this photo); ④ the 🌳 Browse button under Keywords; ⑤ the Recognition section below. Fields with a thin sky-blue border are inherited from the album's defaults.
To caption one photo by hand:
- Click a photo in the grid. — the inspector opens on the right showing that photo's Headline, Caption and Keywords.
- Type into the Caption field. — your text saves as you go; it becomes that photo's caption and overrides any inherited album default.
- Type into the Keywords field, one keyword per entry. — autocomplete suggests paths you've used before after one character; arrow keys move down the list, Enter accepts, Esc closes.
The cascade (inherited fields)
A field with a thin sky-blue border is borrowing a value from the album's defaults — hover it and you'll see "Inherited from album default — type here to override on this photo." Type into it to set a value just for this photo. Clear it again and it falls back to the album default. This is the cascade: a photo with no value of its own borrows the album's.
Letting AI write it (Studio)
Studio Desktop app
The ✨ Generate and ✨ All buttons use AI to write a caption, headline and keywords for you. They only appear when two things are true:
- Your plan is Studio, and
- the album's ✨ AI metadata toggle is on.
When the toggle is off, the ✨ buttons are hidden (not greyed out) — so if you don't see them, the album toggle is off, not your plan.
- Open an album's edit modal: in Library, on the album, click ⋯ → Album settings…. — the settings modal opens.
- Find the ✨ AI metadata toggle. — if your plan can't use it, a 🔒 Studio pill sits beside it. Its helper line reads "Enable the ✨ Generate buttons (caption / headline / keywords) in the photo inspector for this album."
- Turn it on and save. — now open any photo and the ✨ Generate / ✨ All buttons appear in the inspector.
What ✨ All does
✨ All generates all three fields — headline, caption and keywords — for the one photo you have open in the inspector. It does not run on a whole selection. To stamp many photos at once, use the Stationery Pad below.
The Stationery Pad
Desktop app
The Stationery Pad applies the same IPTC fields to a whole batch of photos at once — the desktop version of PhotoMechanic's stationery. Blank fields are left alone, so you only overwrite what you fill in.
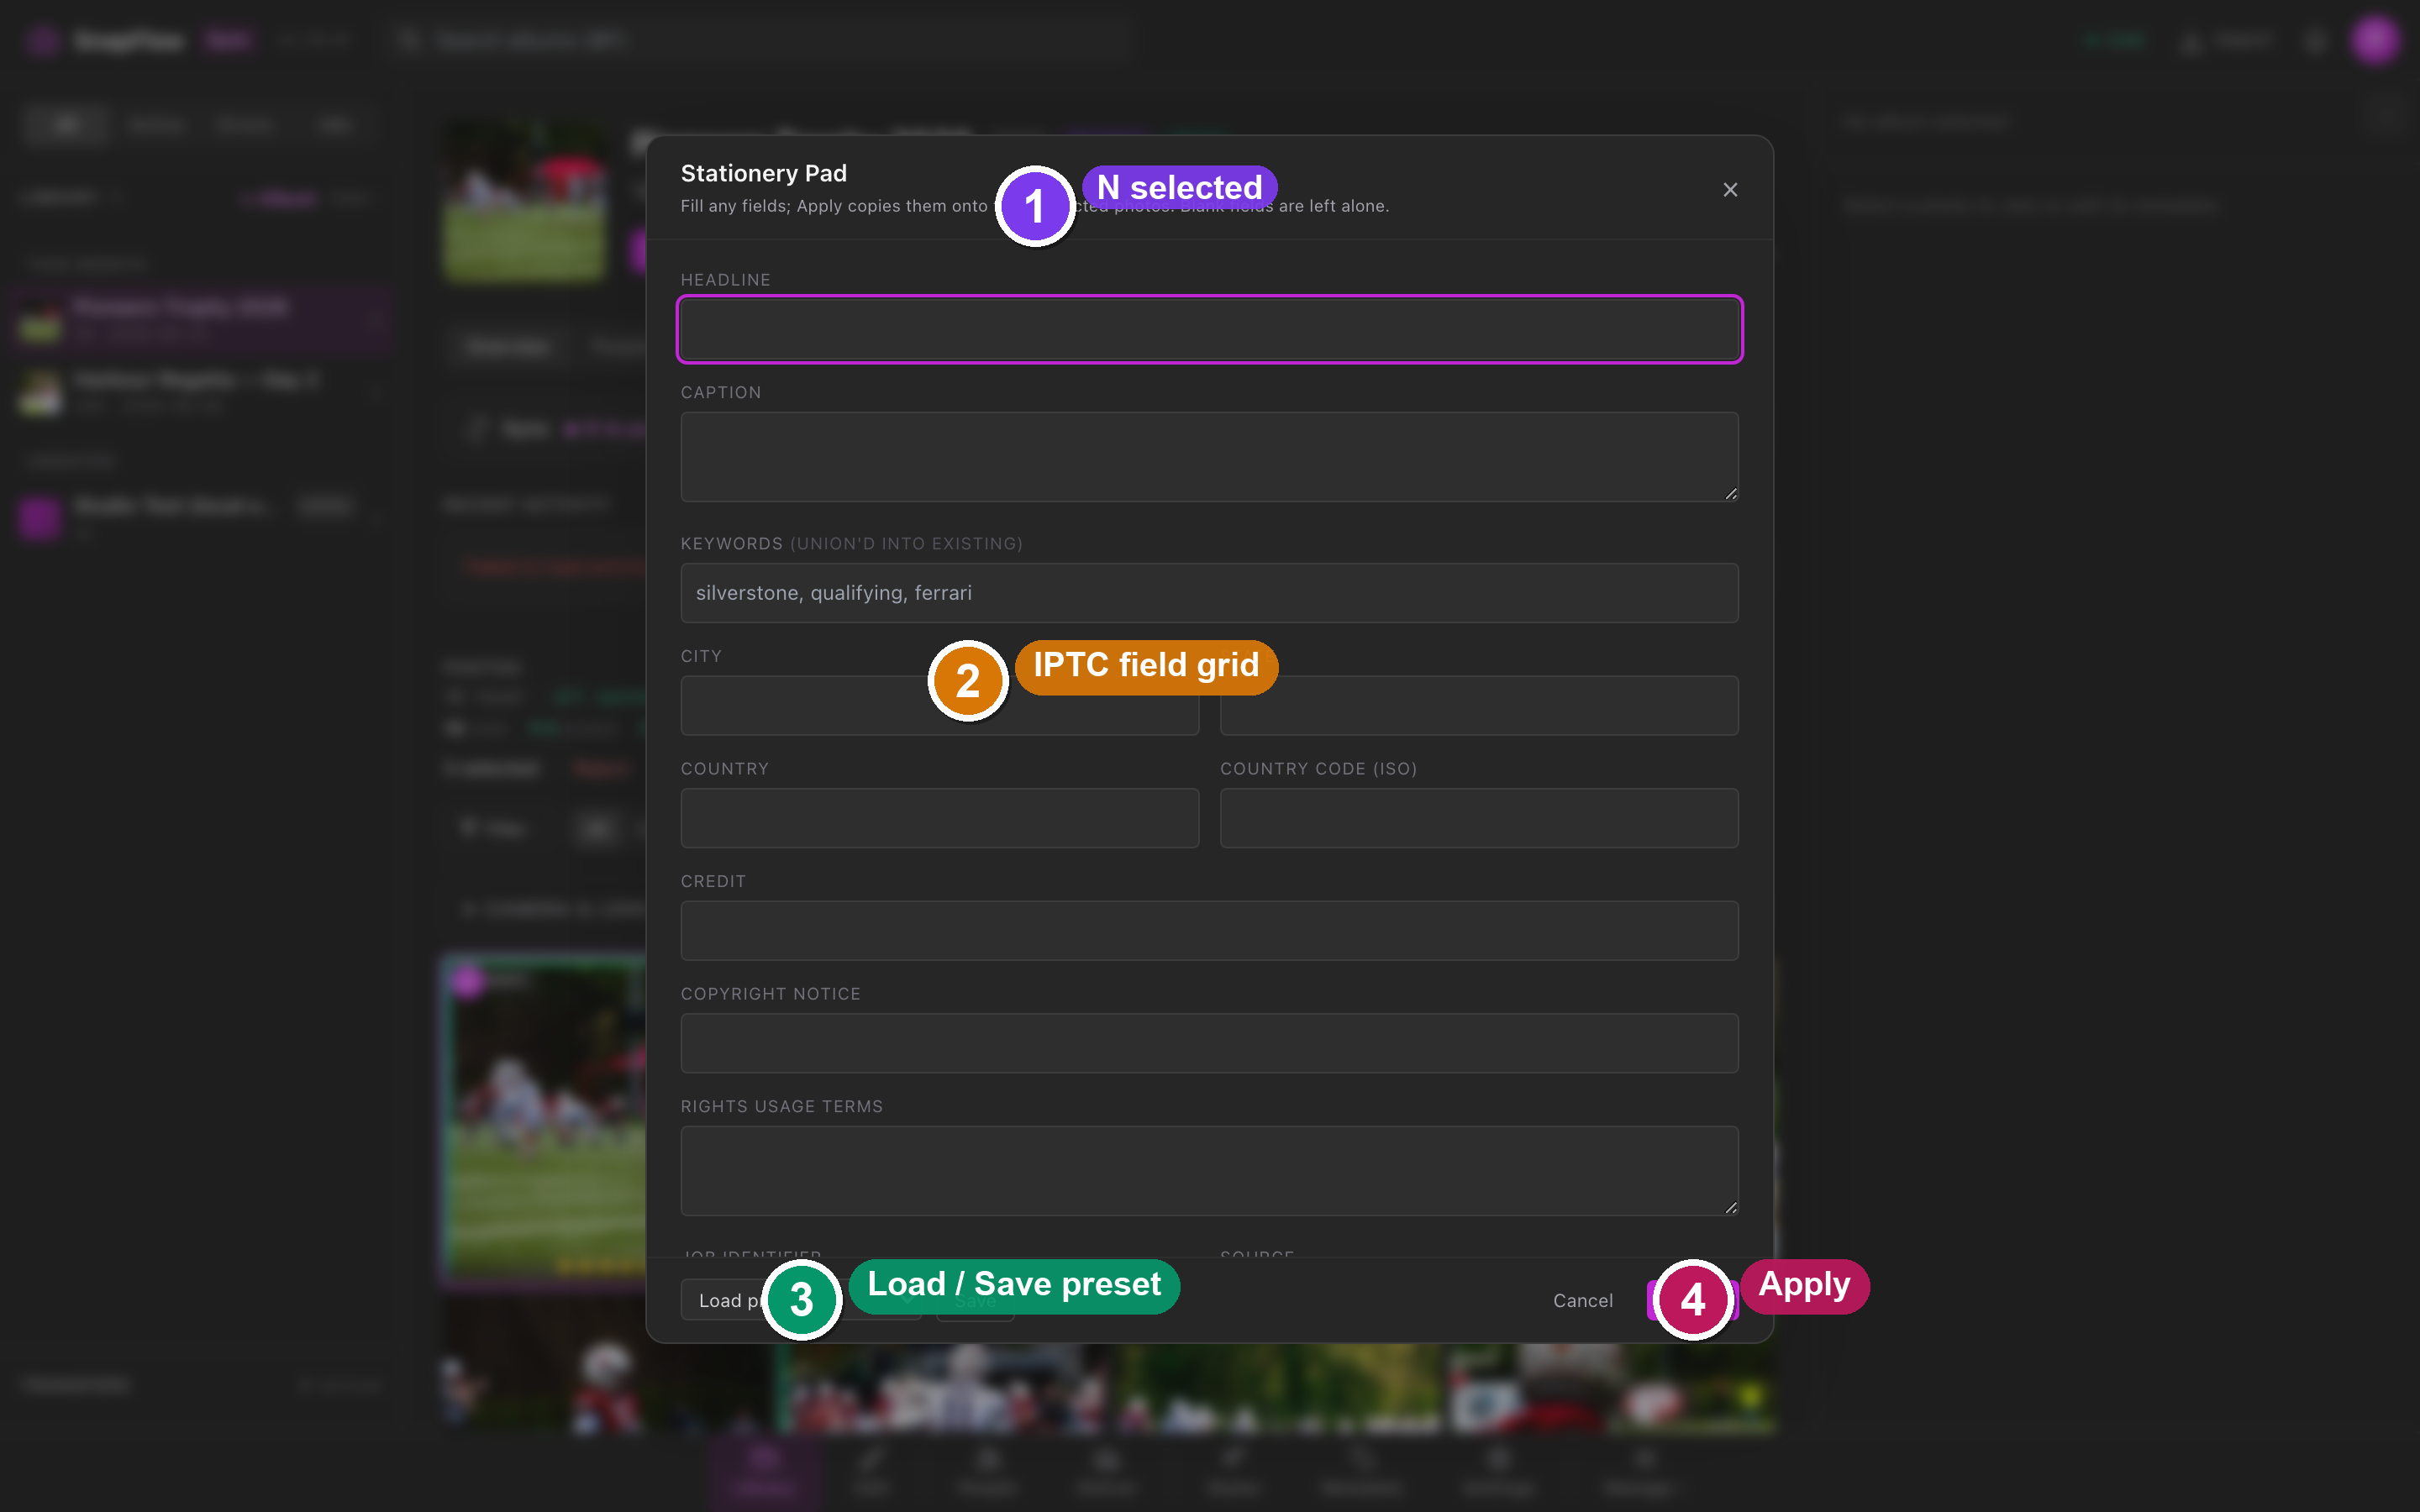 The Stationery Pad. ① the subtitle telling you how many photos it will touch; ② the Headline, Caption and Keywords fields (Keywords are union'd into what's already there, not replaced); ③ the location, credit and rights fields below; ④ the Load preset… dropdown and Save button at the bottom; ⑤ the blue Apply button.
To stamp a batch:
- In Library (⌘1), select your photos: hover a tile and click the ✓ that appears in its corner. — selected tiles get a filled ✓ and a ring. (A plain click opens the photo in the loupe, so use the corner ✓ to multi-select.)
- Press ⌘⌥T, or click the Stationery button in the selection toolbar that appears once photos are selected. — the Stationery Pad opens. Its subtitle tells you it will copy onto every selected photo.
- Fill any of the fields you want to apply: Headline, Caption, Keywords, City, State, Country, Country code (ISO), Credit, Copyright Notice, Rights Usage Terms, Job Identifier, Source, Special Instructions. — leave the rest blank; blank fields are left untouched.
- Click Apply (bottom-right, blue). — the fields you filled in are written to every selected photo, and the Pad closes.
Keywords merge, they don't replace
The Keywords field is labelled "(union'd into existing)". Whatever you type is added to each photo's existing keywords rather than wiping them out. Every other field overwrites the photo's value.
Save a Stationery preset
If you reuse the same credit, copyright and city for a shoot, save it once and reload it next time. Presets are per-user and are shared with the web.
- Fill the Stationery Pad fields the way you want them.
- Click Save (next to the preset dropdown at the bottom). — a box appears: "Save this stationery as:".
- Type a name and confirm. — the preset is saved and appears in the Load preset… dropdown.
- Next time, pick it from Load preset…. — the fields fill in instantly. To remove a loaded preset, click the ✕ next to the dropdown and confirm.
Keywords
- Type into the Keywords field; autocomplete suggests paths you've used before after one character. Arrow keys move, Enter accepts, Esc closes.
- Use a slash for hierarchy:
motorsport/F1/Monaco GPis one keyword that reads as a three-level tree (and survives the round-trip into Lightroom's hierarchical keywords). - The 🌳 Browse button (under the Keywords field) opens the Keyword tree window.
To pick a keyword from the tree:
- In the inspector, under Keywords, click 🌳 Browse. — a window titled Keyword tree opens. Its hint reads "Click a path to insert it. Use slashes for hierarchy: motorsport/F1/Monaco."
- Click a path in the tree. — it's inserted into the Keywords field for the current photo.
The Metadata stage — manage your reusable pieces
Desktop app
Press ⌘6, or click Metadata in the bottom stage bar, to open the Metadata · manage screen. Its subtitle reads "Type captions & keywords per-photo in the inspector on the right. Here you manage the reusable bits." You'll see three cards: Abbreviations, Photographer profiles and Stationery Pad.
Code replacements (Abbreviations)
Code replacements are PhotoMechanic-style typing shortcuts. Type a code plus a space in any caption/keyword/headline field and it expands to your saved text.
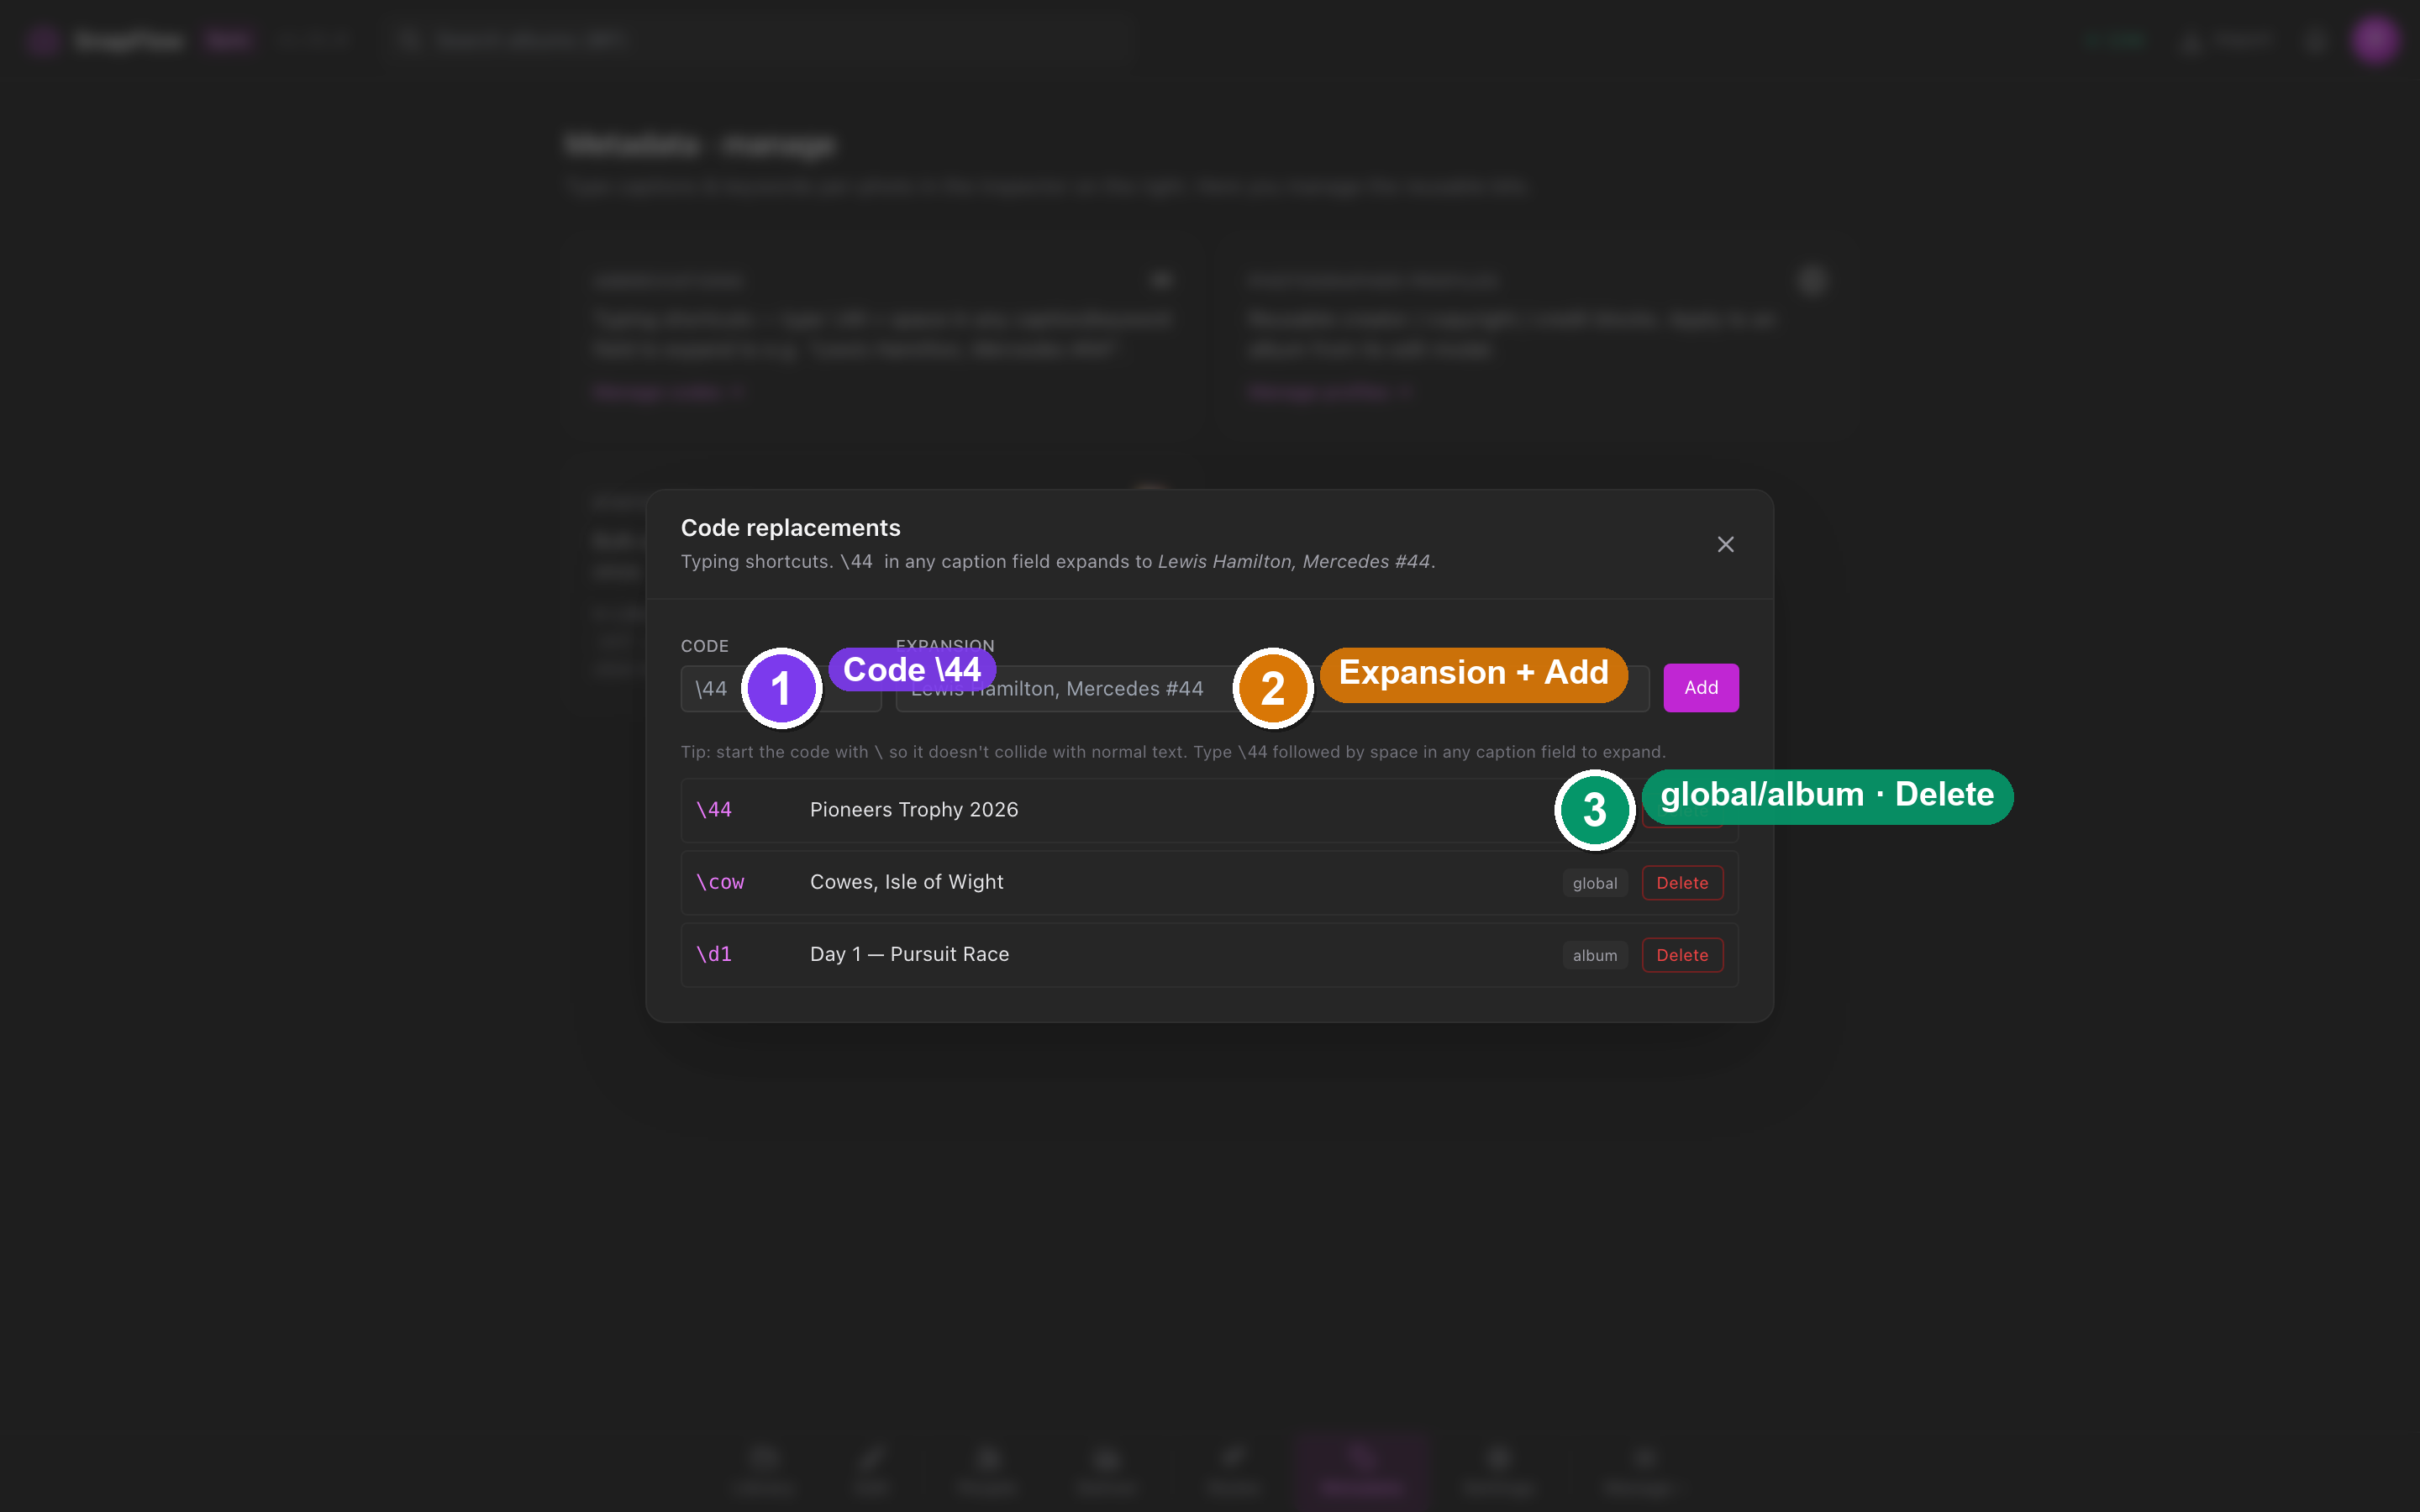 The Code replacements modal, reached from the Metadata stage's Abbreviations card. ① the Code input (e.g.
 \44); ② the Expansion input (e.g. "Lewis Hamilton, Mercedes #44"); ③ the Add button; ④ each saved row with a global/album chip and a Delete control.
- Press ⌘6 to open the Metadata · manage screen.
- Click the Abbreviations card → Manage codes →. — the Code replacements modal opens.
- Add a code (for example
\44) and the text it expands to. - Back in any photo's caption, keyword or headline field, type
\44then a space. — it expands to your saved text. Expansion fires on space, comma, tab or newline.
Album codes can shadow global ones
Code replacements are album-scoped as well as global — an album-specific code overrides a global one with the same trigger. The expansion fires in any inspector text field.
Photographer profiles
A photographer profile is one of your reusable identities — creator, copyright, credit, byline, contact, social handles, rights. Keep one for prints under your name and another for agency wire work.
- Press ⌘6 → the Photographer profiles card → Manage profiles →. — the Photographer profiles modal opens, described as "Reusable creator / copyright / credit blocks."
- Create or edit a profile there.
- To apply one to an album, open that album's edit modal (Library → album → ⋯ → Album settings…) and use Apply profile… in the Photo metadata defaults block — it populates the album's IPTC defaults.
You can also bundle a profile into an ingest profile so it's stamped on import.
IPTC presets
An IPTC preset captures the metadata of one shoot — credit, copyright, city, country, sub-location. Presets live in the album's edit modal, in the Photo metadata defaults block. Its helper line reads "Applied to every photo's IPTC + XMP when the photo itself has no value. Shows as Credit, Copyright, City, Country in Lightroom & Bridge."
- Open the album edit modal: Library → album → ⋯ → Album settings….
- Find the Photo metadata defaults block. — you'll see four controls in a row: Apply profile…, Load preset…, Save preset… and Manage….
- Fill the default fields, then click Save preset… to capture them as a reusable preset, or Load preset… to drop a saved one onto this album.
- Click Manage… to open your IPTC presets library to rename or delete presets.
Defaults cascade to every photo
Anything you set in Photo metadata defaults flows down to each photo that has no value of its own — that's the same cascade you see as the sky-blue border in the inspector. See Metadata fields & AI for the field-by-field reference.
The .xmp sidecar the desktop editor writes is the
same sidecar that carries this IPTC, so your develop edits and your metadata
ride out together. For the full cross-surface round-trip — camera → Lightroom →
the file your agency downloads — see
Metadata workflows.