Editing & styles
Develop RAWs locally (Edit stage), learn looks and set Album Styles (Styles stage).
Desktop app
This chapter is about the two parts of the SnapFlow Sync desktop app where you actually change how your photos look:
- The Edit stage (⌘2) — a local develop editor. You open one photo, push sliders, and the result is saved as a Lightroom-compatible
.xmpsidecar. Think of it as a built-in mini-Lightroom for the RAWs already sitting on your Mac. - The Styles stage (⌘5) — where you learn a look from a folder of your own edits (the Style Trainer), keep fixed-value presets, import looks from Lightroom, and point to the server-side Album Style that auto-edits new uploads.
Everything here runs on your Mac. Nothing is uploaded while you edit.
This is the desktop app, not the website
Editing lives in the SnapFlow Sync desktop app, not on snap-flow.org. If you haven't installed it yet, start at Install & sign in. Pulling photos down to your Mac is covered in The sync model; picking your keepers is Culling & rating.
What the Edit stage is (and what it is not)
The Edit stage is a local develop editor. You open one RAW (or JPEG), adjust exposure, white balance, tone and colour, and SnapFlow saves your changes as an .xmp sidecar next to the photo. Because it's a standard Camera-Raw sidecar, the same photo opens already edited in Adobe Lightroom or Capture One — your edit travels with the file.
There are two different "edit" ideas in SnapFlow, and it's worth getting them straight before you start:
| Edit stage (this chapter, ⌘2) | Album Style (server) | |
|---|---|---|
| What it is | You hand-developing one photo with sliders | A look auto-applied to an album's new uploads, on the server |
| Where it runs | On your Mac (nothing uploaded) | On the SnapFlow server |
| What it writes | An .xmp sidecar (opens edited in Lightroom) |
Re-rendered uploads in the gallery |
| Where you set it | The Edit stage, per photo | Album settings → Style (⋯ menu) — see the Styles stage below |
So: Edit = me, one photo, right now. Album Style = the server, every new upload, automatically.
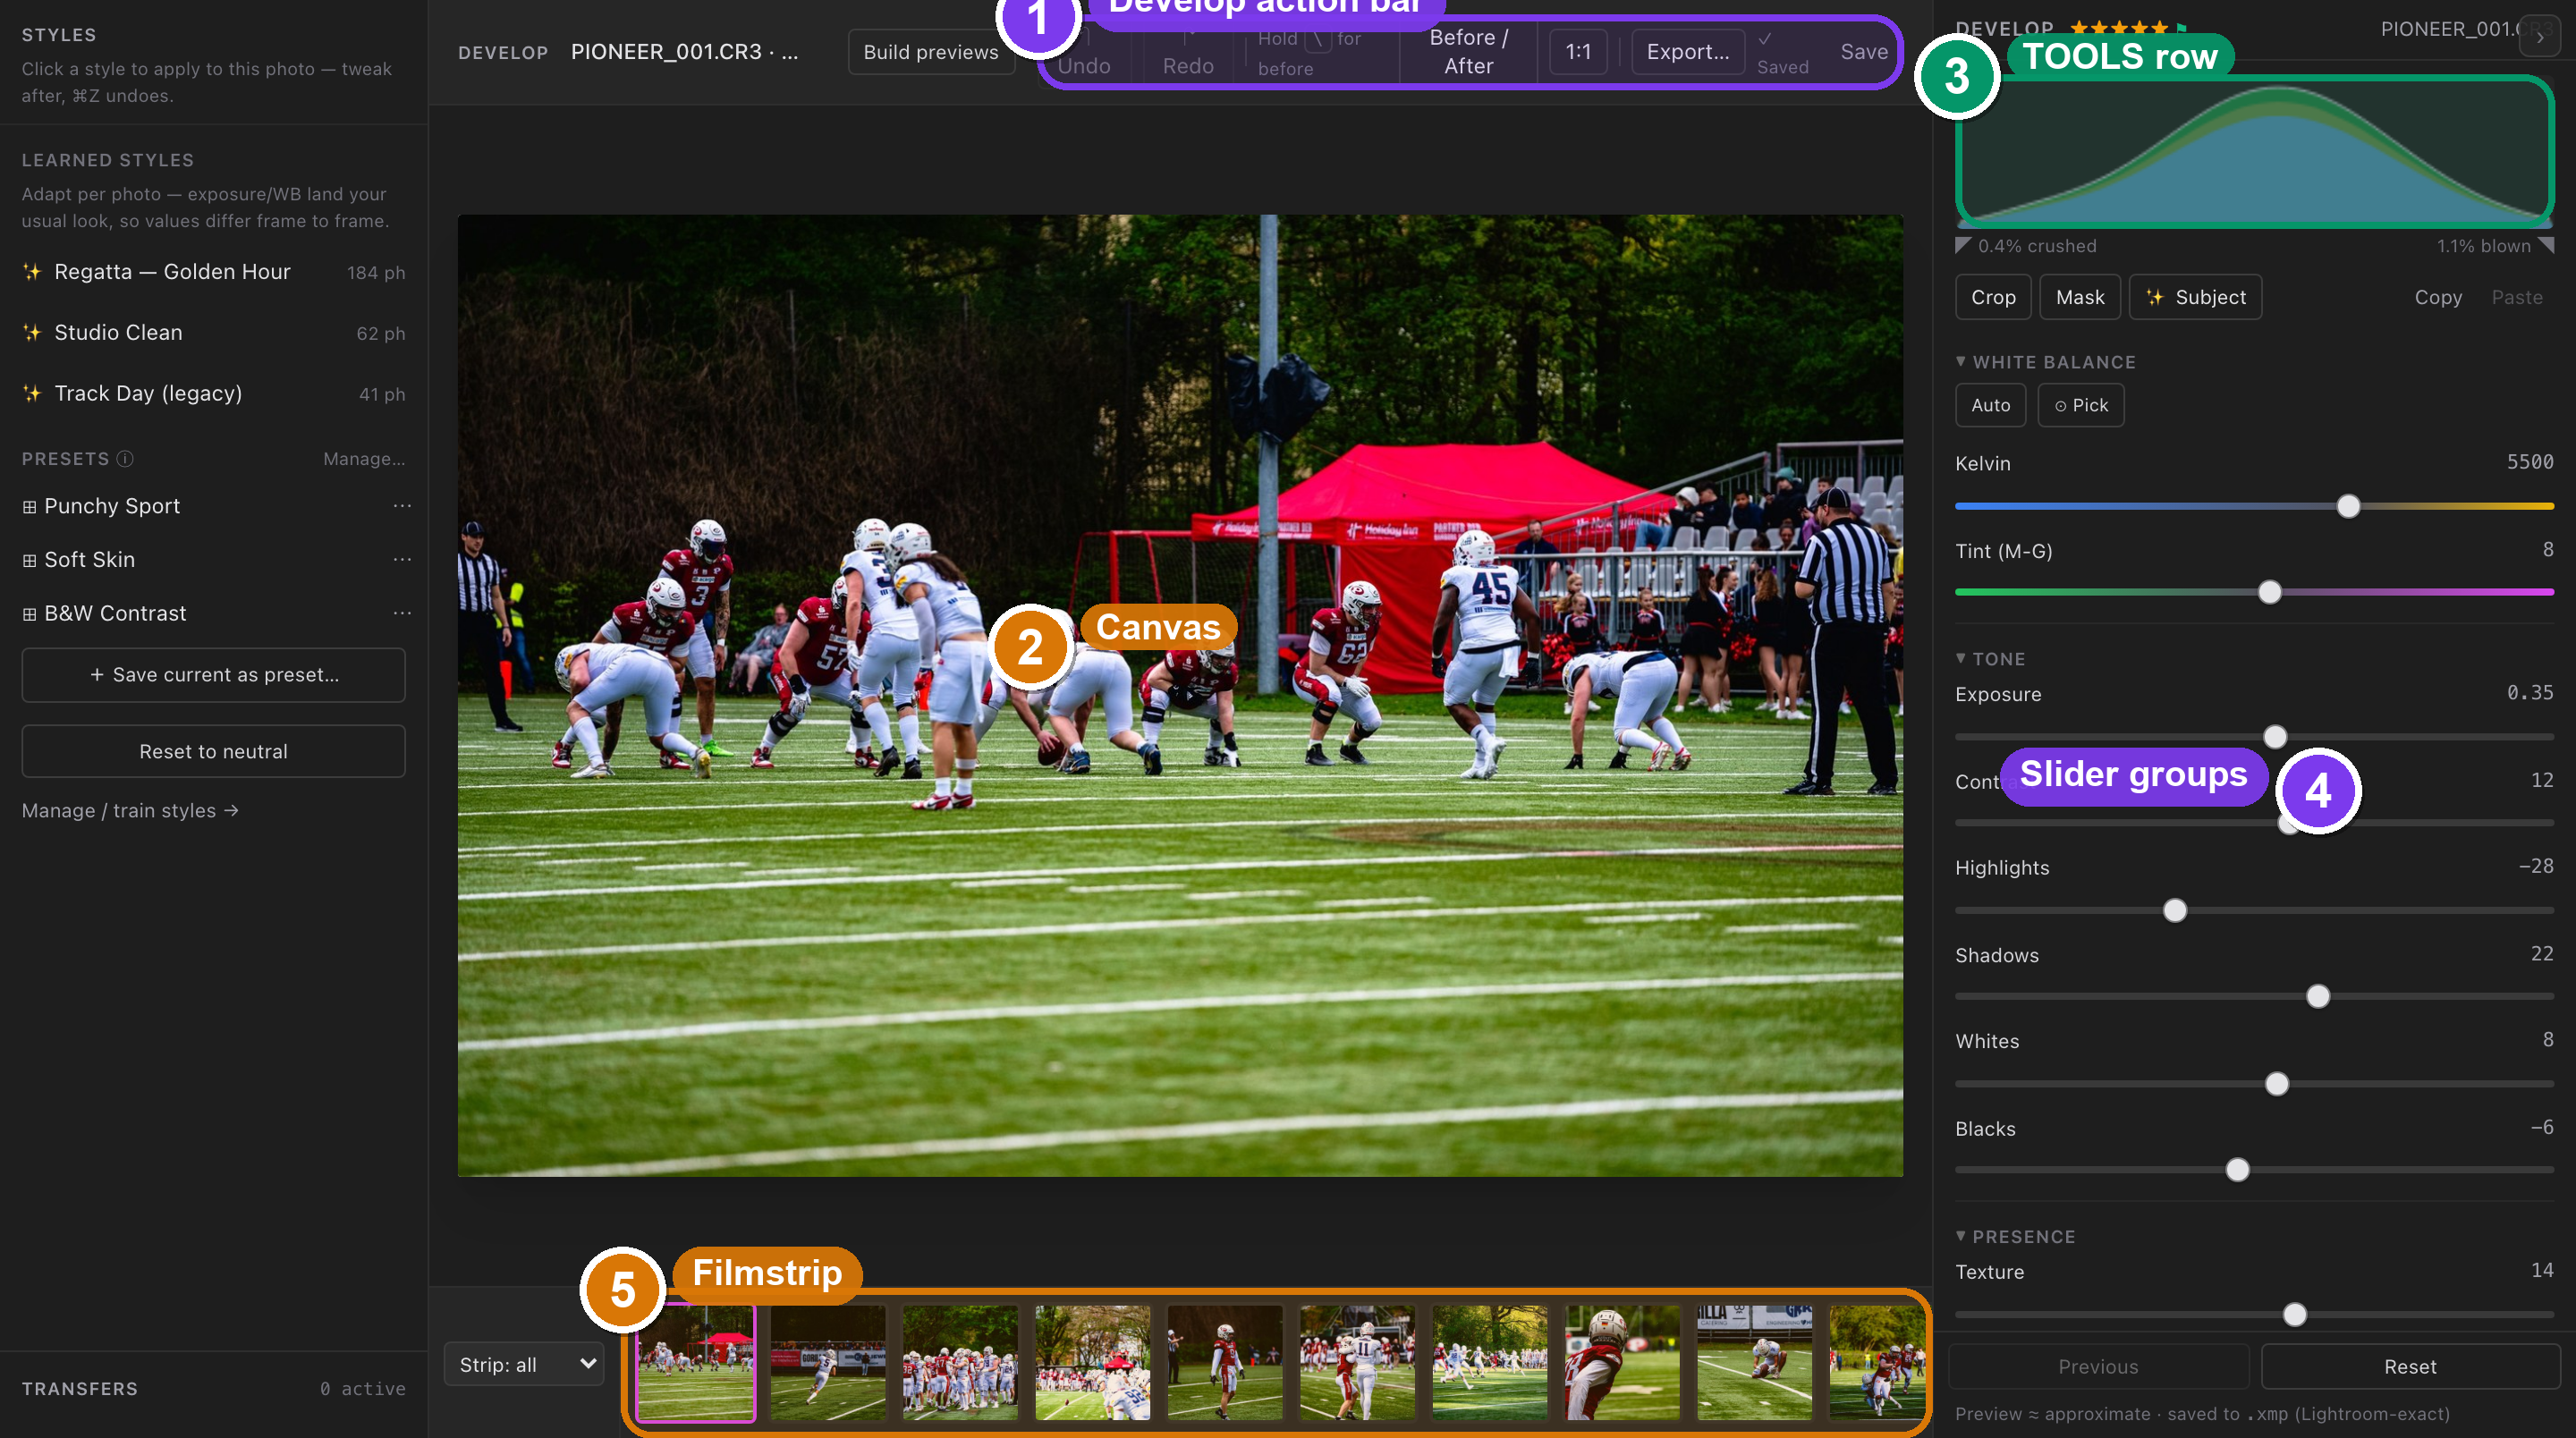 The Edit stage (⌘2). ① the Develop action bar (Build previews · undo/redo · Before / After · 1:1 · Export… · Save); ② the canvas, where the open photo renders; ③ the TOOLS row under the histogram (Crop, Mask, ✦ Subject); ④ the develop slider groups; ⑤ the filmstrip — click any thumbnail to develop that photo next.
How to reach it
- In the bottom stage bar, click Edit (or press ⌘2). — the workspace switches to the develop editor. If no photo is open you'll see "Select a photo below to develop it."
- Pick an album in the Library stage first (⌘1) if the filmstrip is empty — Edit develops the album you have open. — the album's photos appear as thumbnails in the filmstrip along the bottom.
- Click a thumbnail in the filmstrip. — the photo loads onto the canvas and the develop inspector on the right comes alive.
From cull to develop
A natural flow is: cull in Library → filter to your Keepers → then switch to Edit and develop just those picks. You don't have to develop everything — only the frames you're delivering.
Open a photo and find your way around
Once a photo is on the canvas, these are the controls you'll use constantly. They live in the Develop action bar at the top and in the TOOLS row under the histogram (top-right).
- Press J (or click the histogram). — clipping warnings turn on: blown highlights flash red, crushed shadows flash blue, and a small "clipping on (J)" note appears under the histogram. Press J again to turn it off.
- Press Z (or click 1:1 in the action bar). — the canvas jumps to 1:1 zoom so you can check focus and sharpening. Click the photo to zoom into that spot, drag to pan, click again to exit. A "1:1 · drag to pan · click to exit" badge confirms you're zoomed.
- Hold the \ (backslash) key (or press-and-hold the Before / After button). — the canvas shows the photo before your edits while you hold; let go to snap back to the edited version. A Before badge appears top-left while held.
The preview is approximate; the .xmp is exact
The little caption at the bottom of the inspector reads "Preview ≈ approximate · saved to .xmp (Lightroom-exact)." SnapFlow's on-screen render is a fast approximation of Adobe Camera-Raw — close, but the saved .xmp is what Lightroom renders precisely. Trust the file, not the last 2% of the preview.
The Basic sliders, in plain language
The right-hand develop inspector is a stack of collapsible groups. The first three — White Balance, Tone and Presence — are open by default and do most of the work. Drag a slider and the canvas updates live; type a number in the value box for precision; double-click any slider to reset it to neutral.
White Balance — how warm or cool the photo looks.
- Kelvin — colour temperature. Lower = cooler/bluer, higher = warmer/oranger. (For RAWs this is an absolute Kelvin value, exactly like Lightroom.)
- Tint (M-G) — green ↔ magenta balance, to kill a colour cast.
- Temp (fine) / Tint (fine) — small relative nudges on top of the above.
Tone — brightness and contrast.
- Exposure — overall brightness.
- Contrast — separation between lights and darks.
- Highlights — recover (pull down) or lift the brightest areas.
- Shadows — open up (lift) or deepen the darkest areas.
- Whites / Blacks — set the very top and very bottom of the tonal range.
Presence — local contrast and colour intensity.
- Texture — fine detail (skin, fabric) without the harshness of Clarity.
- Clarity — midtone punch.
- Dehaze — cut through atmospheric haze (or add it, going negative).
- Vibrance — boosts muted colours first, protects skin tones.
- Saturation — boosts every colour equally.
Double-click resets one slider; Reset clears them all
Double-clicking a single slider returns just that slider to neutral. The Reset button at the bottom of the inspector clears all develop edits on the photo (and ⌘Z undoes that if you change your mind).
Going further — curve, colour and detail
Below the Basic groups are four more collapsible sections. They start closed; click a section header to open it.
- Tone Curve — shape the tones precisely. The parametric sliders are Highlights, Lights, Darks and Shadows; a point curve sits above them for hand-drawn adjustments.
- Color Mixer — Lightroom's HSL panel. Tabs across the top switch between Hue, Saturation, Luminance and All, each with eight colour bands (Red, Orange, Yellow, Green, Aqua, Blue, Purple, Magenta) — so you can, say, deepen only the blues in a sky.
- Color Grading — three-way colour wheels for Shadows, Midtones, Highlights and Global, plus a split-tone Balance. Drag inside a wheel to push a tint into that tonal range.
- Detail — sharpening and noise reduction: Sharpening, Radius, Detail, Masking, plus Luminance NR and Color NR. Check these at 1:1 (press Z) so you're judging real pixels.
 The develop inspector. ① the live histogram — click it (or press J) for clipping warnings; ② the TOOLS row (Crop · Mask · ✦ Subject · Copy · Paste); ③ the Color Mixer with its Hue / Saturation / Luminance / All tabs; ④ the three-way Color Grading wheels.
Crop, straighten and local fixes
These tools live in the TOOLS row, just under the histogram in the inspector.
Crop & straighten
- Click Crop (or press C). — a crop box appears over the photo and a toolbar drops down at the top of the canvas.
- In the toolbar, pick an Aspect — Free, Original, 1:1, 5:4, 4:3, 3:2 or 16:9. — the box locks to that ratio.
- Drag the Straighten slider (range −45° to +45°) to level a horizon; use ⟲ / ⟳ to rotate 90° and ⇄ / ⇅ to flip. — the photo rotates live under the box.
- Click Done (or C again) to apply, or Reset to clear the crop. — the canvas returns to your framed result.
Radial Mask (local adjustment)
- Click Mask. — a draggable circle appears on the photo with a small toolbar above it.
- Drag the circle over the area you want to treat, then set Exp (exposure), Sat (saturation) or Temp for just that region. Size and Feather control the circle; tick Invert to affect everything outside it instead.
- Click + to add another mask, Delete to remove the selected one, and Done when finished.
✦ Subject (auto subject pop)
- Click ✦ Subject. — SnapFlow detects the subject, brightens it and adds local contrast while easing the surroundings back. Click ✦ Subject again to remove it.
Crop and masks are per-photo — they're never batch-copied
The look-copying tools below (Previous, Sync…, AutoSync, Copy/Paste) carry tone and colour only. They deliberately never copy crop, rotation, flip or masks — so syncing a look across a take can't re-crop your other frames to the wrong framing. Crop each photo on its own.
Edit a whole take fast
You rarely edit one frame in isolation. These tools copy a look across a selection. All of them carry tone and colour only (never crop/masks).
- Step through the take — press ← / → to move to the previous/next photo in the filmstrip order.
- Previous — at the bottom of the inspector, click Previous to apply the previously viewed photo's look to the open one. Great for working down a burst.
- Copy / Paste — in the TOOLS row, Copy (⌘⇧C) grabs this photo's settings; Paste (⌘⇧V) drops them onto the open photo — or onto every photo if you have a multi-selection in the filmstrip.
- Sync… / AutoSync — when you select several photos in the filmstrip, the bottom row swaps Previous for an Auto (AutoSync) checkbox and a Sync… button. Sync… copies the open photo's current look onto every selected photo once; turning Auto on means each further edit you make applies live to the whole selection (it's always off at launch).
Undo and redo work the whole time: ⌘Z undoes, ⌘⇧Z redoes. Your edits autosave to the .xmp sidecar continuously — the "Save" status next to the action bar tells you when it last saved, and the ghost Save button forces an immediate write if you want one.
Keyboard map (Edit stage)
| Key | What it does |
|---|---|
| ← / → | Step to the previous / next photo in the filmstrip |
| 1–5 | Rate the open photo 1–5 stars |
| 0 | Clear the rating |
| X | Reject the open photo |
| P | Pick (flag ⚑) the open photo |
| Z | Toggle 1:1 zoom |
| J | Toggle clipping warnings |
| C | Toggle the Crop tool |
| \ (hold) | Show the Before view while held |
| ⌘Z / ⌘⇧Z | Undo / redo |
| ⌘⇧C / ⌘⇧V | Copy / paste develop settings (paste hits the whole multi-selection) |
Save & hand off
There's no "save and export" ceremony — your develop edits autosave to the .xmp sidecar as you work. That sidecar is the deliverable.
What the .xmp carries:
- Every Camera-Raw slider you moved (white balance, tone, presence, curve, colour mixer, grading, detail), plus crop and masks.
- Your rating and colour label, so they line up with Lightroom.
Because it's a standard sidecar, the photo opens already edited in Lightroom Classic or Capture One — no re-keying your edit. And when you push the album back up, that .xmp rides up with it: see The sync model. The exact same sidecar also carries your IPTC caption and keywords — that round-trip is covered in Metadata tools and the cross-surface Metadata workflows.
If you need a rendered file (a JPEG for someone right now), click Export… in the action bar to choose format, quality and size; it batch-exports your filmstrip selection.
The Styles stage (⌘5)
The Styles stage is your cross-album look library. Click Styles in the bottom stage bar (or press ⌘5). The heading reads Styles, with one line of guidance: "Learned looks (adapt per photo) and presets (same values every photo)." There are three cards.
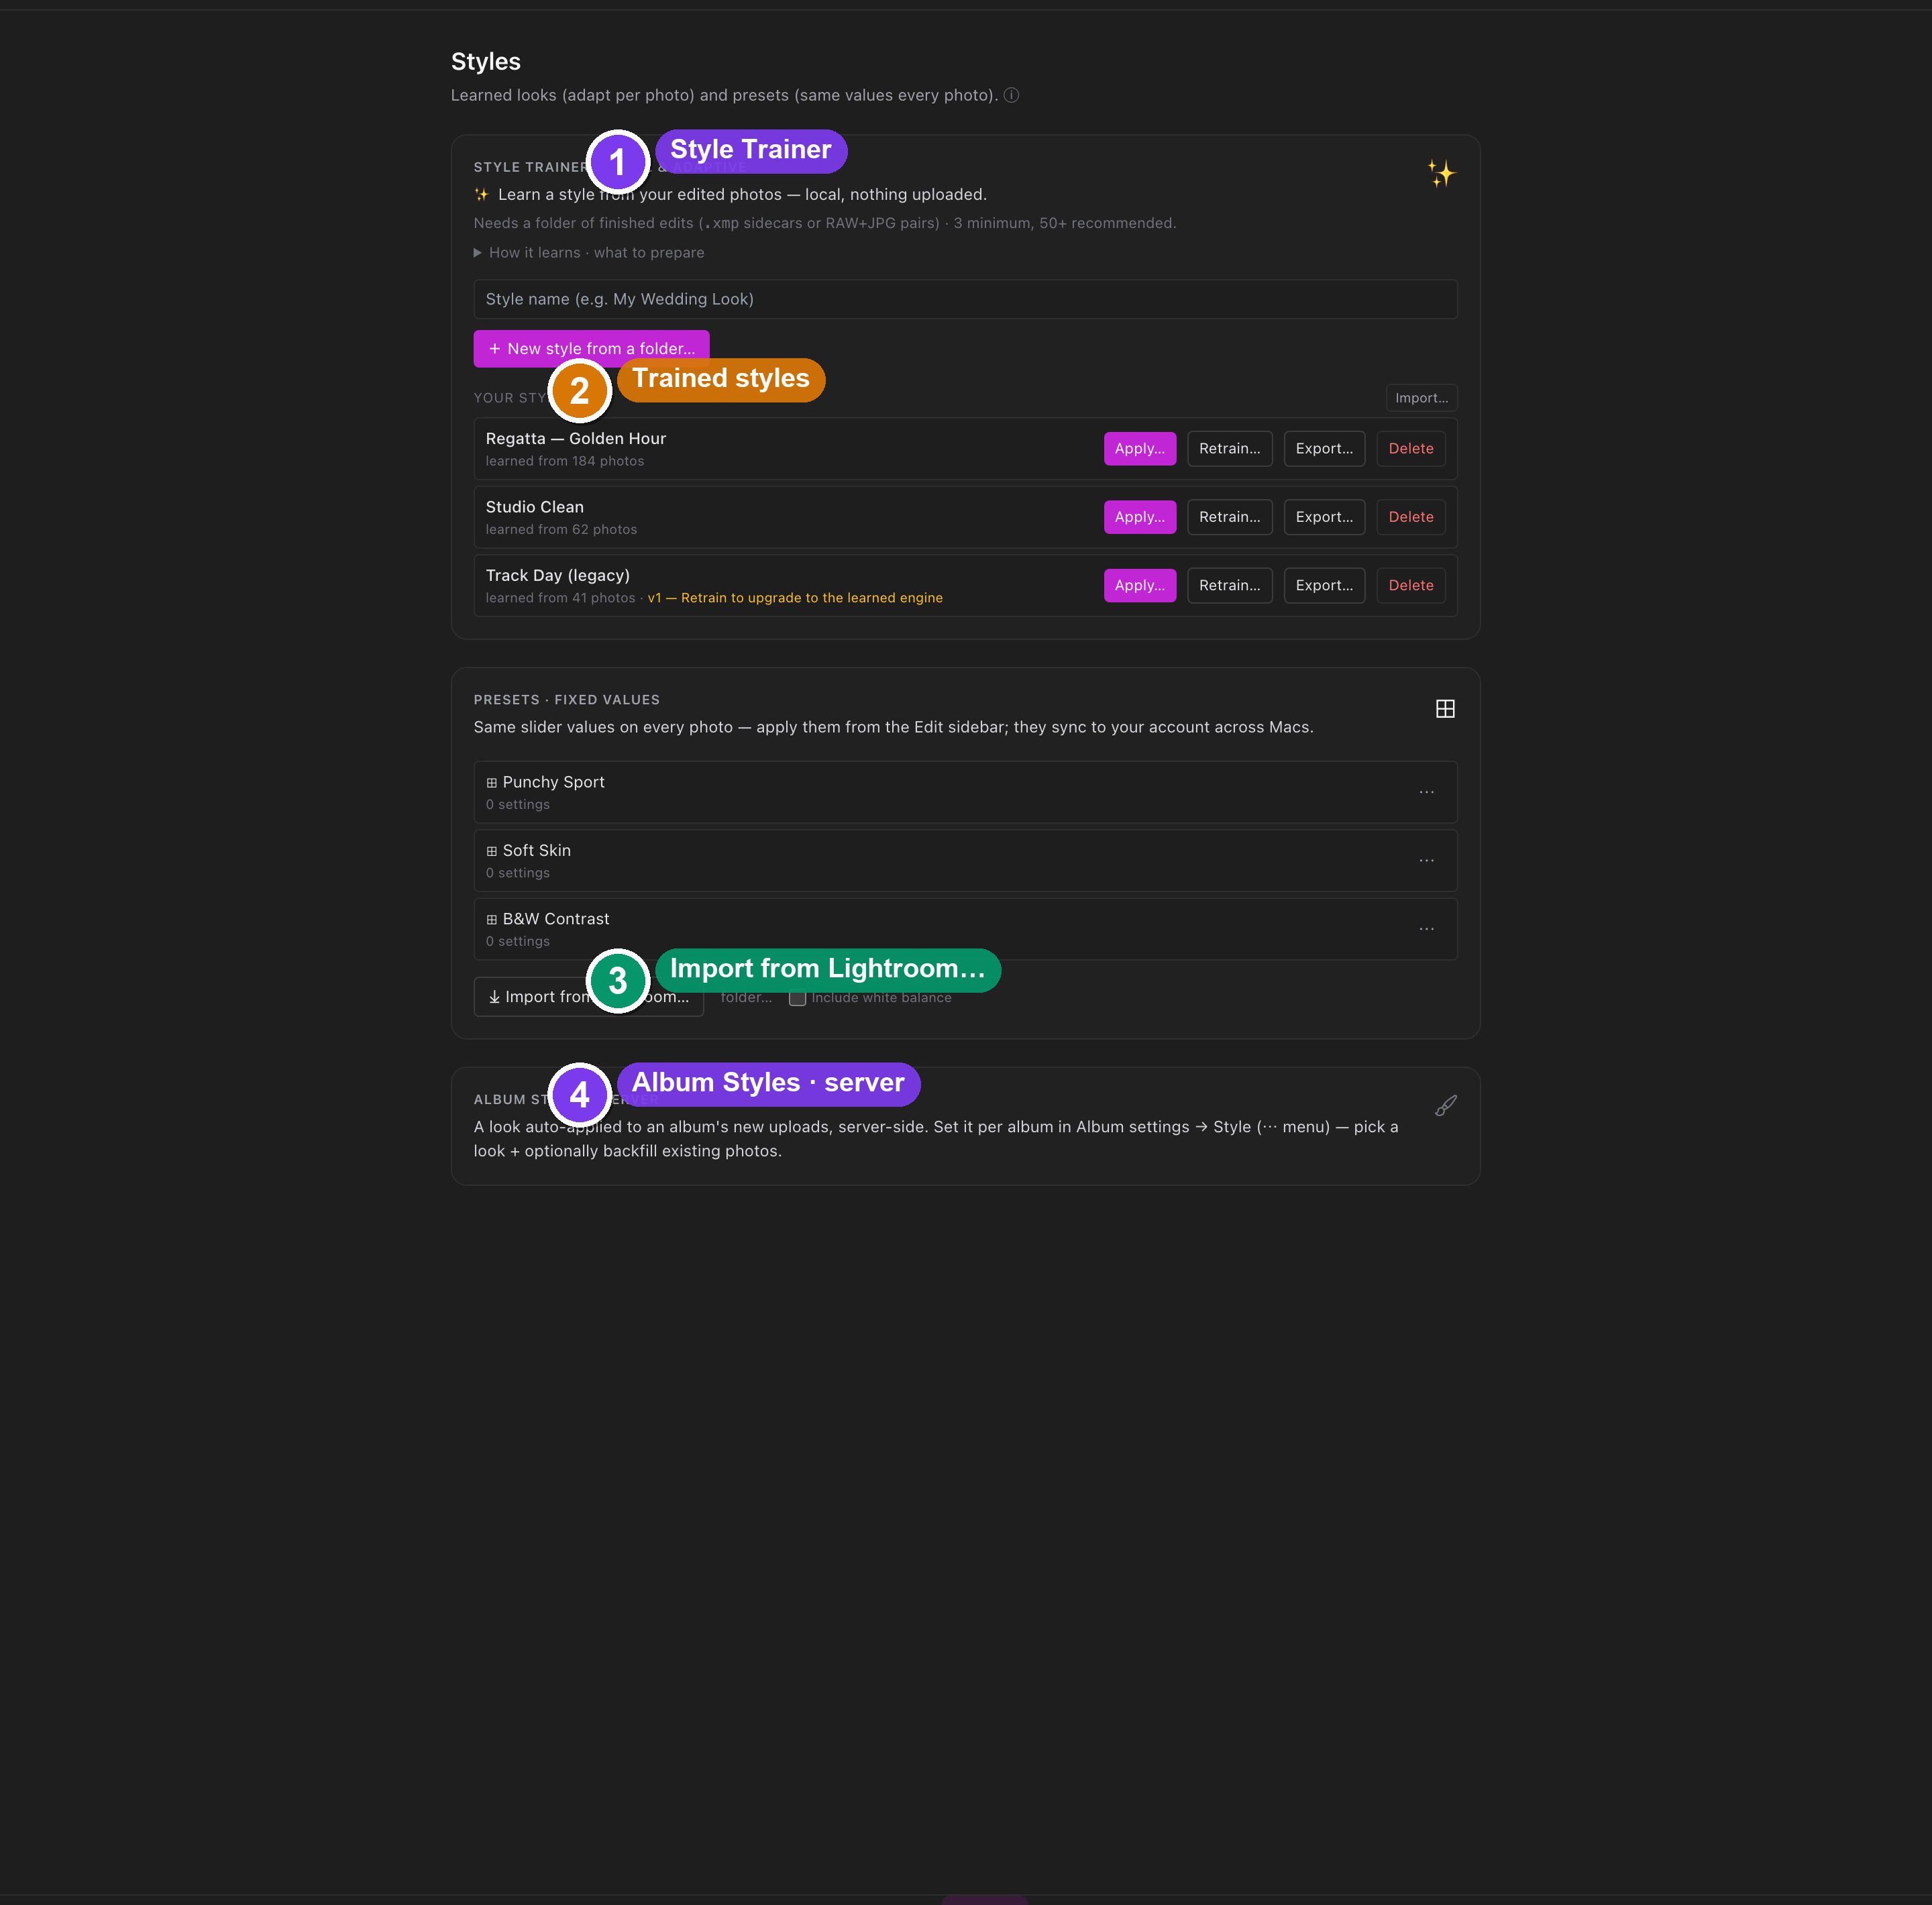 The Styles stage (⌘5). ① the Style Trainer card — + New style from a folder… plus a live training progress bar; ② your trained styles list, each row with Apply… · Retrain… · Export… · Delete; ③ the Presets card with ⤓ Import from Lightroom… and the Include white balance checkbox; ④ the Album Styles · server card.
Style Trainer (learn a look from your own edits)
The Style Trainer learns a per-photo model from a folder of photos you've already edited, then applies that look to new RAWs — so they open already developed in Lightroom. Unlike a fixed preset, a learned style sets different slider values for each photo by design (a backlit frame gets more exposure than a sunlit one) so the whole set lands at your usual brightness.
- In the Style Trainer · local & adaptive card, type a name in Style name (e.g. My Wedding Look).
- Click + New style from a folder… and choose a folder of your finished edits. — SnapFlow scans it (no model is built yet) and shows a report of what it found.
- Click Create style. — a progress bar ("Learning your look…") runs; when it finishes, the style appears in the Your styles list below.
- To use a style, click Apply… on its row and pick a folder of RAWs. — SnapFlow writes a predicted
.xmpnext to each RAW, so they open edited in Lightroom.
What the trainer needs
A folder of finished edits — either .xmp sidecars (your exact Lightroom sliders) or RAW + edited-JPG pairs with the same name (e.g. IMG_001.CR2 + IMG_001.jpg), where it learns the look from the difference. 3 photos minimum, 50+ recommended. The more consistent your edits, the better the model. Train a separate style per distinct look.
Each row in Your styles offers Apply…, Retrain… (update the model in place from a new folder — the previous version is kept as a backup), Export… (save the style as a file to move to another Mac) and Delete. An older v1 model shows a "v1 — Retrain to upgrade to the learned engine" note; Retrain… brings it up to date.
Presets (the same values every photo)
The Presets · fixed values card is for snapshots of slider values that apply identically to every photo — a classic preset. You apply presets from the Edit-stage sidebar; they're created, renamed, exported and managed here, and they sync to your account across Macs.
Bringing Lightroom looks across
- In the Presets card, click ⤓ Import from Lightroom… and choose one or more Adobe Lightroom
.xmpdevelop presets (or click folder… to import every preset in a folder, recursively). — SnapFlow imports the supported sliders and the tone curve, then shows a report of what each preset kept and dropped. - Decide on white balance with the Include white balance checkbox (left off by default). — off means Temperature/Tint are dropped so the preset keeps each photo's own white balance; tick it only if you want the preset to pin an absolute Kelvin WB.
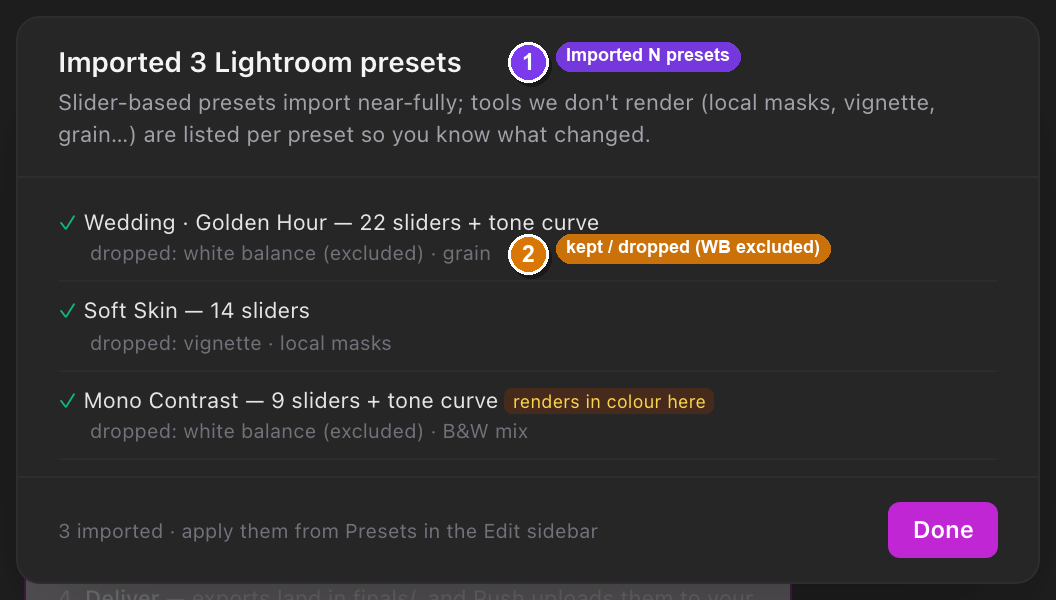 The Import from Lightroom… result. ① the Include white balance checkbox you set before importing; ② the per-preset report listing which sliders came across and which were dropped.
Album Styles (the server auto-edit)
The Album Styles · server card is a pointer, not a control: an Album Style is a look auto-applied to an album's new uploads, server-side. You set it per album in Album settings → Style (the album's ⋯ menu) — pick a look and optionally backfill existing photos. This is the same Album Style summarised in the Edit-stage table at the top of this chapter.
Which one do I use?
Use the Edit stage (⌘2) when you want to develop specific frames by hand. Use a learned style (Style Trainer) to apply your look to a big folder of RAWs at once on your Mac. Use an Album Style (server) when you want every new upload to an album to arrive already styled, hands-off.
Troubleshooting
Photos open slowly in the editor — pre-build previews
The first time you open a RAW it decodes (~1 second); after that it's instant. To pre-warm a whole album, click Build previews in the Edit action bar — SnapFlow decodes every RAW into the local preview cache in the background (Lightroom's "Build Previews"). You may be asked whether to raise the cache limit or fit within it.
Where the preview cache lives — and its size limit
Built previews are stored on disk under Settings (⌘7) → Local cache → Editor previews. You can set a Limit (Off / 5 / 10 / 25 / 50 GB) and Clear it there. Oldest previews are evicted automatically when the limit is reached; Off stops saving new ones (photos then decode on first open).
Develop is for RAWs; finals are served as-is
The Edit stage is a RAW develop pipeline. Already-finished JPEGs (delivered finals) are served as-is and aren't meant to be re-developed here — develop the RAW, then let the .xmp carry your edit to Lightroom and the delivered file.
Your edits live in the .xmp — back it up
Develop edits are non-destructive: the original RAW is never overwritten. Everything you did is in the .xmp sidecar next to the file, so keep the sidecar with the RAW (sync handles this automatically). Lose the .xmp and you lose the edit — but never the original.