Culling & rating
Grid multi-select, the loupe, compare, and the full keyboard map.
Desktop app
Culling means sorting the keepers from the throwaways. It's the one thing the desktop app is fastest at. You fly through a big take with the keyboard — rate, reject and compare — and then push only your best frames up to SnapFlow.
This chapter covers the Library stage (⌘1), where your photos live as a grid of thumbnails, and the loupe (the big single-photo view you get when you open one). Everything here happens on your Mac; nothing changes online until you sync.
Where am I?
The bottom of the desktop app is a row of stages — Library · Edit · People · Deliver · Styles · Metadata · Settings. Culling lives in Library (press ⌘1, or click Library). If you haven't installed the app yet, start at Install & connect.
Select photos in the grid
Open an album in the sidebar and you land on its grid of thumbnails. Here's the one thing that trips people up, so read it first:
A plain click OPENS a photo — it does not select it
As of SnapFlow Sync 1.51.0, clicking a thumbnail opens it in the loupe (the big view). To select photos without opening them — so you can rate a whole batch at once or fill in metadata — use the round ✓ badge in the thumbnail's top-left corner.
To pick out several photos at once:
- Hover a thumbnail. — a faded round ✓ badge appears in its top-left corner.
- Click that ✓. — the badge fills solid blue, the tile gets a blue ring, and the ✓ now stays put. That photo is selected.
- Click the ✓ on each other photo you want. — each one gets the blue ring. The corner badge is the reliable way to multi-select; Shift-click and ⌘-click sometimes work too, but the packaged app doesn't always receive those modifier keys, so trust the ✓.
- Done with the batch? Press Esc. — every ring clears and you're back to a plain grid.
Once you have a selection, the keyboard rates the whole batch: press 1–5 for stars, 0 to clear, X to reject. The selected tiles all update at once.
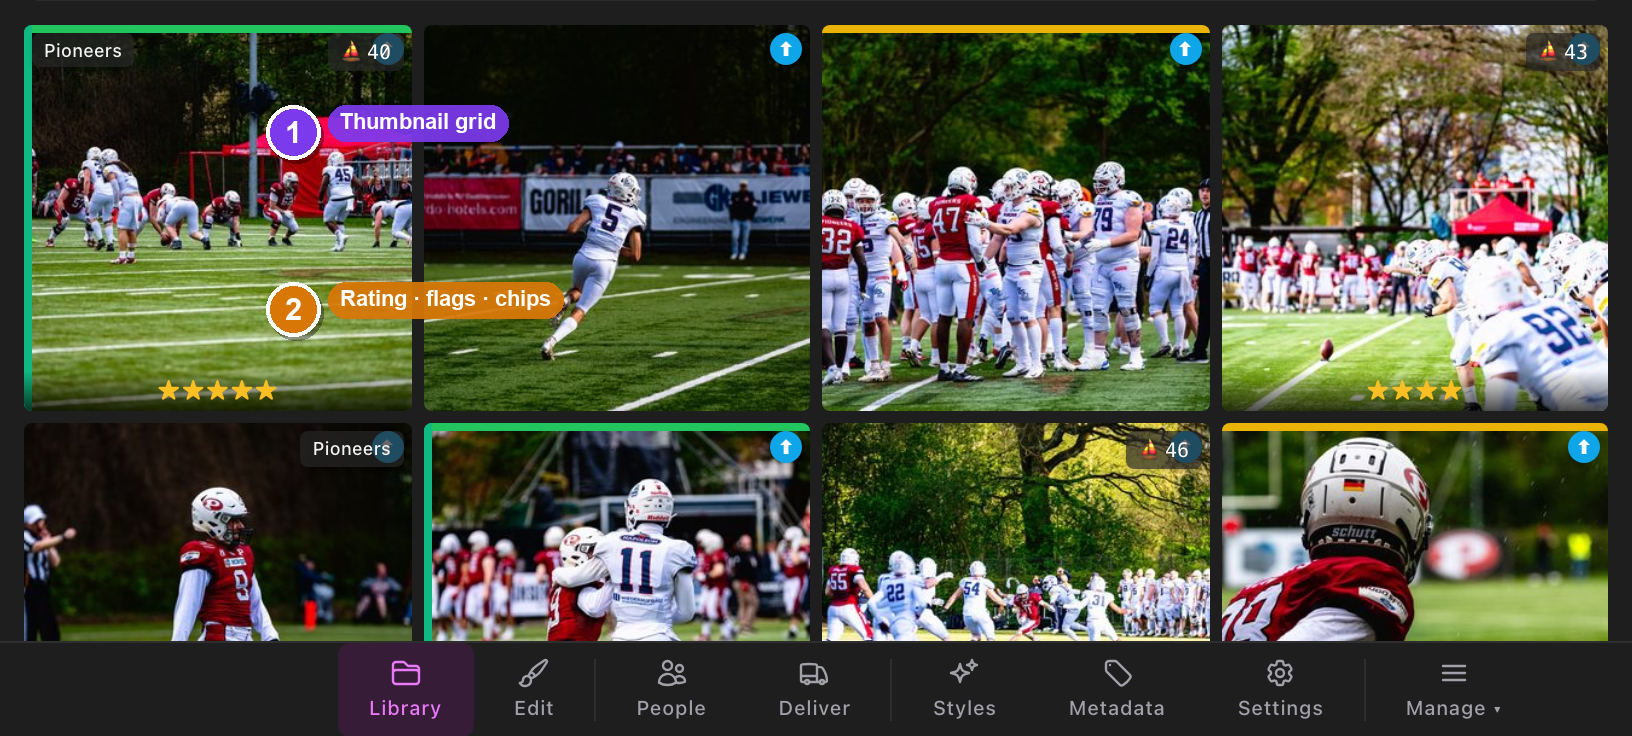 The Library grid mid-cull. ① the hover ✓ badge on an unselected tile, ② a selected tile (filled blue ✓ + blue ring), ③ a rejected tile (dimmed, with a red ✗), ④ a ⚑ pick badge on a flagged keeper, ⑤ the rating / Keepers / Rej filter strip above the grid, ⑥ the 🗂 Stationery button on the selection toolbar (covered in Metadata tools).
What the badges on a tile mean
| Badge on the tile | What it means |
|---|---|
| Round ✓ top-left | Selection toggle (click it to select / deselect) |
| Red ✗, tile dimmed | Rejected (rating −1) |
| ⚑ (green flag) | Pick-flagged keeper (you pressed P) |
| Amber pill, e.g. blurry | Auto-cull flagged this one — see below |
| Stars overlay | Its star rating |
Auto-cull flags
When photos finish importing, SnapFlow gives each one a quick quality glance and may stamp it with one of four advisory flags: blurry, overexposed, dark, or underexposed. The flag shows as a small amber pill in the top-left of the grid tile (and under the photo in the loupe). It's only a hint — nothing is hidden or deleted. Treat a flag as "look at this one closely," not as a verdict.
The 'flagged by auto-cull' banner is on the web album page
SnapFlow also shows an amber "N photos flagged by auto-cull" banner with a Review in cull mode → link on the album's page in your browser (the web Culling chapter explains the browser side). In the desktop app, the flags just live on the tiles — filter or eyeball your way to them.
The loupe — judge one photo at a time
Click any thumbnail to open the loupe: a full-size view for judging sharpness, focus and expression. You can also move the keyboard cursor (the amber ring) with the arrow keys in the grid and press Enter to open whatever's under it.
Once you're in the loupe:
- Press ← / →. — you step to the previous / next photo without leaving the loupe.
- Press Z. — the photo jumps to 1:1 (a pixel-for-pixel zoom). A small 1:1 · click to fit pill appears so you can check critical focus. Press Z again to fit the photo back to the pane.
- Press a number 1–5. — that many amber stars light up under the photo; the rating saves instantly.
- Press X. — a big red ✗ flashes over the frame and it's marked rejected. Press 0 to clear the rating again.
- Press F. — the loupe fills the whole window (all the chrome melts away). Press F again to drop back to the bounded view that keeps the metadata panel visible.
- Press Esc. — the loupe closes and you're back in the grid.
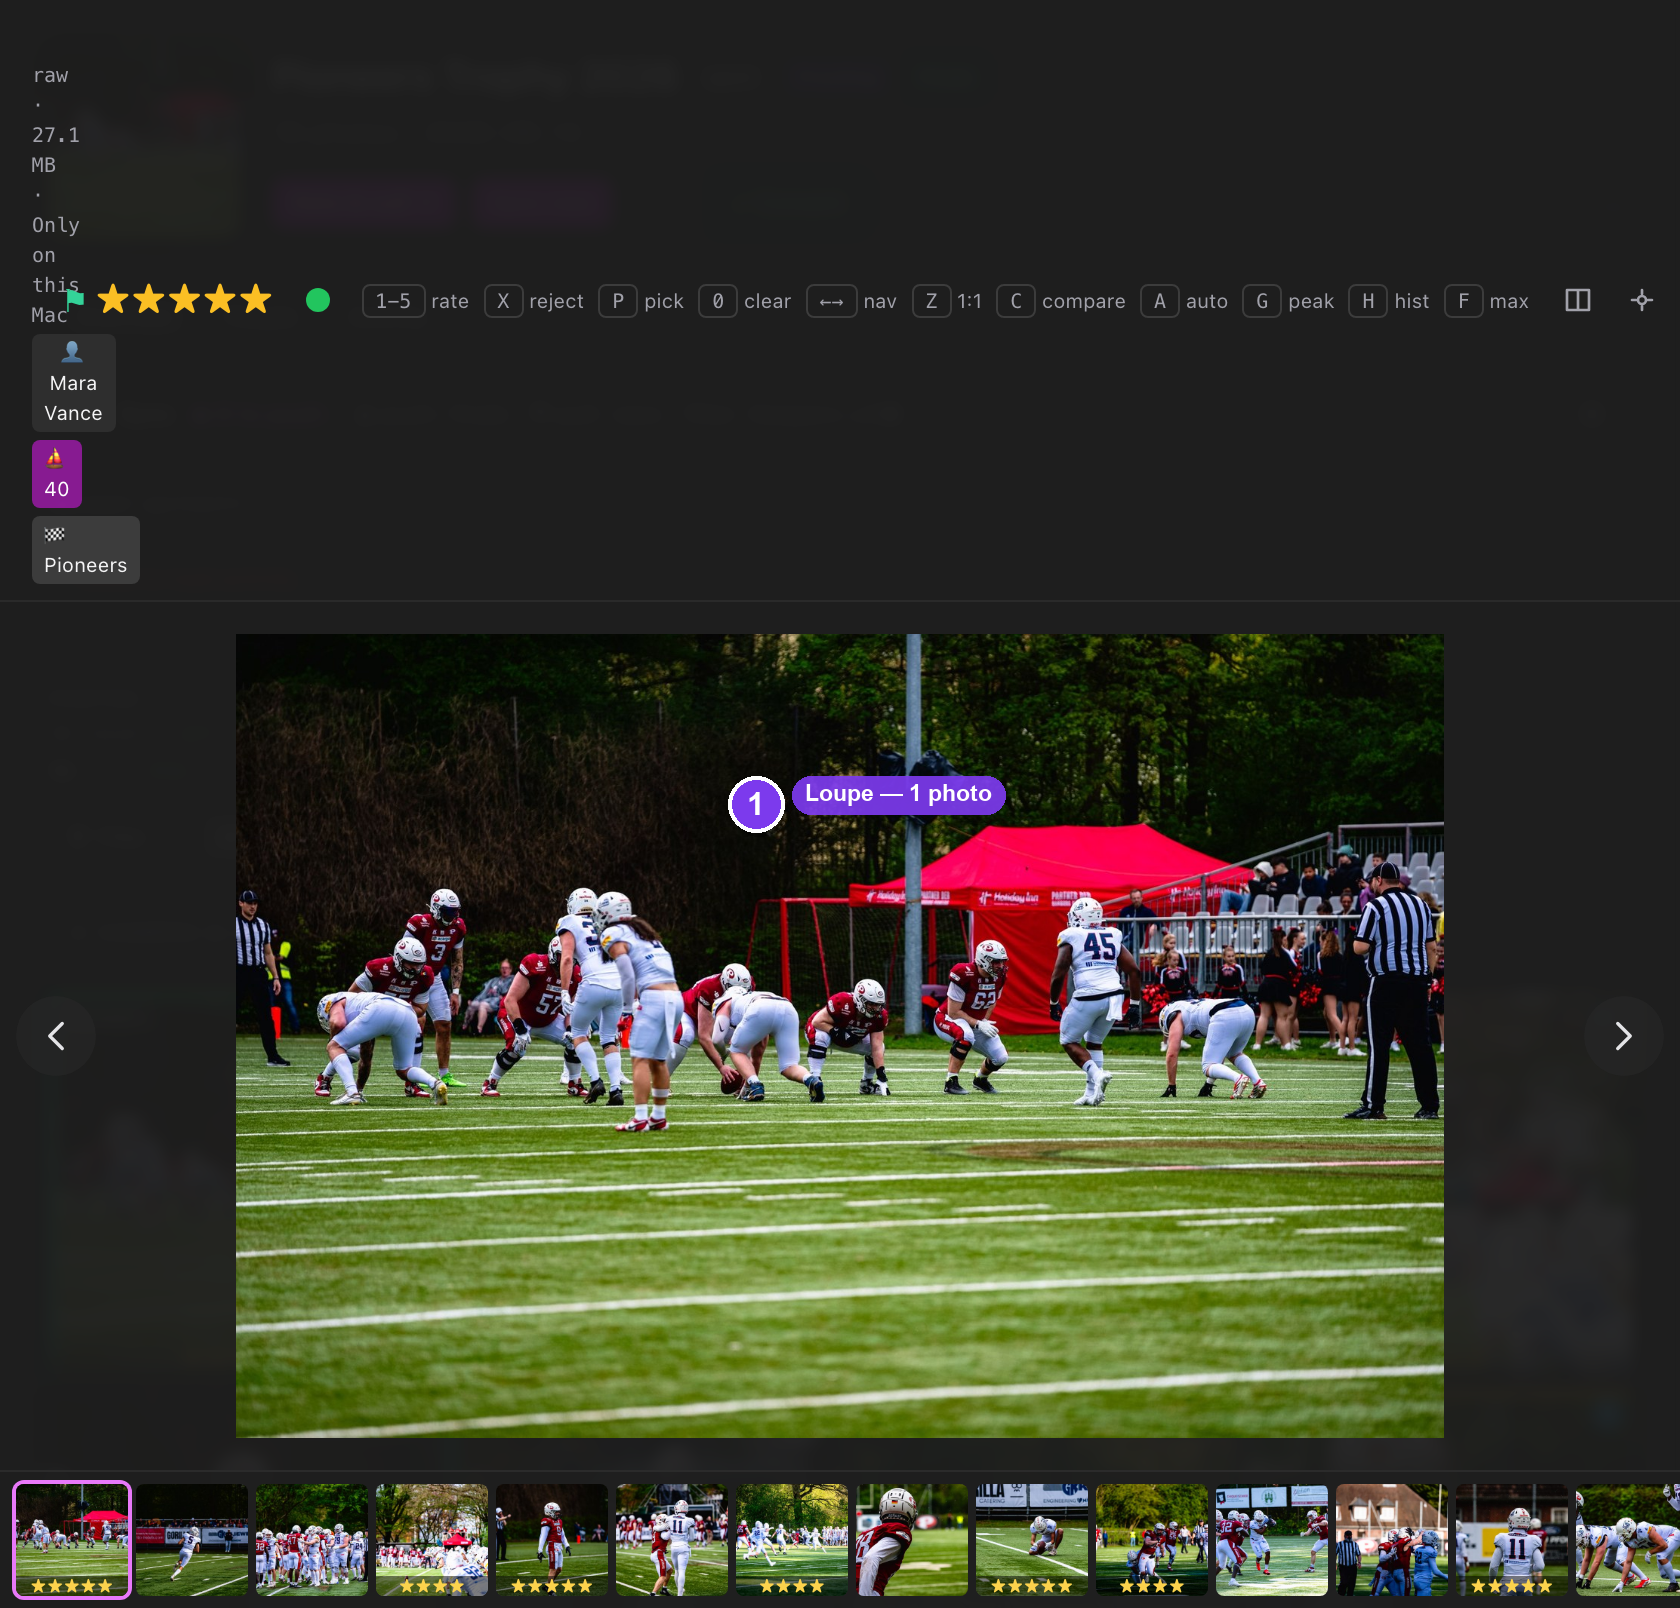 The loupe. ① the keyboard cheat-sheet row (1-5 rate · X reject · P pick · Z 1:1 · C compare · A auto · G peak · H hist · F max), ② the top-bar toggle buttons (Compare, Focus peaking, Histogram, Auto-advance, Full screen), ③ the right metadata inspector, ④ the bottom rate bar (Reject · Clear ★ · ⚑ Pick · 1★–5★ + colour dots).
The top-bar toggle buttons
Every keyboard aid also has a clickable button along the top of the loupe, so you don't have to memorise the keys. Hover any of them for its tooltip:
| Button (and key) | What it turns on |
|---|---|
Compare (C) |
Two frames side by side (see below) |
Focus peaking (G) |
Highlights the in-focus edges so you can spot the sharpest frame |
Histogram (H) |
A small histogram + clipping read-out in the corner |
Auto-advance (A) |
After you rate, the loupe jumps straight to the next photo |
Full screen (F) |
Fills the whole window |
Auto-advance makes culling a rhythm
Turn on Auto-advance (A), then just tap P (or a star) on each frame.
The loupe hops to the next one automatically, so a few hundred frames go by in
a couple of minutes. Note: clearing a rating with 0 does not advance — so
a stray clear won't skip you past a photo you meant to keep.
The bottom rate bar
Below the photo is a clickable version of every rating action — handy if you'd rather use the mouse:
- Reject (red) — same as X.
- Clear ★ — same as 0, removes the rating.
- ⚑ Pick (green) — the pick flag (same as P); see below.
- 1★ 2★ 3★ 4★ 5★ — set the star rating.
- The coloured dots — colour labels (Red / Yellow / Green / Blue), same as keys 6 / 7 / 8 / 9. Lightroom reads these labels too.
Two ways to mark a keeper: the ⚑ pick flag vs. ★ stars
The desktop app gives you two independent "I like this" marks, and they do different jobs:
- ⚑ Pick flag (press P) — a fast, yes/no first pass. A green ⚑ badge appears on the tile. Flag everything you might keep without stopping to decide how good it is.
- ★ Star rating (press 1–5) — a quality score for a slower second pass.
A nice two-pass workflow: race through once with P, flagging anything worth a second look. Then turn on the ⚑ Picked only filter (under Filter ▾), and star-rate just those keepers in peace.
The metadata inspector (right side)
The panel down the right of the loupe is a live IPTC editor that follows whichever photo you're looking at — Content, Location, Credit, Job and Advanced sections, with a Keywords box (a 🌳 Browse button opens your keyword tree). If your album has AI metadata switched on, you'll also see ✨ Generate buttons that draft a caption, keywords and a headline for you (they stay hidden when AI metadata is off). Filling metadata while you cull is covered in full in Metadata tools.
Compare two frames
Shooting bursts? You rarely keep more than one frame from a five-shot rip. Compare puts two of them side by side so you can pick the single best one.
- In the loupe, press C (or click the Compare button). — the view splits into a LEFT and a RIGHT pane. The left is your anchor (the frame you were on); the right is the candidate (the next burst member, or the next photo).
- Press ← / →. — these now step the right candidate through the burst, while the left anchor stays put. Each step is a fresh contender against your anchor.
- Press Z. — both panes zoom to 1:1 together and the zoom stays locked as you step, so you're comparing the exact same patch of every frame.
- Press Tab. — focus moves between the two sides (a ring shows the active one), so a rating goes to the side you mean.
- Found a better frame than your anchor? Press Space. — the two sides swap, so the winner becomes the new anchor and you keep comparing it against the rest of the burst.
- Press C again. — compare closes and you're back to the single loupe.
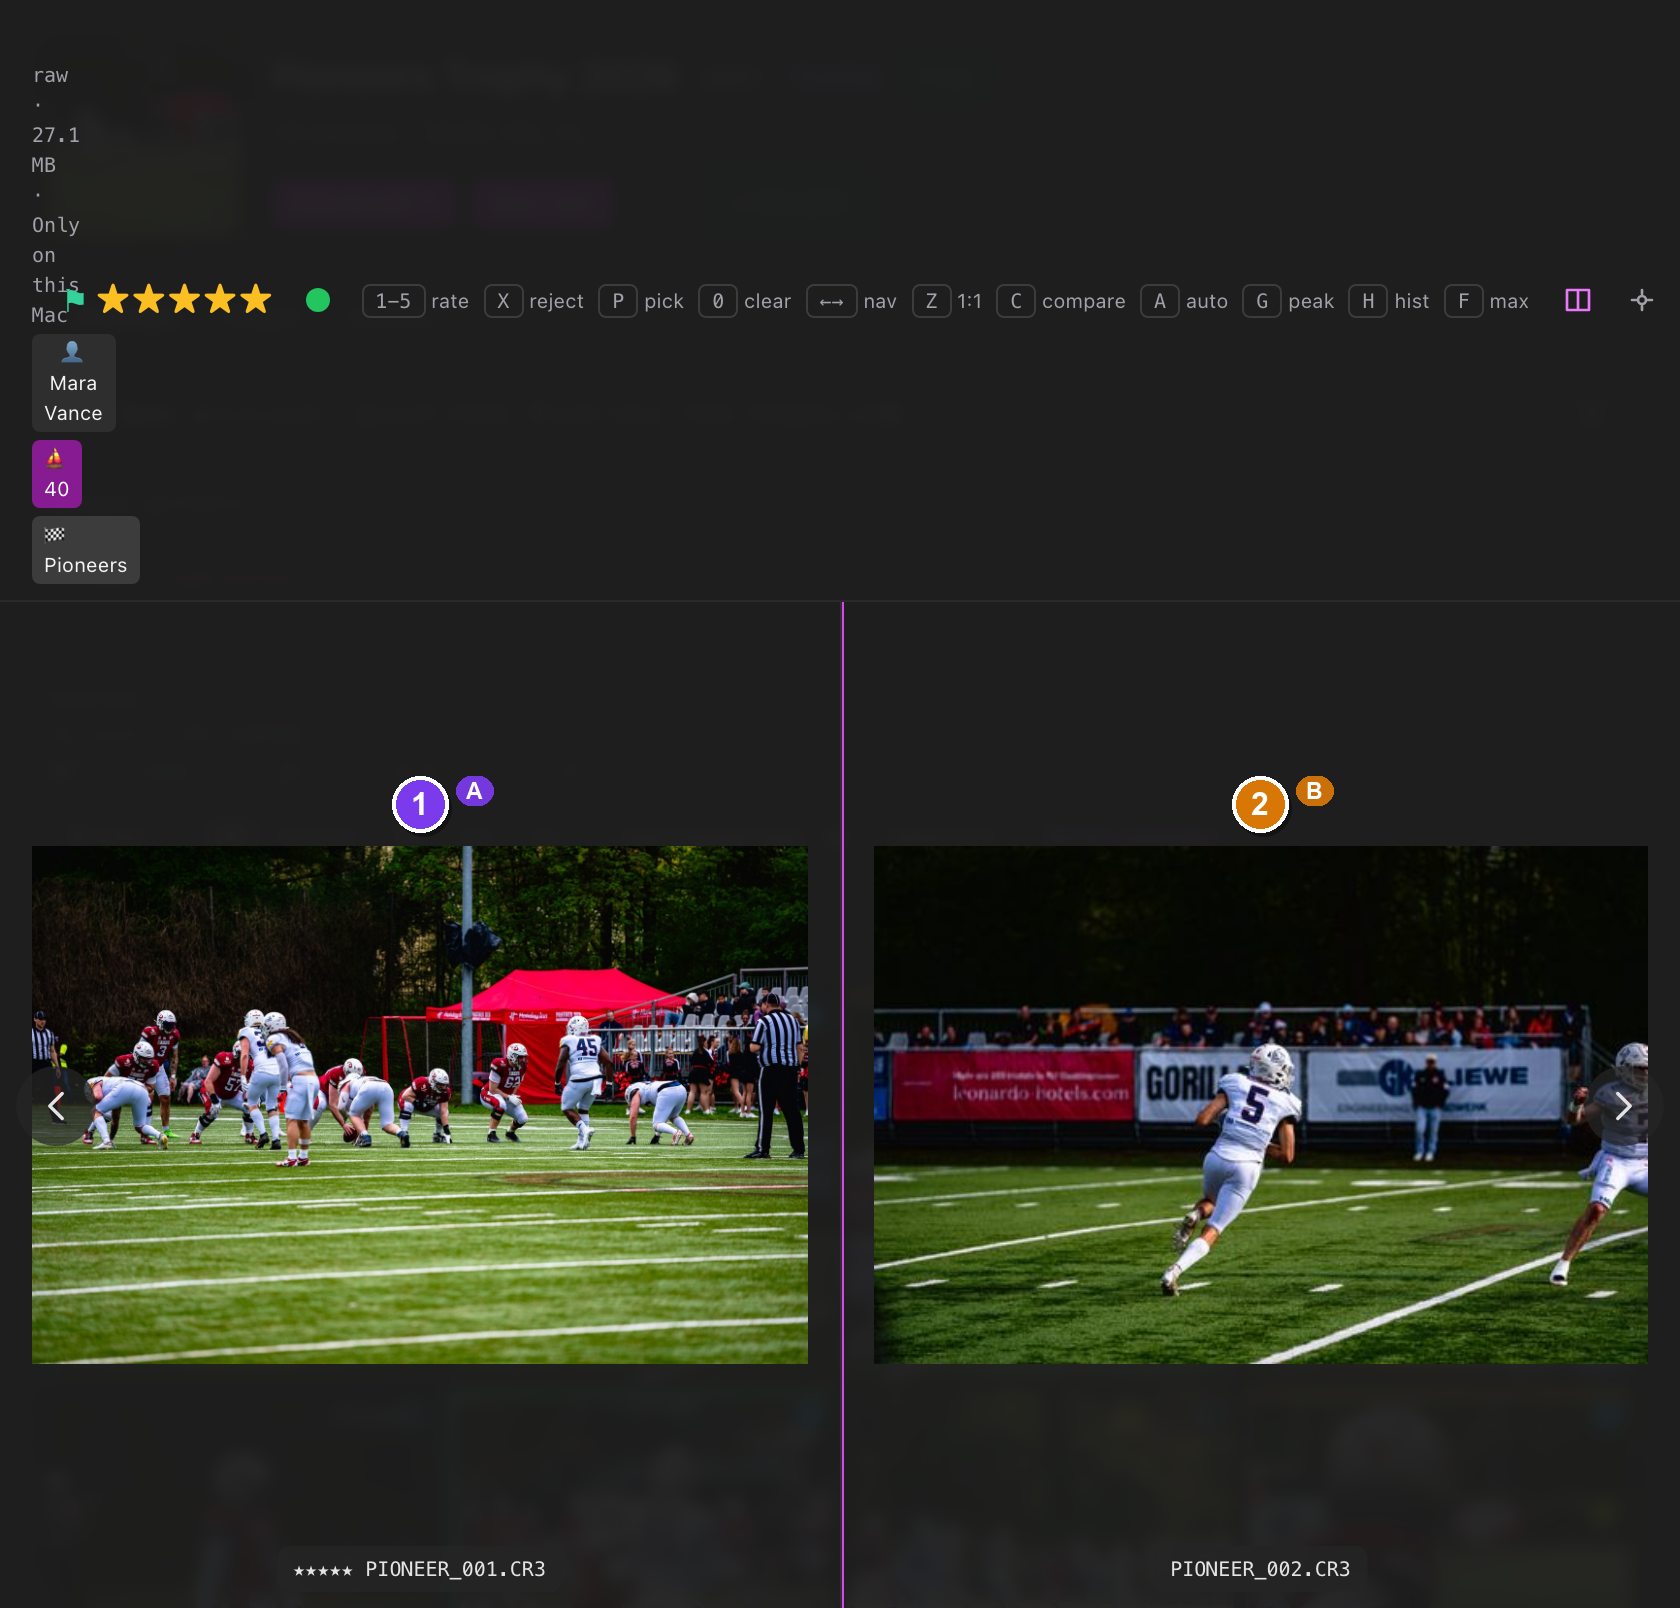 Compare mode. ① the LEFT anchor, ② the RIGHT candidate, ③ the active-side ring (moved with Tab), ④ the Space-to-swap and locked 1:1 zoom that hold the same patch across the whole burst.
Tidy up after culling
Once a take is rated, the grid filters help you act on the result. The everyday chips sit right above the grid; the rest hide behind a Filter ▾ popover.
- Click a rating chip above the grid: All, Keepers (≥4★), 5★, Rej (rejected) or Unr (no rating yet). — the grid shows only that group.
- To hide the duds while you work, open Filter ▾ and tick Hide rejected. — every red-✗ frame drops out of view (it isn't deleted, just hidden).
- Use the Sort dropdown above the grid to Sort: Rating (or Pick flag) so your best frames float to the top.
- To actually remove the rejects, open the album ⋯ menu (top of the album) → Delete rejected…. — a Delete photos dialog opens with two tickboxes: This Mac ("Moves files to the macOS Trash — recoverable") and SnapFlow server ("Permanently deletes the uploaded copy — no undo").
- Tick the locations you mean, then click Delete. — the rejected frames are removed from the ticked places.
'Rejecting' is not 'deleting'
Pressing X only marks a photo rejected (rating −1). The files stay on your disk and in any galleries until you explicitly run Delete rejected… and tick a location. That's deliberate — a stray X never costs you a photo.
From cull to delivery
Culling decides which frames go up. The push filter in your sync settings then sends only those. The two work together:
- Cull as above, giving your selects 4★ or 5★ (or the ⚑ pick flag).
- Open the album's Sync settings (the Sync strip's gear → Album settings → Sync tab). — the push filter dropdown appears.
- Set the push filter to Keepers only (≥4★). — now only your 4-and-5-star frames are eligible to push. (The other options are All photos, Pick-flagged only (⚑) and Non-rejected (skip ✗).)
- Turn on Push raws, then sync. — only your selects ride up to SnapFlow.
The full sync model — Receive vs. Send toggles, the push filter, watch-folder auto-push and where the on-disk folders live — is in The sync model.
Develop your picks next
Happy with your keepers? The Edit stage (⌘2) is a full local RAW develop
studio, and the Styles stage (⌘5) lets you learn a look and apply it across
a take. Both are covered in Editing & styles. Your
edits ride up as .xmp sidecars on the next push.
Keyboard map
In the grid (with photos selected via the corner ✓):
| Key | Action |
|---|---|
1–5 |
rate the selection N stars |
0 |
clear the rating |
X |
reject the selection |
P |
toggle the ⚑ pick flag |
Esc |
clear the selection |
← → ↑ ↓ |
move the keyboard cursor (amber ring) |
Enter |
open the cursor's photo in the loupe |
In the loupe:
| Key | Action |
|---|---|
← / → |
previous / next photo (in compare: step the candidate) |
1–5 / 0 / X |
rate / clear / reject |
P |
toggle the ⚑ pick flag |
6 7 8 9 |
colour label (red / yellow / green / blue) |
Z |
toggle 1:1 zoom |
C |
toggle compare view |
A |
toggle auto-advance (rate → jump to next) |
G |
toggle focus peaking |
H |
toggle histogram + clipping |
F |
toggle full-window loupe |
Space |
(compare) swap the two sides |
Tab |
cycle detection boxes, or move focus between compare sides |
Esc |
close the loupe |
Recognition, in the loupe (when detection boxes are shown):
| Key | Action |
|---|---|
B |
show / hide the detection boxes |
M |
toggle tag mode — draw a box to tag a subject |
T |
open the identity picker for the selected box |
Y / N |
confirm / reject the suggested identity |
Enter |
confirm the photo's first pending number hint |
Shift+I |
ignore the selected box's cluster |
The loupe's recognition tools — confirming face matches and tagging subjects — are covered in Recognition corrections.