Internal review, proofing & delivery
Team approve/reject, retouch notes, client proofing, confirm delivery.
This is the heart of the org workflow. Photos come in, your team decides what's good enough to show, the client picks their favourites, you upload the finished edits, and then you hand over the gallery — each step gated so nothing reaches the client before it's ready. Web
Everything in this chapter happens on org events (a corporate or agency event is just an album owned by your organisation). If you're a solo photographer, the equivalent client-facing flow is covered in Proofing & client delivery.
Who can do what
The review approve/reject buttons and the Send & mark delivered button are for owners and managers only. Team members with the proofer role can view and download, and leave retouching notes during proofing, but they can't approve, reject, or confirm delivery. Viewers can only look.
Turn on the review and proofing steps
Internal review is not a top-level toggle — it lives inside Client proofing. You tick Client proofing first, and then a small indented box appears with Internal review and Watermarked preview under it.
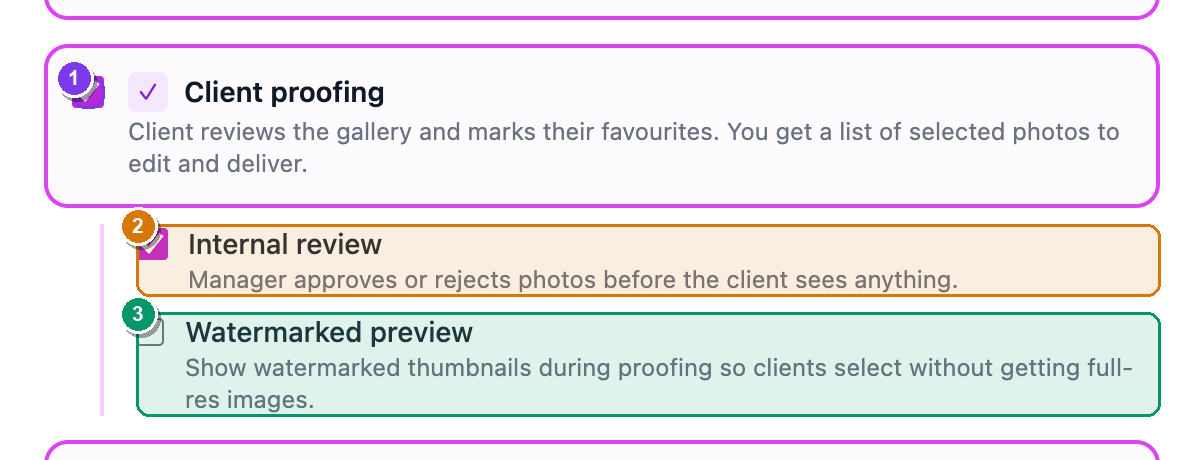 The Workflows card on the Edit event page. ① the Client proofing checkbox (a purple ✓ badge); ② once it's ticked, an indented panel appears with Internal review and ③ Watermarked preview. Tick Internal review to add the approval step, then Save changes at the bottom.
Here's the exact path, click by click:
- Open the event you want to set up. — its detail page opens, with the photo grid and (if you've turned on delivery steps) a row of phase dots near the top.
- Go to the event's Edit event page. — a two-column settings page opens, headed Edit event. The Workflows card is in the right-hand column.
- In the Workflows card, tick Client proofing. — "Client reviews the gallery and marks their favourites." The box gains a brand-blue border and a small indented panel slides open underneath it.
- In that indented panel, tick Internal review. — "Manager approves or rejects photos before the client sees anything." This adds a Review phase to the event, between Uploading and Client proofing.
- (Optional) tick Watermarked preview too. — "Show watermarked thumbnails during proofing so clients select without getting full-res images." Good when you don't want clients downloading unwatermarked previews.
- Scroll to the bottom and click Save changes. — you land back on the event, and the phase stepper now includes the Internal review step.
Untick Client proofing and you lose both
Internal review and Watermarked preview only exist under Client proofing. If you untick Client proofing, both nested options are cleared automatically — so turn Client proofing back on if you ever need them again.
The phase stepper: how an event moves forward
Once you've turned on delivery steps, the event page shows a phase stepper — a row of numbered dots near the top, with the current phase named beside them. SnapFlow builds the steps from the toggles you turned on. A fully-loaded event runs:
Uploading → Internal review → Client proofing → Finals upload → Delivered
(Turn off a toggle and that step simply disappears. The phase lifecycle is explained in full in Projects & event phases.)
To move the event to the next step, click the green/blue advance button on the right of the stepper. Its label tells you exactly where you're going:
| Button | Moves the event to |
|---|---|
| Start review → | the Internal review phase |
| Open for proofing → | the Client proofing phase |
| Upload finals → | the Finals upload phase |
| Mark delivered → | the Delivered phase (this button is green) |
There's also a small ← Back button to step back a phase if you advanced by mistake.
The gallery obeys the phase
The client only ever sees what the current phase allows. While you're in Internal review, the client sees nothing. The moment you click Open for proofing →, the approved set appears in their gallery. You never have to hide or unhide anything by hand.
Internal review: approve or reject each photo
When the event is in the Internal review phase, an owner or manager works through the incoming shots. Each photo card in the grid gains a small bar along the bottom with two buttons.
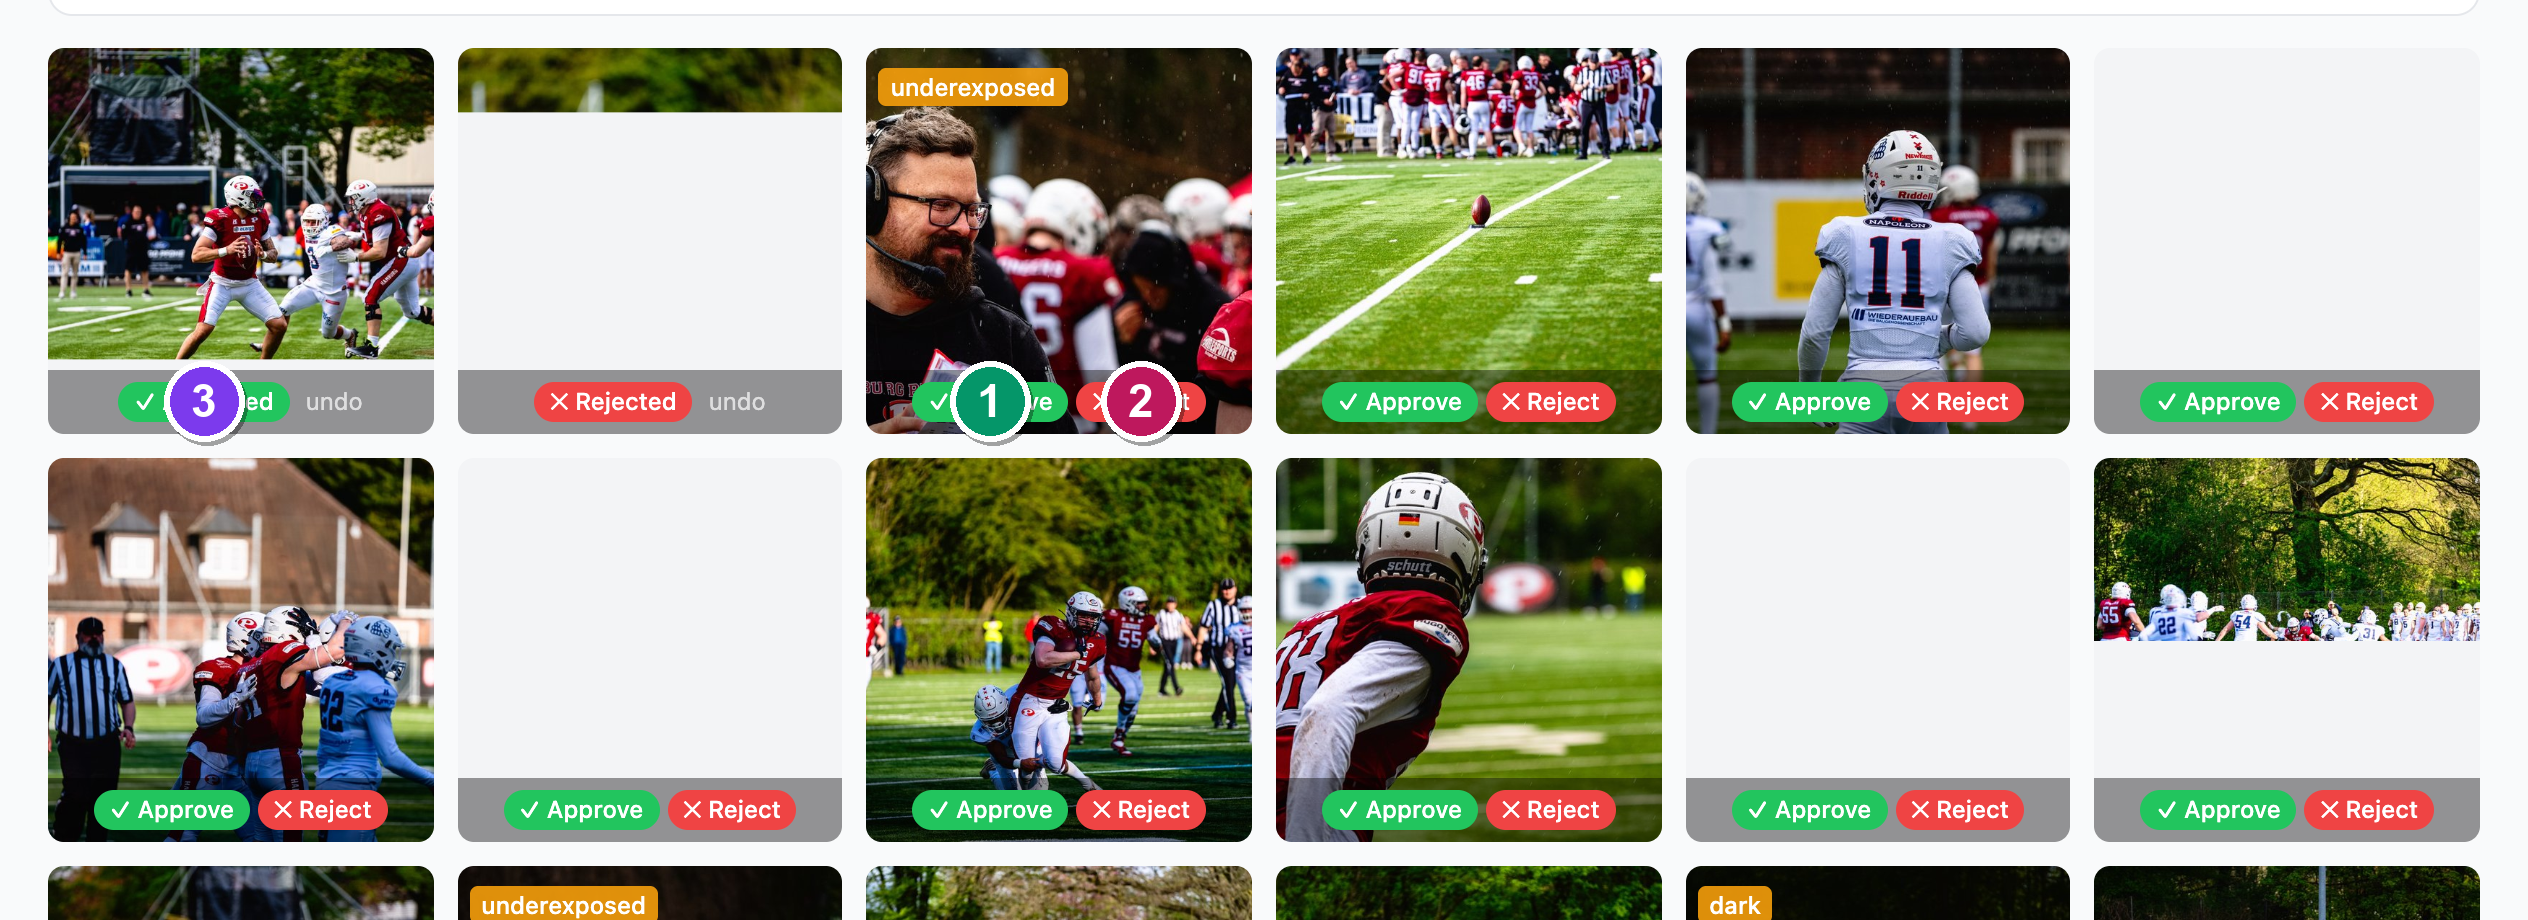 The grid during the Internal review phase. ① the green ✓ Approve button and ② the red ✕ Reject button sit on every pending photo. ③ once you choose, the photo shows a ✓ Approved (green) or ✕ Rejected (red) badge with a small undo link to reset it.
For each photo:
- Click ✓ Approve (green). — the buttons are replaced by a green ✓ Approved badge. This photo will flow on to the client.
- Or click ✕ Reject (red). — the buttons are replaced by a red ✕ Rejected badge. This photo is held back and never reaches the client.
- Changed your mind? Click the small undo link next to the badge. — the photo resets to pending and the ✓ Approve / ✕ Reject buttons return.
Only approved photos move into the client-facing proofing gallery. This is the quality gate a solo photographer does by eye; for a team it's an explicit, auditable step where the manager signs off before the client sees anything.
The Approve/Reject bar only shows during review
Those green/red buttons appear only while the event is in the Internal review phase, and only for owners and managers. In any other phase the grid is the normal photo grid.
Client proofing: the client picks favourites
After you click Open for proofing →, the event enters the Client proofing phase. The client opens the gallery, sees a banner inviting them to tap the heart on any photo, and marks their favourites — exactly like the solo flow. The guest-side experience, plus how to export the selected photos as a ZIP or CSV, is covered in Proofing & client delivery.
The one difference for an org event: when Internal review is on, the client only ever sees the approved set. Rejected and pending photos are invisible to them.
Retouching notes (during proofing)
While the client is proofing, owners, managers and proofers can leave a short retouching note on a photo the client has selected — a quick instruction back to the editor ("crop tighter", "fix white balance"). The note travels with the photo so whoever edits it sees exactly what was asked.
Here's how to leave one:
- Make sure the event is in the Client proofing phase and the client has selected (hearted) the photo. — only client-selected photos can carry a note.
- Hover the selected photo and click the small pencil icon (bottom-left of the card). — a little note box slides up over the photo.
- Type your instruction in the Retouching note… box and click away. — the note saves automatically, and the pencil icon turns brand-blue to show a note is attached.
Notes live on client-selected photos, in the proofing phase only
The pencil/note popover appears only on photos the client has selected, and only while the event is in the Client proofing phase. You won't see it during Internal review or on un-selected photos.
Confirm delivery
When the edits are done and your finals are uploaded (the Finals upload phase if you use Finals delivery), advance the event one last time with Mark delivered →. The event moves to the Delivered phase, and a green Ready to deliver banner appears for owners and managers.
 The green Ready to deliver banner, shown once the event reaches the Delivered phase. ① an optional client-email box (pre-filled placeholder client@company.com (optional)); ② the green Send & mark delivered button.
To finish the hand-off:
- (Optional) type or confirm the client's email in the box. — leave it blank and SnapFlow just marks the event delivered without emailing anyone.
- Click Send & mark delivered. — this marks the event officially Delivered and, if a client email is present, emails them a "Your photos are ready" message with a link to the finished gallery.
The banner only appears after you've advanced to the Delivered phase and before you've confirmed — once you click Send & mark delivered, the event is recorded as delivered (with the date) and the banner goes away.
The full chain
Upload → Internal review (approve/reject) → Client proofing (client hearts favourites + retouching notes) → Finals upload (your edits) → Confirm delivery (client emailed). Every gate is optional — turn on only the steps your studio actually uses. The advance buttons read Start review →, Open for proofing →, Upload finals →, Mark delivered → in order.
Editorial mode & rename-on-delivery (where to find them)
Two agency power-features change what lands in the delivered file itself:
- Editorial mode — "No AI-generated captions/keywords in delivered files; asserts the image is a genuine photograph (IPTC DigitalSourceType)." For wire desks that forbid AI-touched metadata.
- Rename delivered files — renames every delivered JPEG using a filename
template (the default is Keep original filenames; templates are managed
under Settings → filename templates, e.g.
{album_slug}_{date}_{frame:04d}).
These live on the photographer (web) album edit page — not the event Edit page
The Agency delivery card with Editorial mode and Rename delivered files is on the photographer/web album Edit page, not on the corporate event Edit event page. If you don't see them in the event's Workflows area, that's expected — they're documented in Album settings reference and the cross-surface Metadata workflows chapter, which explains exactly what gets baked into the delivered file.
Next: Reports & analytics.