Metadata & IPTC
Album defaults, per-photo IPTC, captions and keywords — on the web.
SnapFlow writes proper IPTC metadata into every photo you deliver — caption, keywords, copyright, credit and location — so your files arrive labelled and searchable in Lightroom, Capture One, Bridge or digiKam. You edit it all from one big table on the web. Web
This chapter covers what you type and where it goes. For the bigger picture — how a keyword you set in Lightroom rides into the file your agency downloads, and back again — see Metadata workflows.
Jargon, once
IPTC is the photo-industry standard for "who, what, where" labels baked into a photo file. EXIF is the camera's own data (model, lens, shutter, ISO). SnapFlow shows you both; you can edit the IPTC, the EXIF is read-only.
Open the Metadata Editor
- From your dashboard, click an album to open it. — the album page opens with its photo grid.
- Top-right, click More ▾ → Metadata editor. — a full-width table opens; the header reads Metadata Editor with the photo count beside it, e.g. "(42 photos)".
That's the page where everything in this chapter happens.
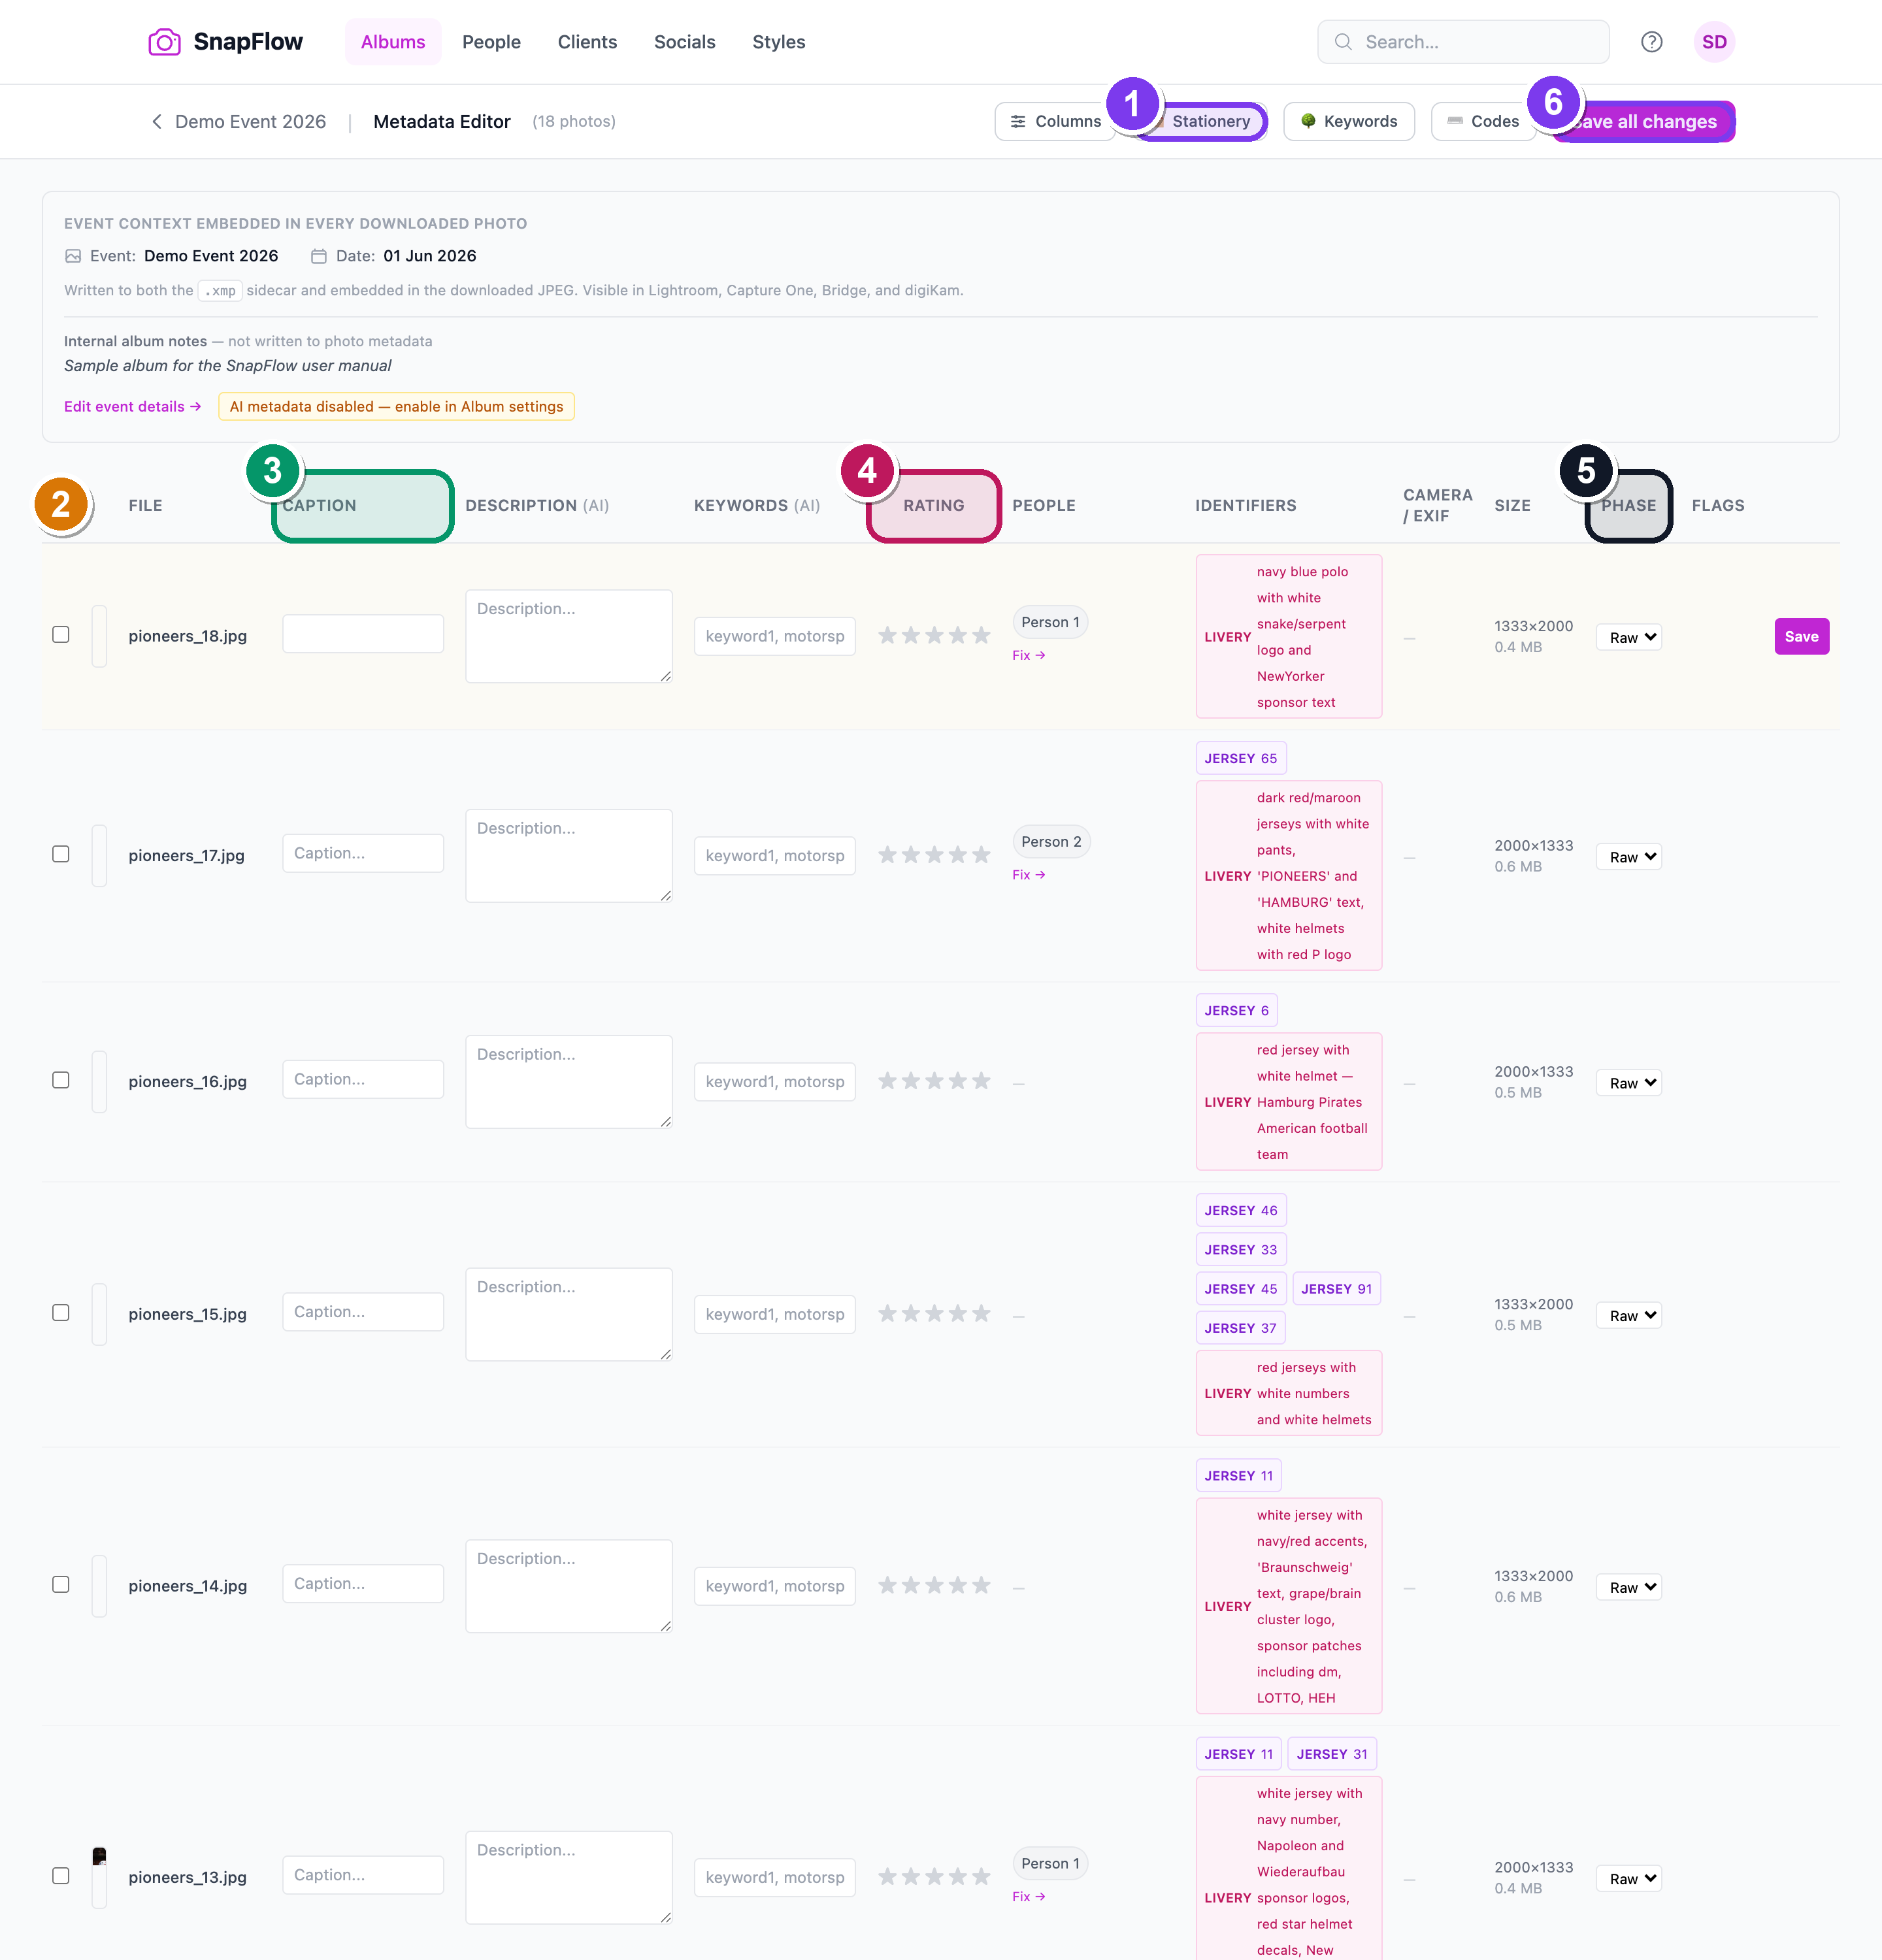 The Metadata Editor. ① the toolbar buttons — 🗂 Stationery, 🌳 Keywords, ⌨ Codes, and (Studio only) Generate missing / Regenerate all; ② the select-all checkbox at the top-left of the table; ③ the editable Caption column; ④ the Rating stars; ⑤ the Phase dropdown (Raw / Final); ⑥ the Save all changes button that appears once you edit a row.
The event banner at the top
Above the table sits a grey "Event context embedded in every downloaded photo" strip. It shows the album-wide values (event name, date, credit, copyright) that flow into every file automatically. Hover any chip to see the exact field name it maps to in Lightroom. Change these on the album's Edit album page (the link Edit event details → sits just under the strip) — see Album settings & workflows.
Reading the table columns
Left to right, the columns are:
- (checkbox) — tick rows to target them with Stationery (see below).
- (thumbnail) — a small preview; click it to open the photo's full page.
- File — the filename, plus capture date if known.
- Caption — the human caption; editable here.
- Description (AI) and Keywords (AI) — only appear on the Studio plan. AI-written description and keywords; both editable.
- Rating — five clickable stars.
- People — only appears once faces are detected. Detected people as chips; click Fix → to manage them on the People page.
- Identifiers — only appears once number/livery detection has run. Car/bib/jersey numbers as coloured chips.
- Camera / EXIF — read-only camera, lens, focal length, aperture, shutter, ISO.
- Size — dimensions and file size.
- Phase — a dropdown: Raw or Final.
- Flags — the Sneak peek checkbox (when sneak peek is on for the album).
Hide columns you don't need
Top-right, click Columns to open a checklist. Untick Detected people, Identifiers, EXIF / Camera, Dimensions, Phase / Status or Flags to tidy the table for a wide-screen edit. — the columns vanish instantly; nothing is deleted.
Not everything here is IPTC
Most columns are embedded into the file. But Phase (Raw / Final), review status and Sneak peek are curation flags — they steer SnapFlow's own workflow and are not written into the downloaded photo. Editing them is fine; just don't expect them in Lightroom.
Edit one photo at a time
To set the easy fields inline, type straight into the table:
- Click into a Caption cell and type. — the row tints amber to show it has unsaved edits, and a small Save button appears at the row's right edge.
- Click the Rating stars to rate (clicking the same star again clears it).
- Click Save on that row — or Save all changes (top-right) to save every amber row at once. — the amber tint clears and a green ✓ flashes.
The full IPTC editor (all ~20 fields)
The table only shows a handful of fields. To edit the full IPTC set for one photo, use the lightbox:
- On the album grid, click a photo to open it big (the lightbox — the full-screen single-photo view).
- In the caption strip under the photo, click the small pencil (✎, tooltip "Edit metadata"). — a dark editor panel slides up with five tabs.
- Click across the tabs and fill what you need: - Content — Headline, Caption / Description, Keywords. - Location — Sub-location (venue, corner), City, State, Country, ISO. - Credit — Creator / Byline, Copyright Notice, Credit Line, Source, Rights Usage Terms. - Job — Job Identifier, Special Instructions. - More — Caption Writer, Urgency (1-8), Intellectual Genre, Scene Codes, Subject Codes.
- Click Save (bottom-right). — the panel keeps the photo visible above while you work, then confirms the save.
Greyed placeholders = inherited
Fields like Creator / Byline and Credit Line show a faint "(inherits album default)" placeholder. Leave them blank and the photo uses the album-wide value you set on the Edit page. Type something to override just this one photo.
AI captions & keywords Studio
With AI metadata switched on for the album, SnapFlow uses Claude Vision to auto-write a description and keywords for every photo as it arrives. These are suggestions — review and tweak them before delivery.
In the per-photo lightbox editor, the Content tab has three buttons:
- ✨ Generate (next to Headline, Caption or Keywords) — writes just that field.
- ✨ All — writes the headline, caption and keywords for this one open photo.
After a generate, the status line reads "Generated. Review and Save to keep." — nothing sticks until you click Save.
To fill a whole album at once, use the toolbar on the Metadata Editor:
- Click Generate missing (top-right). — only photos with no AI text yet are queued; existing AI text is never touched. You'll see "Queued N — refresh later." If everything's already done, it says "All photos already have AI."
- Or click Regenerate all to redo the entire album. — a confirm box warns this overwrites existing AI text; on confirm you get "Queued N — refresh later."
Each Studio-only Description (AI) cell also has its own small ↻ button to regenerate that single photo.
Three things gate AI metadata — check all three
AI captions and keywords need all of the following, in order:
- A Studio plan. Only then do the AI columns and ✨ buttons appear.
- The album's AI metadata toggle ON. On the album's Edit album page → right-hand Workflows card → tick AI metadata. If it's off, the Metadata Editor shows an amber chip: "AI metadata disabled — enable in Album settings."
- Your one-time AI consent. Avatar → Settings → Data & privacy tab → tick AI processing of my photos and content → Save. Without it, generation refuses. See Account, storage & billing.
AI never clobbers what you typed
A caption you typed by hand, or one that arrived baked into a delivered file, is treated as manual — AI generation skips it. AI only fills blanks.
Stationery Pad — set fields on many photos at once
The Stationery Pad is the PhotoMechanic-style bulk tool: fill a form once, stamp it onto a whole batch. Perfect for "every photo from this race gets this credit, city and copyright."
- (Optional) In the table, tick the checkboxes on the rows you want — or tick the select-all box in the header. — leave everything unticked to target the whole album instead.
- Top-right, click 🗂 Stationery. — a modal opens, titled 🗂 Stationery Pad.
- Read the subtitle line: it says either "…copies them onto N selected photos" or "…onto ALL photos in this album," so you always know your target.
- Fill any of the 13 fields you want to set: Headline, Caption, Keywords, City, State, Country, Country code (ISO), Credit, Copyright notice, Rights usage terms, Job identifier, Source, Colour label and Special instructions.
- Click Apply (bottom-right). — the status line shows "Applied to N photos," then the page reloads with the new values.
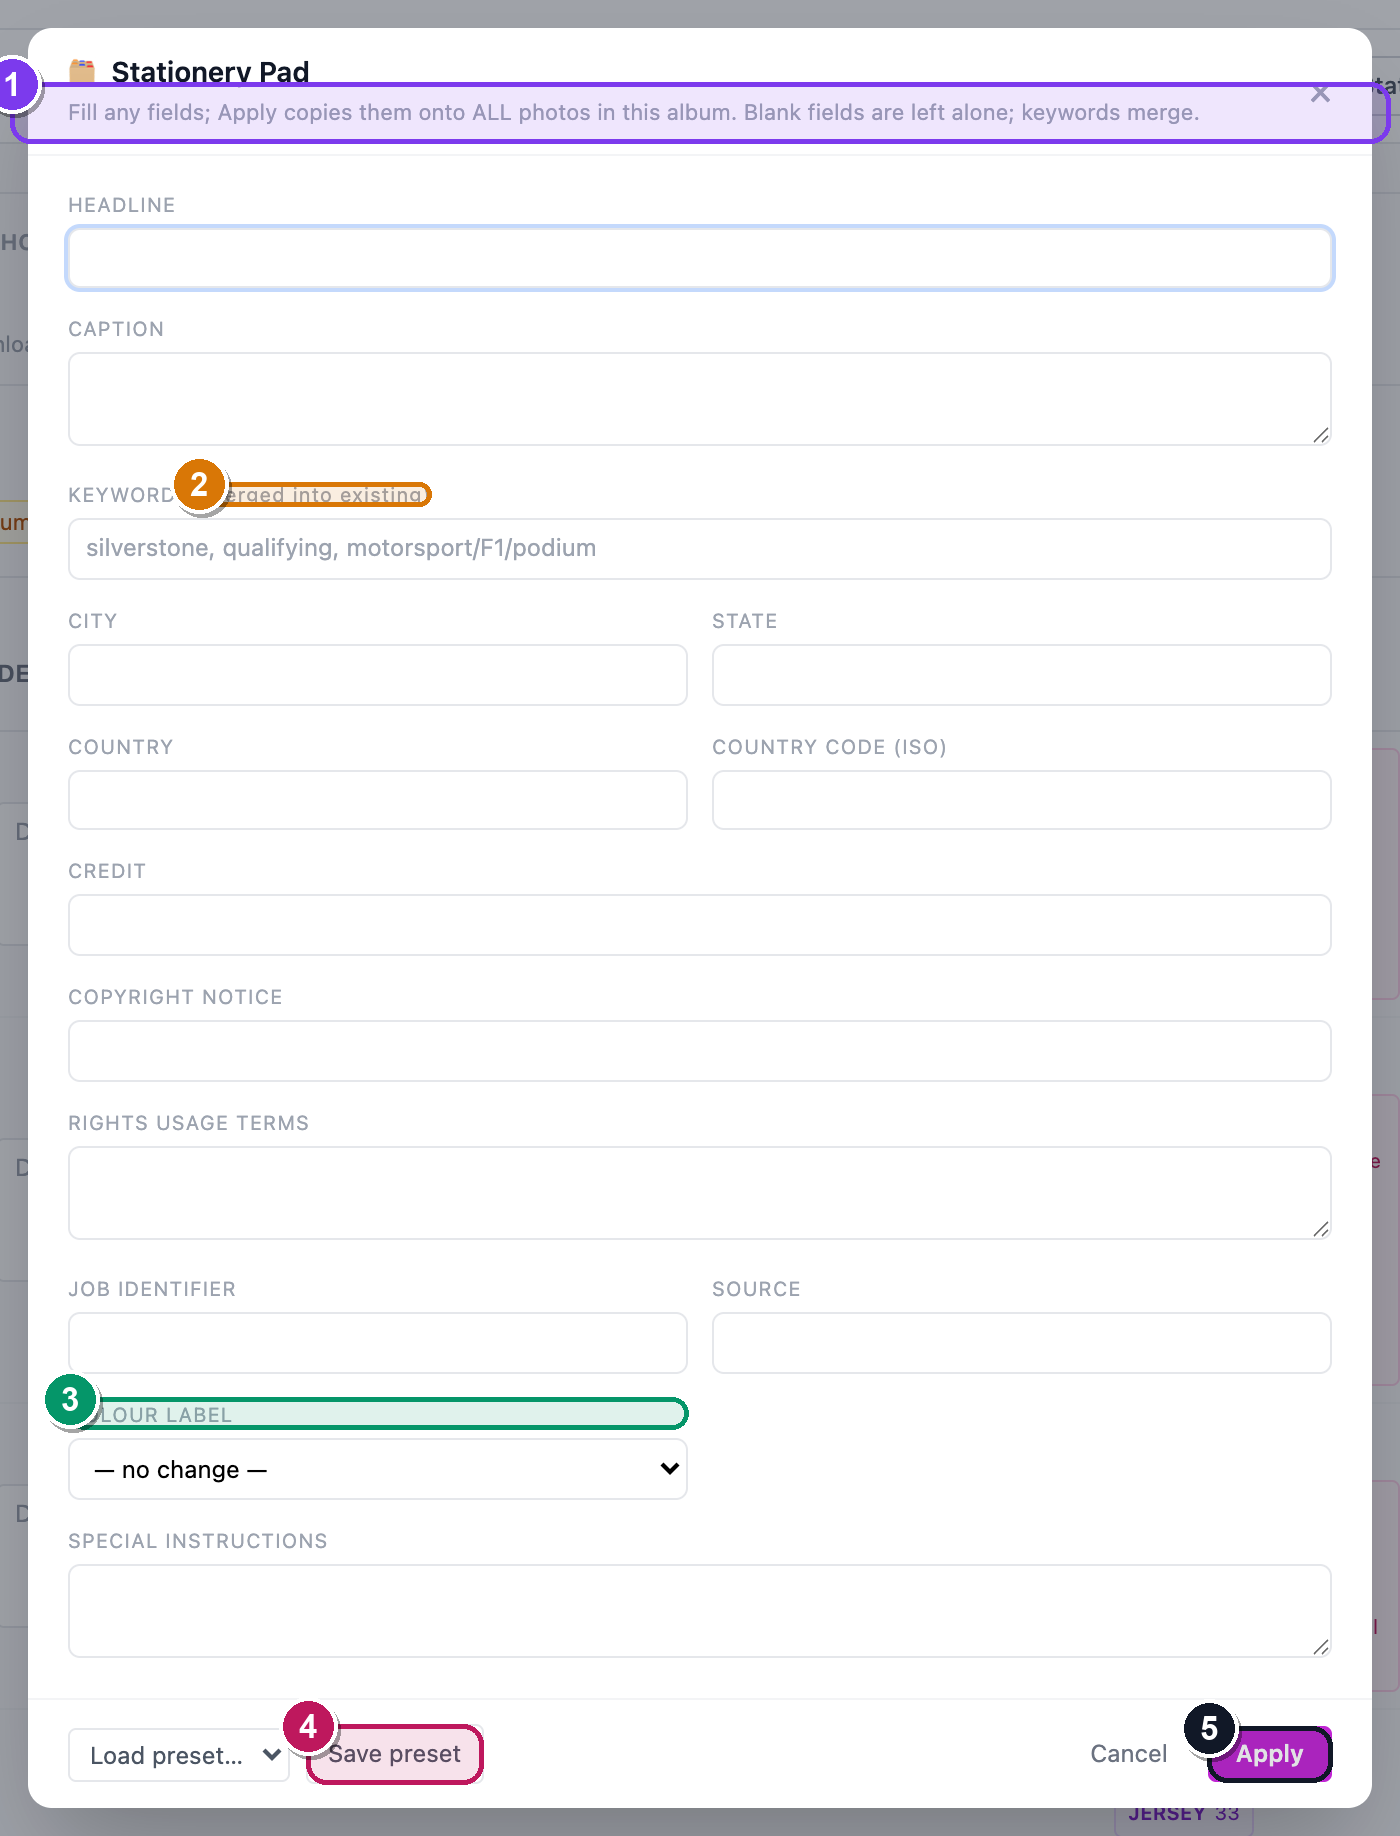 The Stationery Pad. ① the subtitle confirms the target — "N selected photos" vs "ALL photos in this album"; ② the Keywords field, labelled (merged into existing) so it adds rather than replaces; ③ the Colour label dropdown (Red / Yellow / Green / Blue / Purple, or Clear label); ④ the Load preset… dropdown and Save preset button; ⑤ the Apply button.
Blank fields are left alone; keywords merge
Empty boxes are skipped — Stationery never wipes a field you left blank. And Keywords are merged into each photo's existing list, not overwritten. Everything else replaces the matching field.
Save a Stationery preset for next time
Reuse the same stamp across events:
- Fill the Stationery fields as above.
- Click Save preset. — a prompt asks "Save this stationery as:"; type a name and confirm. The status line reads "Preset saved."
- Next time, open Stationery and pick it from the Load preset… dropdown. — the fields fill in instantly.
- To remove one, load it, then click the small ✕ beside the dropdown. — it confirms, then says "Preset deleted."
Presets follow you, web and desktop
Stationery presets are saved to your account, not the album — they show up on every album's Metadata Editor and in the desktop app's Stationery Pad too.
Keywords tree & code replacements
Two more PhotoMechanic-style helpers live on the same toolbar.
Browse your keyword tree
- Click 🌳 Keywords. — a 🌳 Keyword tree window opens, grouped by the top word of each keyword path.
- Click any path (e.g. motorsport / F1 / podium). — it's inserted into the last keyword field you were typing in.
Slash means hierarchy
Type keywords with slashes to build a hierarchy: motorsport/F1/podium. The
parts survive the round-trip into Lightroom's nested keyword tree. Anything
you've used before shows up here automatically.
Type a code, get the full text
Code replacements turn a short code into a long string — type \44 and out comes
"Lewis Hamilton, Mercedes #44." Great for athletes, sponsors and stock phrases.
- Click ⌨ Codes. — a ⌨ Code replacements modal opens.
- In the top row, type a Code (e.g.
\44) and its Expansion (e.g. "Lewis Hamilton, Mercedes #44"), then click Add. — it appears in the list below with a global or album badge. - To use it: in any caption, headline or keyword field, type the code then press space (or comma, tab, or Enter). — the code instantly expands to the full text.
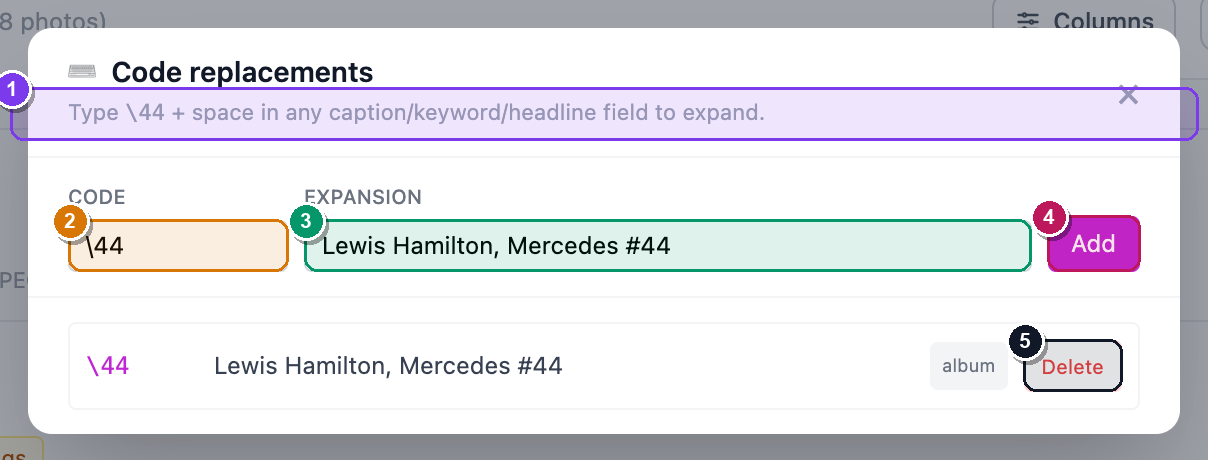 The Code replacements modal. ① the helper line — "Type \44 + space in any caption/keyword/headline field to expand"; ② the Code input; ③ the Expansion input; ④ the Add button; ⑤ a saved row showing its global or album badge and a Delete button.
Keyword autocomplete as you type
In any keyword field, after typing one character a suggestion list pops up from your keyword tree. Use ↑ / ↓ to move, Enter to accept, Esc to dismiss. It plays nicely with slash hierarchies.
Album codes win over global ones
A code you save while inside an album is album-scoped and shadows a global
code with the same name — handy when \1 means different drivers at
different events.
Where it all ends up
Everything you set here is written into the .xmp sidecar and embedded
into the downloaded JPEG at delivery — so your clients, your agency and your own
catalogue all see consistent captions, keywords, credit and copyright with no
manual re-tagging.
When a client downloads a proofing ZIP, those captions and keywords are baked into every JPEG inside it — see Proofing & client delivery.
It survives the Lightroom round-trip
Edit captions, keywords (including the slash hierarchy) or colour labels in Lightroom and they flow back into SnapFlow; what you set in SnapFlow flows out to Lightroom. The full story — what travels, which way, and how raws and finals stay one identity — is in Metadata workflows.
Also on the apps
Hierarchical keywords, code replacements and Stationery presets are now on the web too — the desktop app simply adds a few more pro tools on top (IPTC presets, photographer profiles). The desktop app Desktop app covers those in Metadata tools. On iOS iOS, metadata is viewable via the photo info sheet.