Albums
Browse, create, upload from your phone, rate, cull, and photo info.
The Albums tab is home base. Everything starts here — creating an album, flicking through photos, rating and rejecting on the move, uploading a few quick phone shots, and sharing. This chapter walks you through it one tap at a time.
Where you are
Open the app and look at the row of icons along the bottom of the screen — that's the tab bar (the four buttons that switch between the main areas of the app). The first one, Albums, is the screen this chapter is about. The others are Edit, Posts and Reels (covered in their own chapters).
Browsing your albums iOS
When you tap Albums you land on a screen titled Albums with every album you own. It can show two ways:
- List — a row per album with a small thumbnail, the name, the date and the photo count.
- Grid — bigger cover cards, two across.
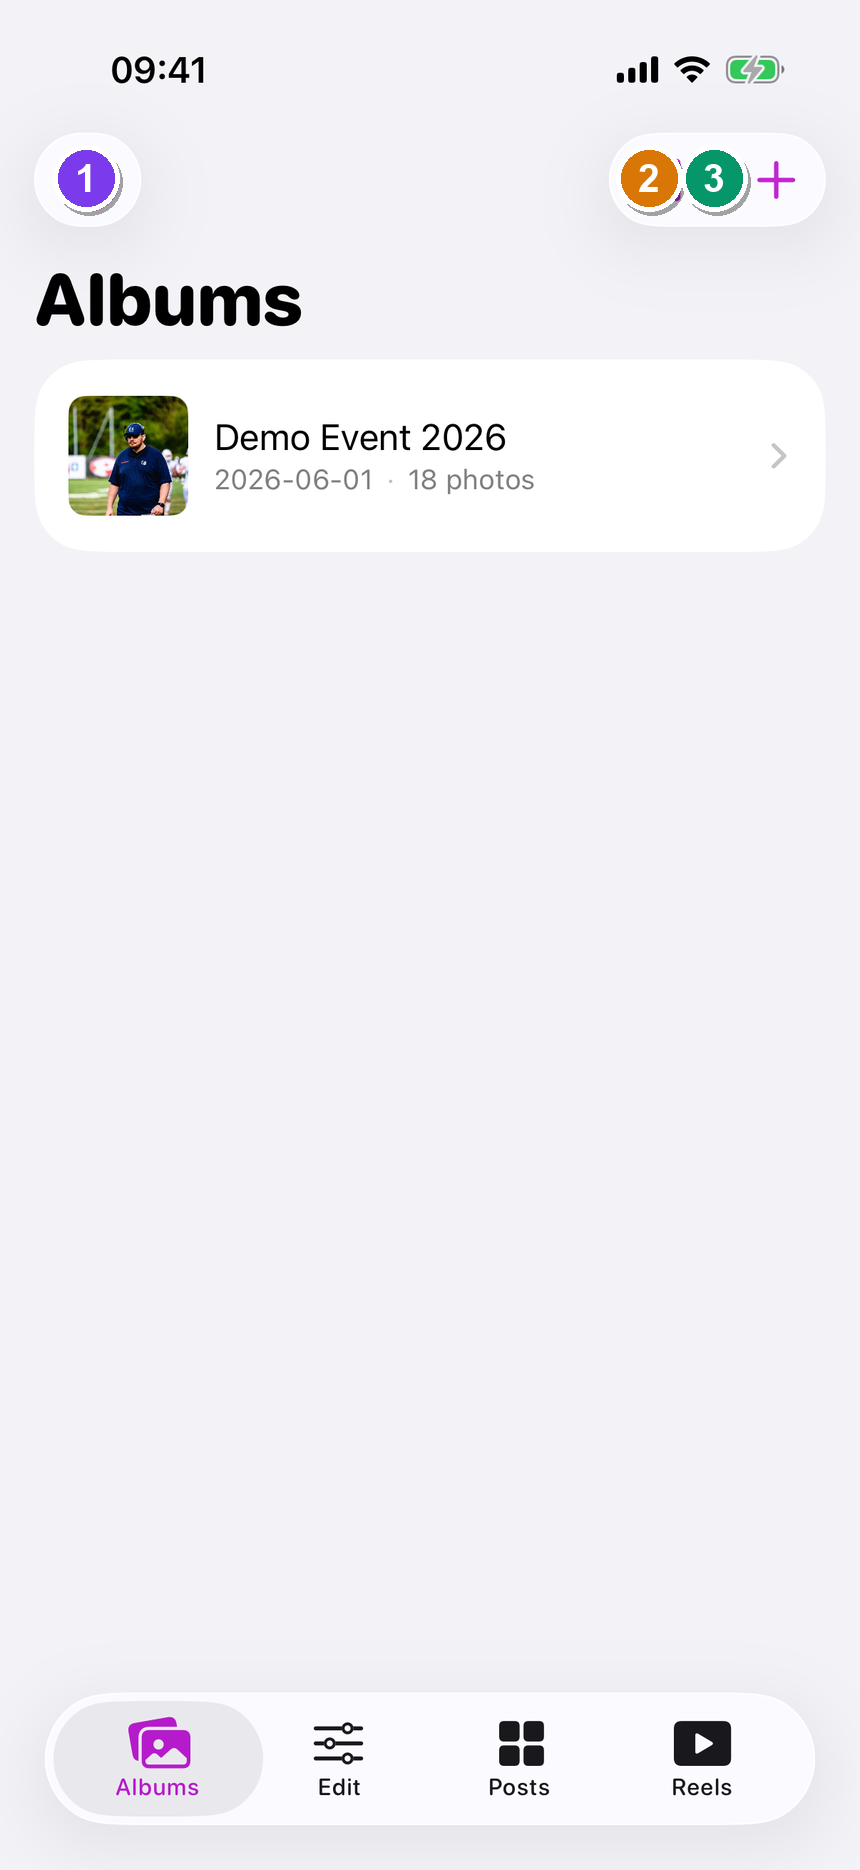 The Albums tab. ① the avatar (top-left) opens your Profile. ② the layout button (top-right) flips between list and grid. ③ the + button (top-right) starts a new album.
Here is how to find your way around:
- Tap the layout button (top-right — it shows a grid icon when you're in list view, and a list icon when you're in grid view). — the albums redraw in the other layout. Your choice is remembered next time you open the app.
- Pull the list down and release to refresh. — a spinner appears and the newest photo counts load.
- Tap any album row (or grid card) to open it. — the album's detail screen slides in (see the next section).
- Tap the avatar (the little round photo, top-left). — your Profile sheet opens, where camera FTP, AI processing and account settings live.
No albums yet?
A brand-new account shows a centred "No albums yet" card with the hint "Tap + to create your first album." Tap + to get going.
Creating an album iOS
Tap + (top-right) and the New Album sheet appears. It is one long form split into labelled sections. Fill in what you need from top to bottom — the only required field is the album name.
- In the Album section, type a name into the Name field. — this is the one thing you must fill in; Create stays greyed out until you do.
- Set the Event date with the date picker, and (optionally) type a Description (optional). — both are just there to help you find the album later.
- Decide visibility with the two toggles: Public gallery (anyone with the link can see it) and Password-protect (a passcode is required). — turning on Password-protect reveals a Password field underneath.
- In Type of shoot, tap Shoot type and pick what you're shooting (portrait, wedding, sports, and so on). — for a Sports shoot a new Sport disciplines section appears below.
- (Sports only) In Sport disciplines, tap every discipline at this event (F1, motocross, sailing, cycling, football…). — each chip you tap fills in. These chips tell the recognition AI what to look for. If your sport isn't listed, tap other_sport and type it into Name the sport.
- In the Workflow section, switch on the workflows you want: Live gallery, Proofing, Culling workflow, Finals delivery, Sneak peek. — a greyed-out toggle means your plan doesn't include that workflow yet. You can change any of these later.
- In the Recognition section, switch on the detection you want: Face detection, Bib / number recognition, Visual clustering, Helmet recognition. — see the gate below before you flip Face detection or Visual clustering on.
- In the Other section, switch on FTP uploads enabled (so your camera can upload over Wi-Fi), Watermark photos, or AI metadata if you want them. — turning FTP uploads enabled on means the camera's login details get generated and shown once on the next screen, so write them down.
- Tap Create (top-right). — the sheet closes and your new album appears in the Albums list.
Face / visual recognition needs a legal basis
The moment you switch on Face detection or Visual clustering, a new toggle appears in the Recognition section: I have a legal basis to process biometric data (with the sub-line "KUG § 23 or GDPR Art. 9(2)(a) consent — required before face / visual recognition runs."). The Create button stays disabled until you tick it. This is a legal requirement for handling people's biometric data — only tick it if it's true for your shoot.
First screen after creating with FTP on
If you turned on FTP uploads enabled, the next screen shows your camera's one-time FTP credentials. They are shown once — note them down before you move on. You can re-issue them later from the web dashboard.
Inside an album iOS
Tapping an album opens its detail screen. From top to bottom you'll see:
- Header — a one-line subtitle (the event date and photo count, e.g. "Jun 1, 2026 · 18 photos") and, on the right, a Recognize button — but only if this album has at least one recognition pipeline switched on (face, number, visual or helmet). Tapping Recognize runs detection over the album. While it's working the button reads Running… and a progress bar shows "N / total." Recognition is covered fully in Recognition on iOS.
- People strip — a horizontally scrolling row of face clusters (the groups the app made of the same person). Scroll it sideways; tap a face to open it.
- Teams strip — appears only when teams have been found. It's a row of team chips; tap a chip to share that team's photos (see Sharing on iOS).
- Quick filters — a row of chips: All · Picks · Unrated · Rejected, each with a live count so you know how many photos are in each before you tap.
- Photo grid — a three-across grid of the album's photos.
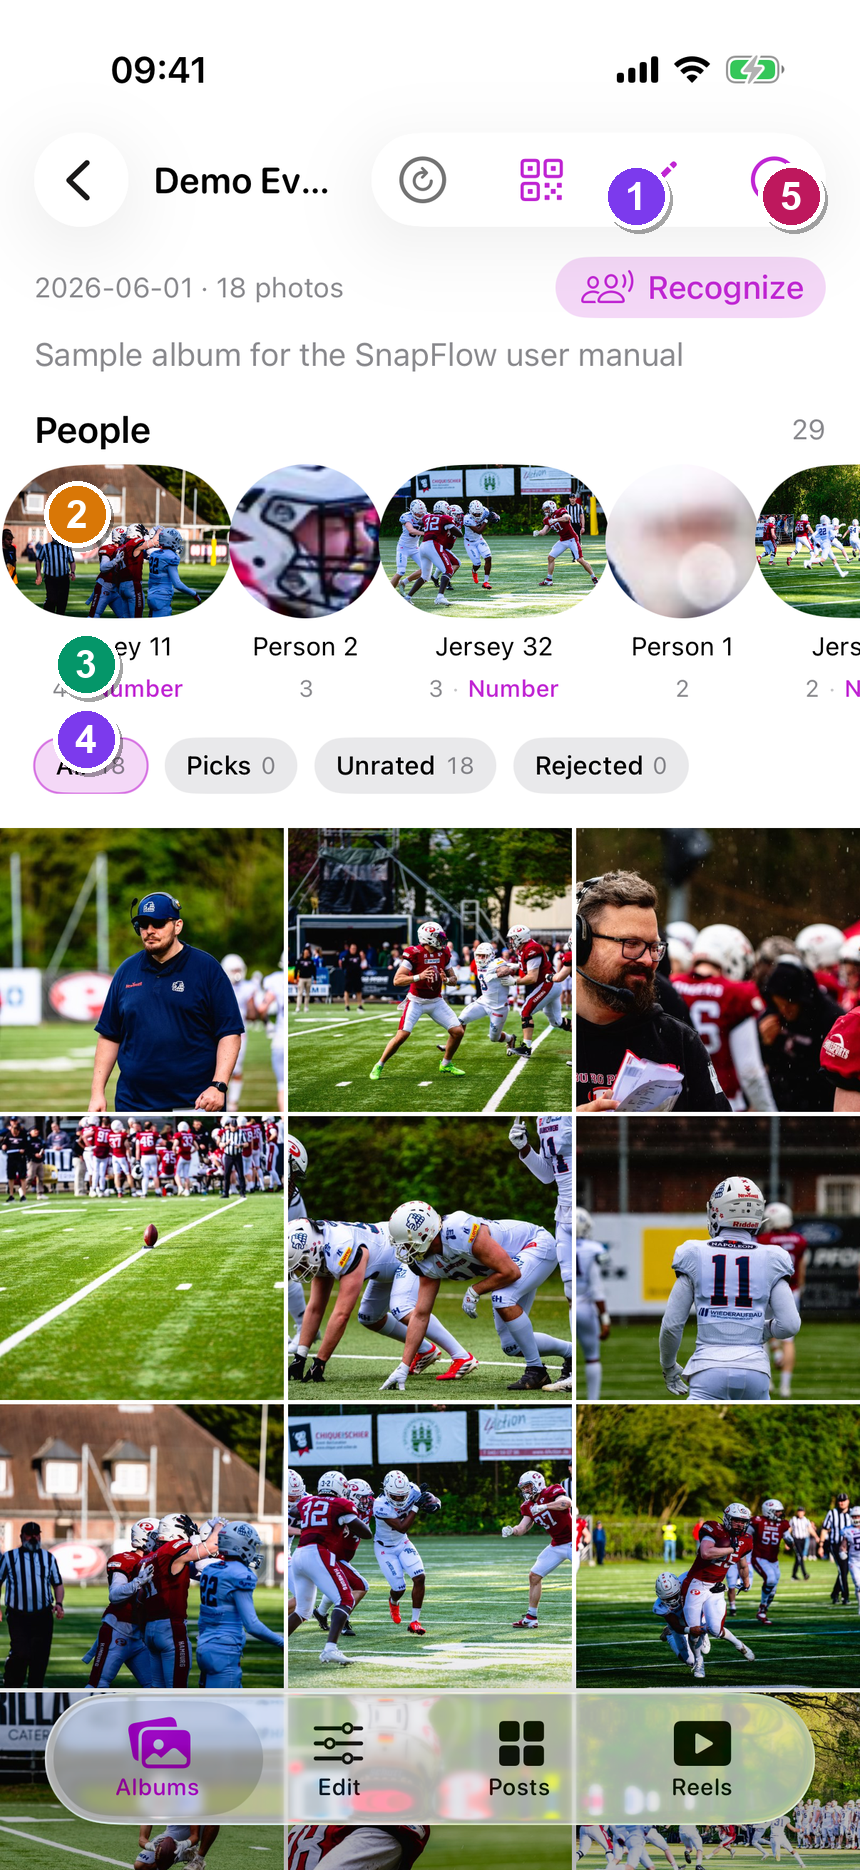 An album detail screen. ① the Recognize button (only shown when a recognition pipeline is on). ② the People strip of face clusters. ③ the Teams strip. ④ the quick-filter chips (All · Picks · Unrated · Rejected). ⑤ the upload button (top-right) — picks up to 10 photos from your camera roll.
What the four toolbar buttons do
Along the top-right of the album screen, left to right: the auto-refresh button (a circular arrow — when it's filled and coloured, the grid reloads itself every 30 seconds), the QR button (opens the album's shareable QR code — see Sharing on iOS), the pencil button (opens Edit album — see below), and the upload button (a plus-in-a-circle — covered next).
Uploading from your phone iOS
This is for grabbing the odd phone snap into an album. For the real on-location flow — camera uploading straight in over Wi-Fi — see the FTP note below.
- On the album screen, tap the upload button (top-right, the plus-in-a-circle). — the iOS photo picker opens.
- Tap up to 10 photos from your camera roll, then tap Add. — the picker closes and the upload starts; the upload button turns into a filled arrow while it works.
- Wait a moment. — a status line reads "Uploaded N photos" and the new tiles appear in the grid (ingest runs in the background, so they may take a few seconds to surface).
Where camera FTP photos land
Your camera's own FTP uploads don't go through this picker. They land in whichever album you've set as the Active album in your Profile (avatar → Profile → Camera FTP). That's the on-location workflow; the camera-roll picker above is just for one-off phone shots. See Notifications & Profile for the active-album switch.
Rating & culling iOS
You can rate and reject photos right in the grid, without opening each one.
- Press and hold any tile for about half a second. — you enter select mode: the tile gets a blue ring and a checkmark, and a dark action bar slides up from the bottom reading "N selected."
- Now tap more tiles to add or remove them from the selection. — the count in the action bar updates as you go. Emptying the selection drops you back out of select mode.
- In the bottom action bar, tap the star button. — a menu lists 5 stars down to 1 star plus Clear rating. Tap one to apply it to every selected photo.
- To reject the selection instead, tap the ✗ button. — every selected photo is marked rejected (it moves to the Rejected quick filter).
- To share the selection, tap the share button. — the iOS share sheet opens with a public link for each selected photo.
- When you're done, tap Done. — select mode ends and the rings disappear.
Rejecting isn't deleting
A rejected photo isn't removed — it just gets a rejected rating and moves under the Rejected quick filter. Nothing leaves your album from here.
The loupe (the big single-photo view) iOS
Tapping a single tile (when you're not in select mode) opens the loupe — the full-screen single-photo view. Swipe left and right to move between photos.
Across the bottom of the loupe is a rating bar: ✗ (reject), 0 (clear the rating) and ★ one through five. Tap any of them to rate or reject the photo you're looking at.
Along the top of the loupe is a row of action buttons. They appear in this order (some only show when relevant):
- Before/after (only when the photo has an AI-styled version) — flips between the styled photo and the untouched original.
- Share — generates a public link that works for 7 days and hands it to the iOS share sheet (AirDrop, Messages, Mail, and so on).
- Save to Photos — saves the photo you're looking at to your iPhone's camera roll. — a green "Saved to Photos" toast confirms it.
- Tag (only when this album has number or visual recognition on) — opens the manual tagging sheet (see below).
- Info — opens the photo's metadata (see below).
See and edit photo info iOS
- In the loupe, tap the Info button (top row, the ⓘ circle). — a sheet titled Photo Metadata slides up.
- The Headline, Caption and Keywords fields are editable — type into any of them (keywords are comma-separated: "sport, athlete, venue"). — the Save button at the top wakes up the moment you start typing.
- Tap Save. — the sheet shows "Saving…" then saves your changes back to the photo.
What you can and can't edit on iPhone
Only Headline, Caption and Keywords are editable here. Credit, Copyright and Source are shown read-only — they're usually set as album-wide defaults, and you edit those on the web dashboard or the desktop app. See Metadata for the full picture.
Tag a photo to a number or team iOS
- In the loupe, tap the Tag button (top row, the tag icon). — a sheet titled Tag photo opens. (If you don't see a Tag button, this album doesn't have number or visual recognition on.)
- Fill in any of the number fields — Car number, Bib number, Jersey number, Sail number (sailing albums only) or Bike number — and/or the Team / visual subject field. — they all save in one go.
- Tap Save. — a line confirms "Saved N tags" and the photo is added to that number or visual group.
Faces and helmets aren't tagged here
The Tag sheet only handles numbers and visual subjects. Faces and helmets are tagged from the cluster screens — see Recognition on iOS.
Editing an album's settings iOS
The pencil button (top-right of the album screen) opens the Edit album sheet. This is for tidying up the album's basics — it does not change the workflow or recognition toggles (those are set when you create the album, or on the web dashboard).
- On the album screen, tap the pencil button (top-right). — the Edit album sheet slides up with four sections.
- In Details, change the Album name or Description (optional), and toggle Has an event date to set or clear the date.
- In Gallery, flip Public gallery and Allow downloads. — a helper line under the toggles spells out exactly what guests can do with your current choice.
- In Photo metadata defaults, fill in album-wide IPTC values — Credit line, Copyright, City, State / region, Country (plus its ISO code) and Venue / sub-location (optional). — these stamp onto every photo that doesn't already have its own value, and show up as Credit, Copyright, City and Country in Lightroom and Bridge.
- In Gallery password, set or clear a passcode for the public gallery. — only used when the gallery is public; guests get a password prompt before any photos load.
- Tap Save (top-right). — the sheet closes and the album header updates.
Want to change recognition or watermarking?
The Edit album sheet on iPhone deliberately leaves the recognition pipelines, watermarking and finals-delivery toggles alone — those are better set on the big screen. Open the album on the web dashboard to change them. See Album settings.
The QR button (top-right) opens the album's shareable QR code — that's covered in Sharing on iOS.