Billing & ownership
Org plan and quotas, ownership transfer, organisation deletion.
An organization is billed as one team, not per person. Your plan, your usage gauges and the account's most serious controls live in two places — the Billing page and the org Account settings page — and the biggest ones are reserved for the owner (the one account that owns the organization). Web
This chapter shows you how to open each page, read your plan and quotas, buy more storage, redeem codes, and hand over or close the organization safely.
Who can see what
Every member can open Billing and read the gauges. Only the owner can buy storage, transfer ownership, or delete the organization. A non-owner who tries those just sees a "Delete account" option for their own seat.
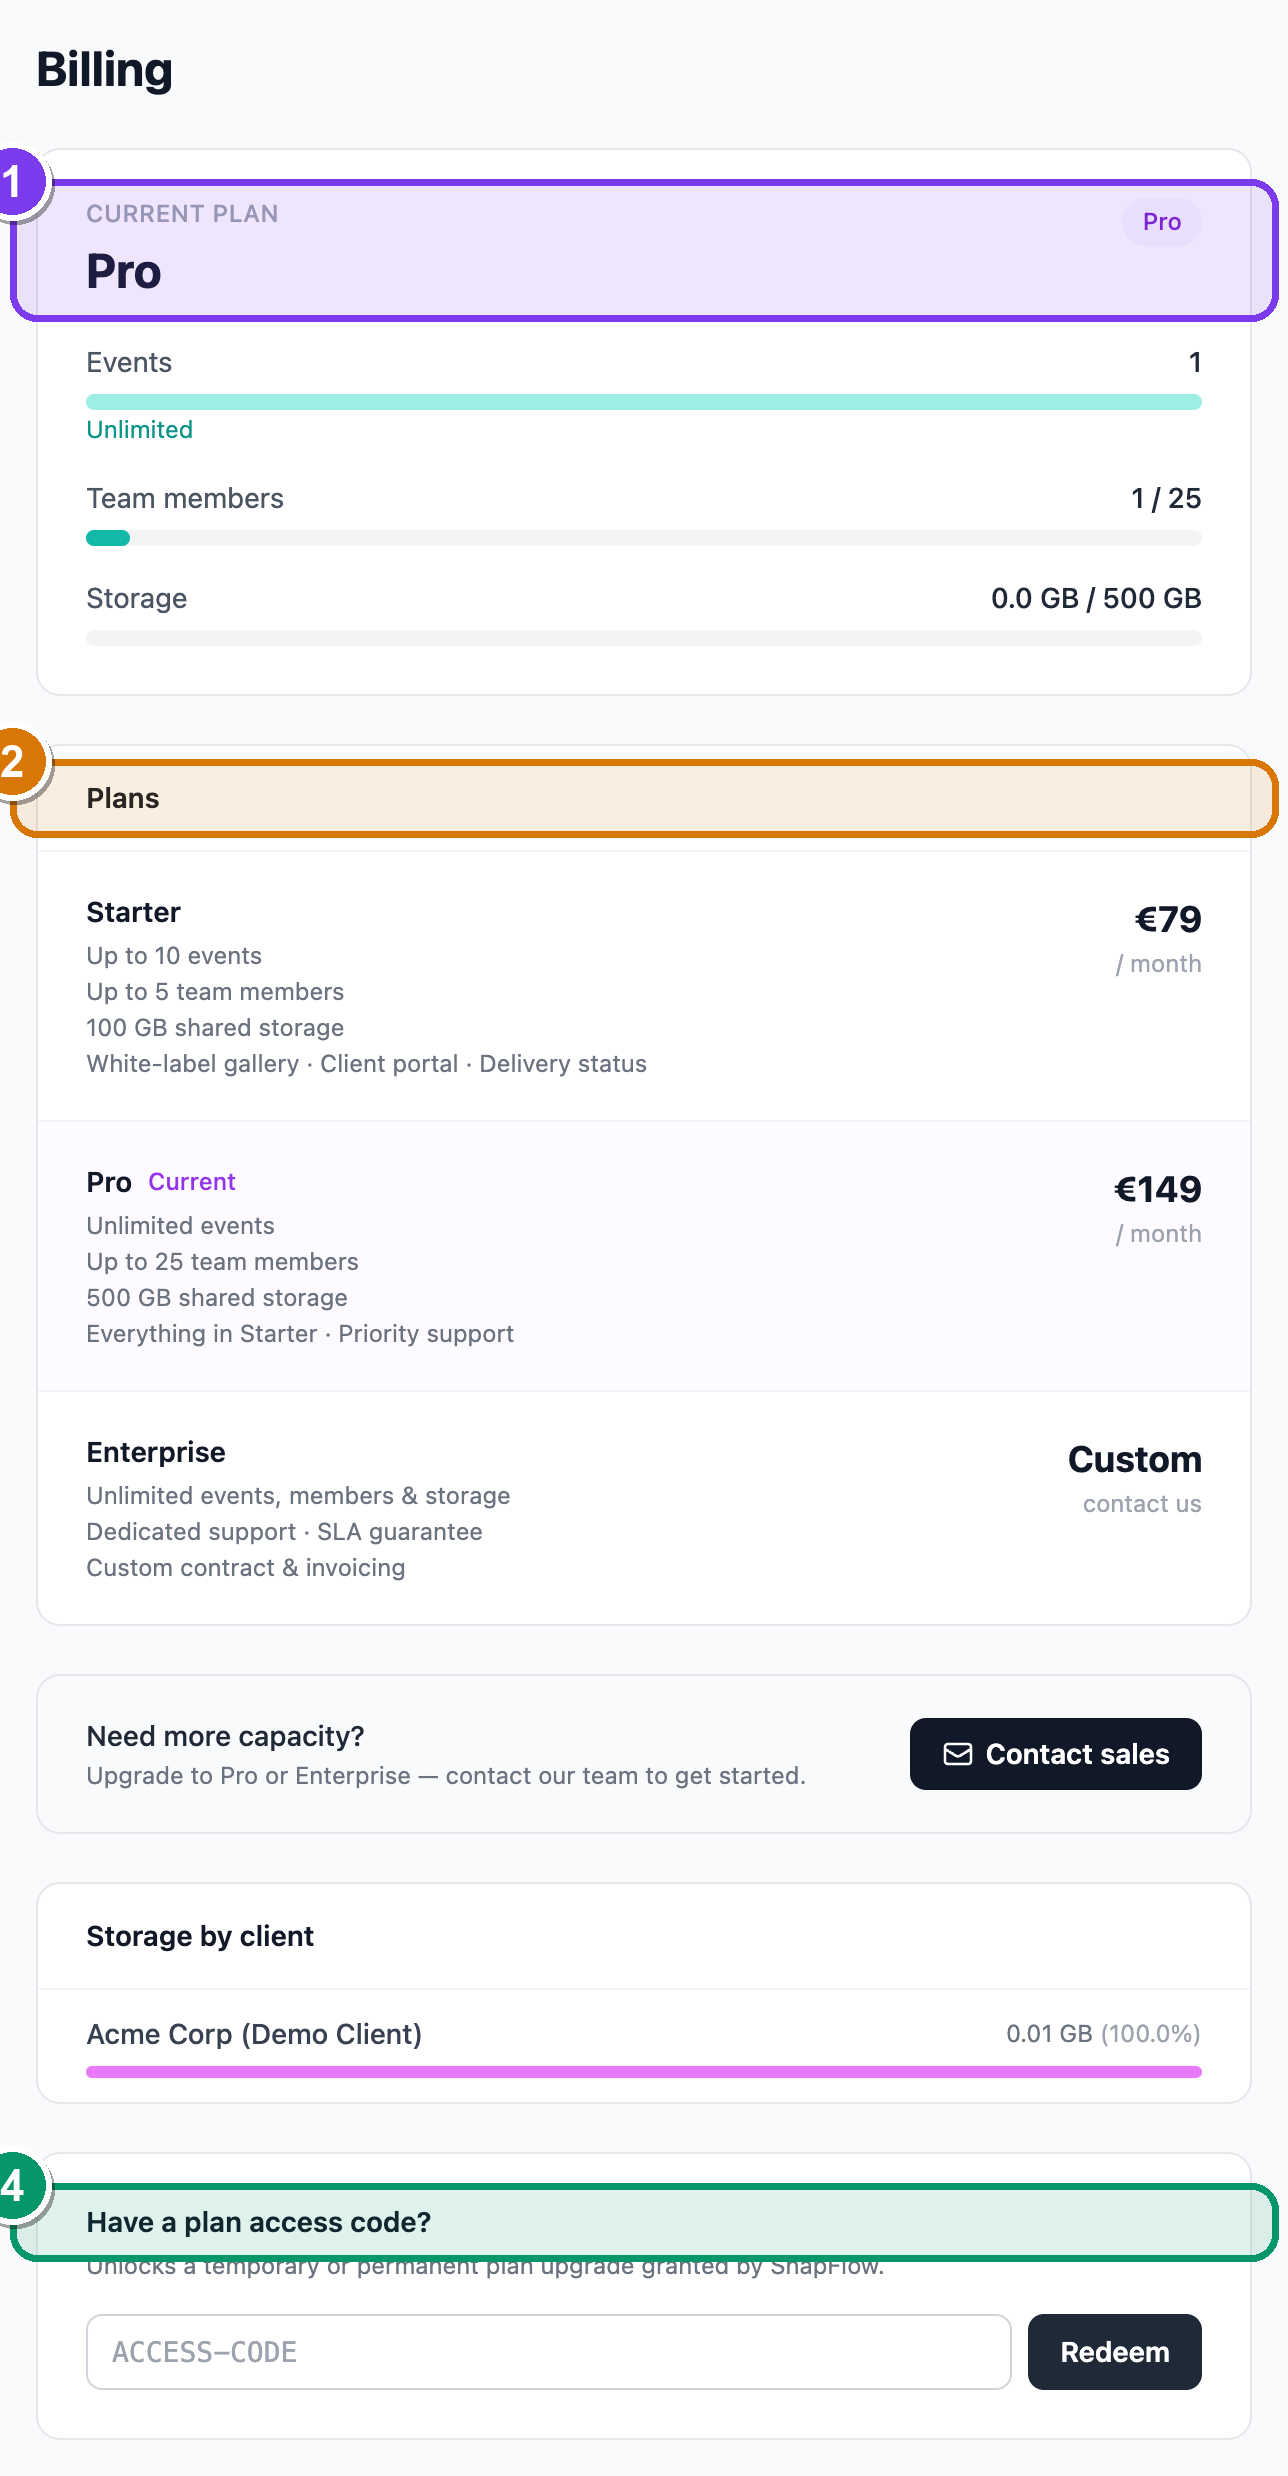 The Billing page at
 /admin/billing. ① the Current plan card with the Events, Team members and Storage gauges; ② the Plans comparison cards (the Current tag marks the one you're on); ③ Manage billing & subscription (only shows once you have a Stripe subscription); ④ the two code boxes — Have a billing discount code? and Have a plan access code?. Note there is no storage-purchase button here — that lives on Account settings (see "Buy more storage" below).
Open the Billing page
- In the top-right of any org screen, click your round avatar (the coloured circle with your initials). — a small menu drops down.
- Click Org billing (it reads Org billing · {your org name}). — the
Billing page opens at
/admin/billing.
That's it. The page is read-only for usage; it shows where you stand and gives you the buttons to change plan, redeem codes, or open Stripe.
Only org owners and managers see 'Org billing'
The Org billing line appears in the avatar menu only for organization accounts. If you came from a solo photographer account, your billing lives under your personal Settings instead — see Your account & settings.
Read your plan & quotas
The Current plan card at the top of Billing names your tier — Starter, Pro or Enterprise — and shows three usage gauges:
- Events — events you've created versus your plan's limit (Starter caps at 10; Pro and Enterprise show Unlimited).
- Team members — seats used versus your limit (Starter allows up to 5; Pro up to 25; Enterprise unlimited).
- Storage — gigabytes used versus your included allowance.
Each gauge is a coloured bar. It turns teal when you're comfortable, amber as you approach the cap, and red when you're at or over it. An Unlimited label replaces the number when your plan has no cap.
A trial-expiry banner may appear
If your plan is on a timed trial, a banner sits at the very top of the Billing page. It reads "Trial expires in N days…" (amber) or "Your trial has expired." (red) and asks you to contact us to keep your data. It vanishes once you're on a paid plan.
Change plan (it isn't self-serve checkout)
Below the gauges, the Plans card lists every tier side by side with its limits and price. The tier you're on is marked Current.
- Read the Starter, Pro and Enterprise rows to compare events, seats and storage. — the one you're on is highlighted and tagged Current.
- To move up, scroll to the Need more capacity? box and click Contact sales. — your email app opens a pre-addressed message to our team.
Moving between tiers is handled by our team, not by an in-page checkout. Use Contact sales and we'll set it up.
Plan names on agency accounts
The comparison cards show the corporate tier names (Starter / Pro / Enterprise). Agency plans render generically here — your real entitlements still apply; the cards are just the comparison reference.
Manage your card & invoices (Stripe)
Once you have a paid subscription, a Manage billing & subscription link appears at the bottom of the Current plan card.
- Click Manage billing & subscription. — the secure Stripe customer portal opens in your browser.
- In Stripe, update your card, download invoices, or cancel.
SnapFlow never sees your card details — Stripe handles all of that. If you've never had a paid subscription, this link won't be shown yet.
See where your storage is going
If clients are linked to your events, a Storage by client card lists each client with a bar showing how many gigabytes (and what percentage) their photos use. It's a quick way to spot which client is filling the account.
Buy more storage
Storage purchase is not on the Billing page — it lives on the org Account settings page. Buying more space keeps your current plan and just raises the storage allowance, charged prorated (you only pay the difference for the rest of the current billing period).
- Click your avatar (top-right) → Settings. — your personal Settings area opens.
- In the left sub-nav, click the {your org name} (org) → link (at the
bottom, under a divider). — the org Account settings page opens at
/admin/settings. - Scroll to the Storage plan card and click Manage storage →. — the
Storage plan page opens at
/admin/storage-upgrade. - Read the Current allowance card (your used-versus-included bar), then under Upgrade to a larger tier pick a card and click Upgrade to N GB (or N TB). — a confirmation pops up: "…You'll be charged the prorated difference now."
- Confirm. — your allowance jumps to the new tier and a green note appears.
Owner only
Only the org owner can change the storage plan. If you're a manager or other member, the Storage plan page shows an amber line: "Only the account owner can change the storage plan." Ask your owner to do step 4, or have ownership transferred (see below).
Already on the biggest tier?
If you're on the largest standard storage tier, the page shows a "contact us" note instead of more cards. Email us for a custom amount or a downgrade.
Redeem codes
Two code boxes sit near the bottom of the Billing page. They do different things — use the right one for the code you were given.
A billing discount code (a Stripe promo)
This box only appears once you have an active paid subscription.
- On Billing, find Have a billing discount code?. — a single field plus an Apply button.
- Type your code and click Apply. — a green confirmation appears on success, or a red error if the code is invalid.
A discount code applies a percentage or monthly discount to your existing Stripe subscription.
A plan access code (a SnapFlow upgrade grant)
This box is always shown. Use it for a code SnapFlow gave you directly.
- On Billing, find Have a plan access code?. — a field plus a Redeem button.
- Type your code and click Redeem. — a green confirmation appears on success, or a red error if it can't be redeemed.
A plan access code unlocks a temporary or permanent plan upgrade granted by SnapFlow (for example a trial extension or a partner plan).
Profile & password (every member)
Every member can edit their own name and change their password — on the org Account settings page (avatar → Settings → {org name} (org) →):
- Profile card — edit your Full name. Your Email is shown but greyed out: "Email cannot be changed. Contact support if needed."
- Organisation card — edit the Organisation name (this is the studio name members and clients see).
- Change password card — fill Current password, New password and Confirm new password, then click Save changes at the bottom of the form. Leave the password fields blank to keep your current one.
You won't find a personal "Plan & Storage" gauge here — those are org-level and live on the Billing page. If you came from a solo account and that section seems to have vanished, that's expected: it moved to Billing.
Ownership & deletion (owner only)
The most serious controls live in the red Danger Zone at the bottom of the org Account settings page (avatar → Settings → {org name} (org) → → scroll to Danger Zone). Only the owner sees the ownership and org-delete controls; everyone else sees a single "delete my own account" option.
Transfer ownership
Use this before you leave the studio, so the organization keeps running under someone else.
- In the Danger Zone, find Transfer ownership. — a short form with a member dropdown and a password field.
- Open the Transfer to dropdown and pick an active team member. — the list shows every member except you, by name.
- In Confirm with your password, type your own password. — required; a wrong password aborts with "Incorrect password."
- Click Transfer ownership. — a browser prompt asks you to confirm ("…You will lose owner privileges."); accept it.
When it completes, the member you picked becomes the new owner and you are demoted to Manager. The organization, its events and photos all stay exactly as they were.
Delete the organization (and your account)
- In the Danger Zone, find Delete organisation & account. — a password field and a red Delete organisation & account button.
- Type your password, then click Delete organisation & account. — a browser prompt warns this permanently deletes the org and ALL its events and photos; accept only if you're certain.
This removes the whole organization, every event, every photo, and the owner account. There is no undo.
If you're not the owner
A non-owner member doesn't see the transfer or org-delete controls. Instead the Danger Zone shows a single Delete account section with a Delete my account button. Type your password and confirm to remove only your own membership and account — the organization keeps running for everyone else.
These don't undo
Transferring ownership, deleting the organization, and deleting your account are all permanent. If the work needs to live on under someone else, transfer ownership rather than delete.
That completes the Organizations track. The day-to-day craft — uploading, culling, recognition, metadata and socials — is shared with the Photographer (web) track. For your personal (non-org) settings, see Your account & settings; to put your studio's name and branding on galleries, see White-label & custom domains.