Recognition corrections
Enable pipelines, run/re-run recognition, and fix clusters.
Recognition is how SnapFlow finds the people, numbers, teams, vehicles and helmets in your photos so you can deliver each person (or car, or team) their own set without hand-sorting thousands of frames. The heavy lifting runs on the SnapFlow server after you push — but the desktop app is the comfortable place to switch it on for an album and to fix the results while you cull.
This chapter is the desktop control panel. For the full story of what each pipeline does and why, see the recognition chapters in the Photographer (web) track: Recognition, Numbers & identifiers, Teams, Vehicles and Helmets. On your phone the matching chapter is Recognition on iPhone.
Jargon, defined once
- A cluster is a bundle of photos SnapFlow thinks show the same person (or helmet, or vehicle). Naming a cluster names everyone in it at once.
- The loupe is the big single-photo view you get when you click a tile.
- A pipeline is one recognition skill — faces, numbers, teams, vehicles, or helmets — that you turn on per album.
Turning recognition on for an album
Recognition pipelines live in the Album settings window, on the Recognition tab.
- In the Library stage (bottom bar, ⌘1), open the album you want — its photos fill the main pane. (See Install & connect if the stage bar looks unfamiliar.)
- Click the album's ⋯ (more) menu and choose Album settings…. — a window opens titled Album settings, with four tabs along the top: General · Style · Recognition · Sync.
- Click the Recognition tab. — you'll see a Recognition pipelines heading and the parent toggle below it.
- Tick 👤 People detection. — an amber box slides in underneath asking you to confirm a legal basis (see the warning below), and a small indented list of sub-options appears.
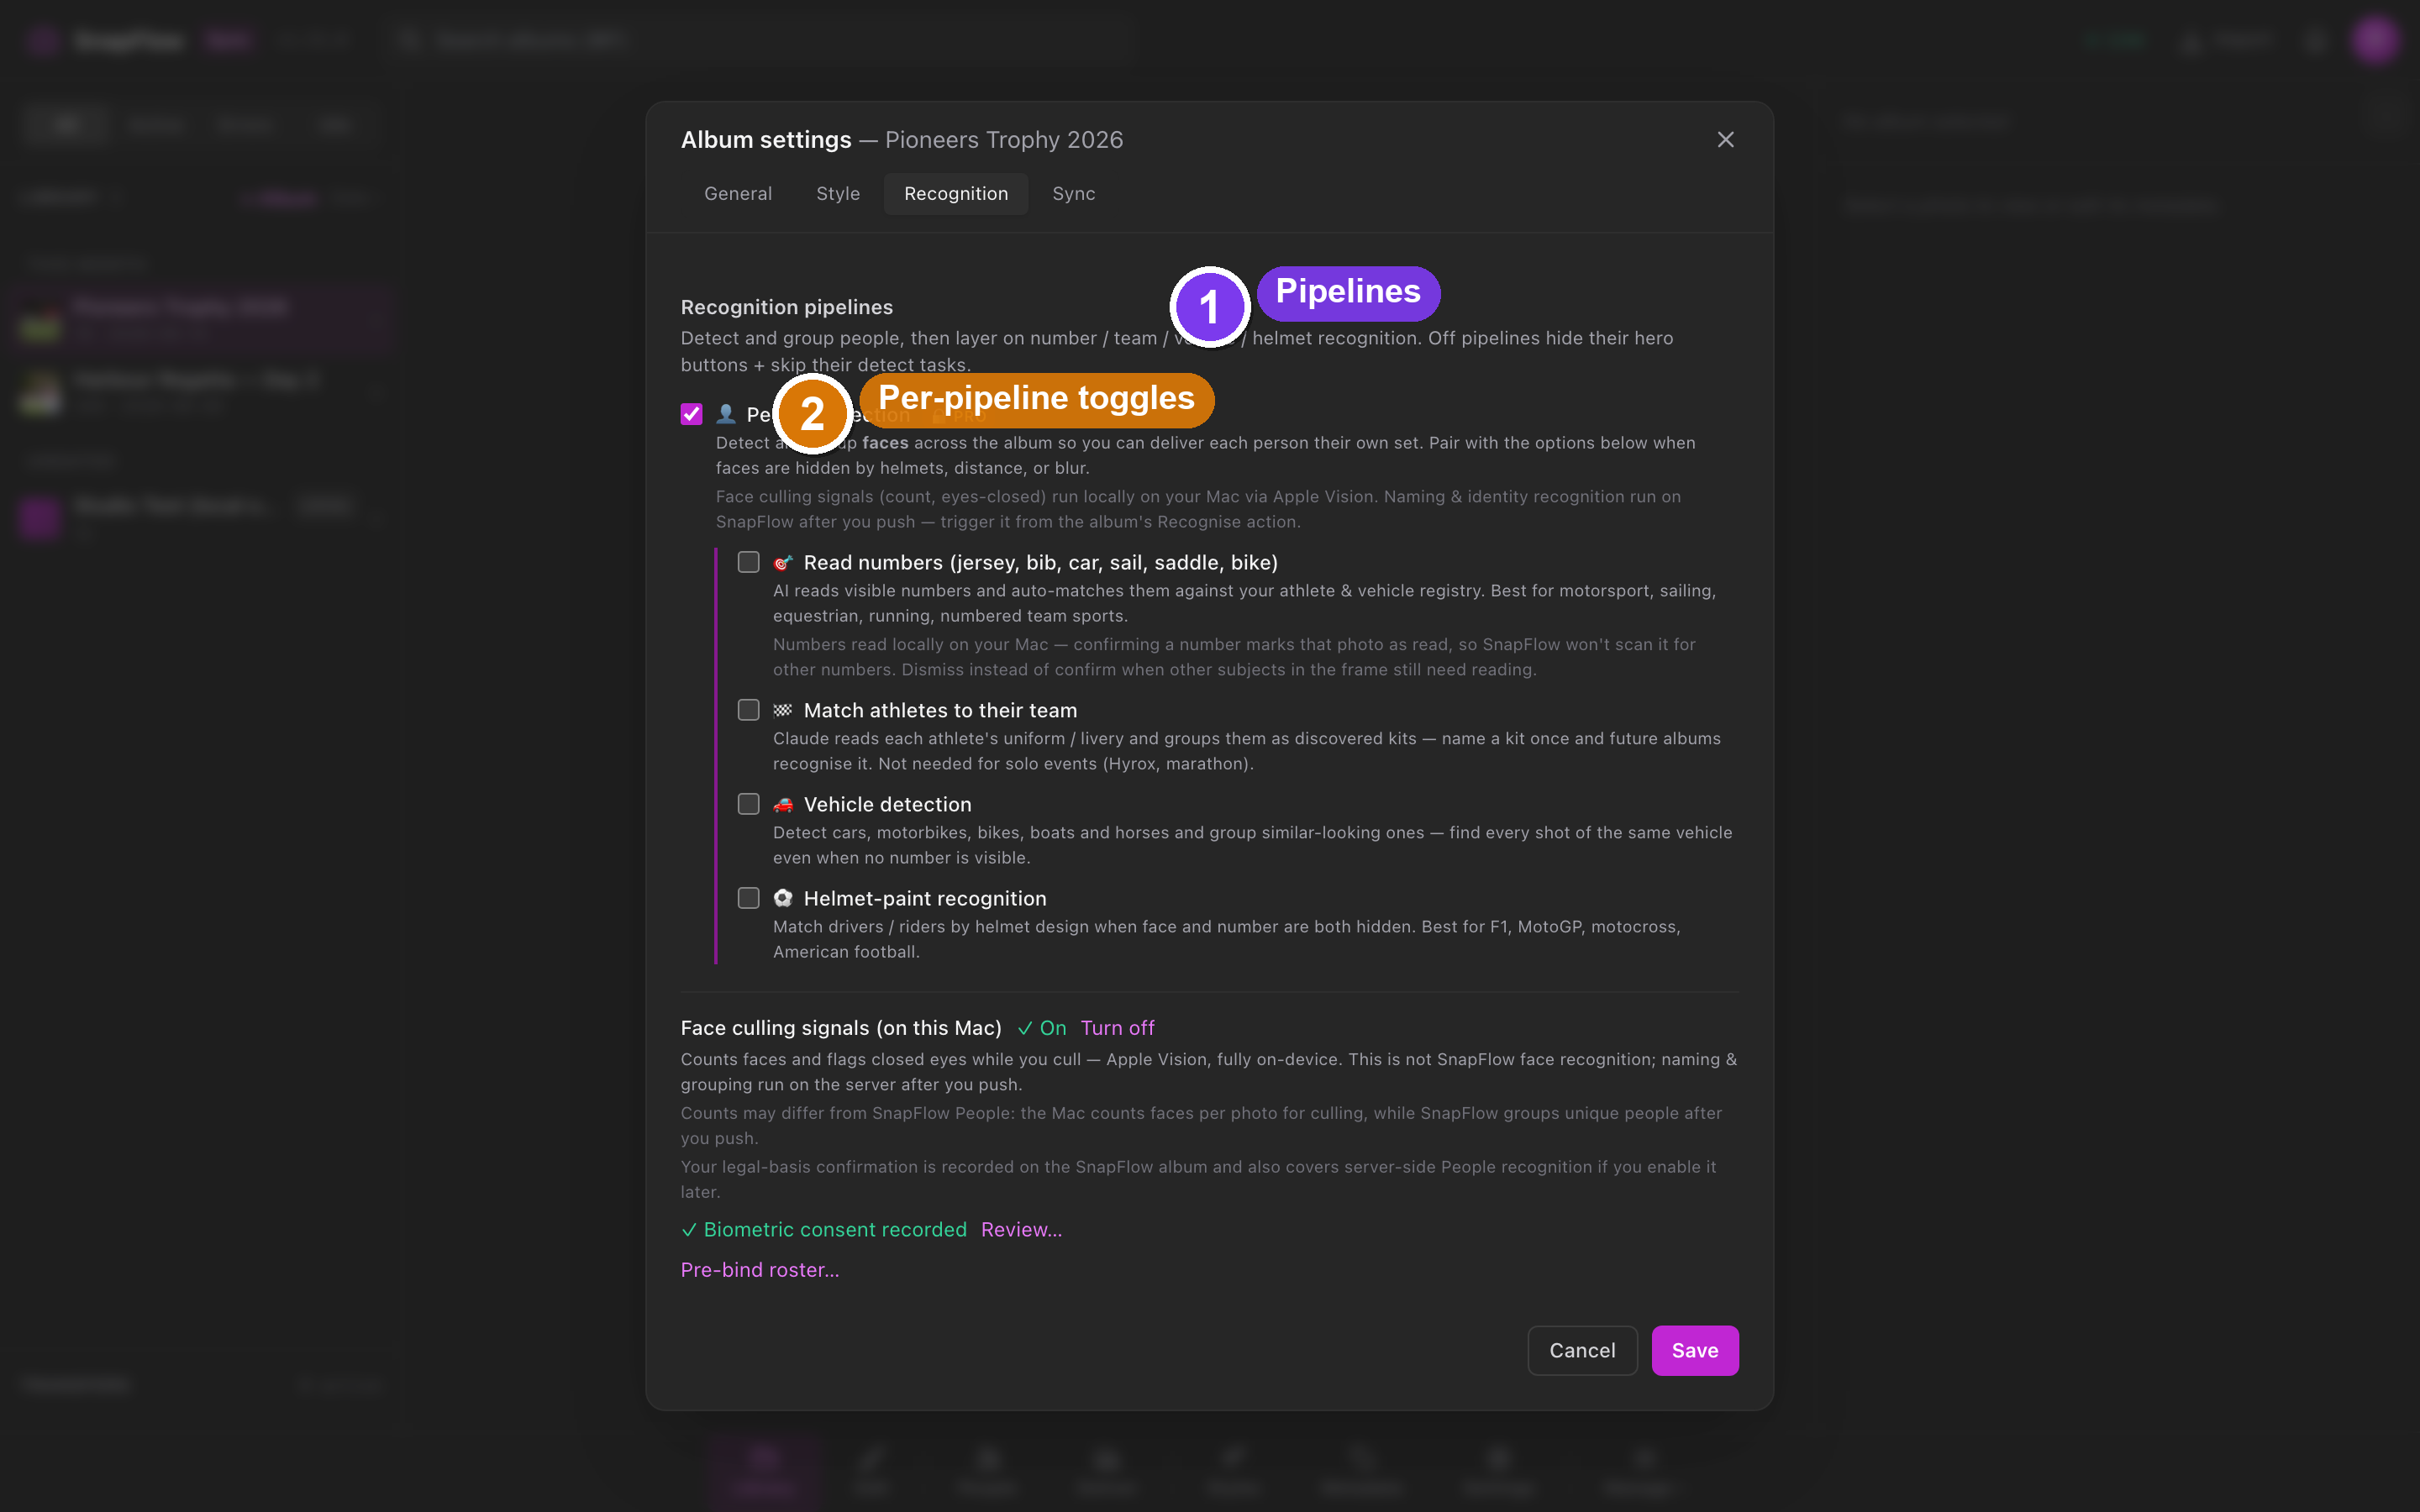 The Album settings window open on the Recognition tab. ① the Recognition tab button; ② the 👤 People detection parent toggle; ③ the four nested sub-options (Read numbers, Match athletes to their team, Vehicle detection, Helmet-paint recognition); ④ the ✨ AI metadata toggle with its 🔒 Studio pill (over on the General tab); ⑤ the amber Article 9 legal-basis checkbox.
Face data needs a legal basis (GDPR Article 9)
The first time you switch People detection on, an amber box appears with the checkbox "I have a legal basis to process biometric data." Face embeddings are special-category data under GDPR Article 9 — SnapFlow does not decide your basis, it just records that you confirmed one (it suggests KUG § 23 or explicit consent). You must tick this box or Save will fail. The confirmation is timestamped on the album for your audit trail, and it also covers server-side People recognition if you enable it later.
- Tick any sub-options you need (each is explained below), then click Save at the bottom of the window. — the window closes; from now on every photo you push is queued for recognition on the server.
The four sub-options under People detection
These only appear once People detection is ticked, because none of them make sense without it. Use the exact wording on screen:
- 🎯 Read numbers (jersey, bib, car, sail, saddle, bike) — AI reads visible numbers and matches them to your athlete & vehicle registry. Best for motorsport, sailing, equestrian, running and numbered team sports.
- 🏁 Match athletes to their team New — reads each athlete's uniform or livery and groups them as discovered kits; name a kit once and future albums recognise it. Skip it for solo events (Hyrox, marathon).
- 🚗 Vehicle detection Beta — detects cars, motorbikes, bikes, boats and horses and groups similar-looking ones, so you find every shot of the same vehicle even when no number is showing.
- ⛑ Helmet-paint recognition Beta — matches drivers and riders by helmet design when face and number are both hidden. Best for F1, MotoGP, motocross and American football.
Your plan decides what actually runs
Toggling a sub-option always saves your intent, even on a plan that does not include it — so you can set the album up ahead of an upgrade. But when you later try to run that pipeline (next section), an action your plan doesn't cover shows an upgrade prompt instead of starting, with a note to open billing on the web.
AI metadata (auto captions & keywords)
Studio
Separate from face recognition, the desktop app can have Claude write a headline, caption and keywords for each photo. The switch is one tab over, in the General tab of the same Album settings window.
- With Album settings open, click the General tab.
- Find ✨ AI metadata in the workflow toggles (it carries a 🔒 Studio pill if your plan doesn't include it). — its description reads "Enable the ✨ Generate buttons (caption / headline / keywords) in the photo inspector for this album."
- Tick it and click Save.
What changes: the per-photo ✨ Generate buttons in the metadata inspector become visible. With AI metadata off, those buttons are hidden (not just greyed out), so an album with no AI toggle simply has no Generate buttons. For the inspector itself and how to use those buttons, see Metadata (desktop).
AI metadata is independent of People detection
You can run captions/keywords without face recognition, and vice-versa. They are two unrelated toggles on two different tabs.
Running and re-running recognition
When at least one pipeline is on and has something to do, the album hero grows a Recognition pill — a small status badge with a ▾ at the end. Its colour tells you the state at a glance: grey "Recognition: not run", amber (work to do, e.g. "4 unnamed · 2 unmatched cars"), or green "Recognition: all named".
- Click the Recognition pill in the album hero. — a menu drops down listing every pipeline action (this is the Recognise action the People-detection help text refers to).
- Pick the action you need. The exact labels you'll see, depending on which pipelines are on: - Detect faces (or Re-detect faces once a run has happened) - Re-match faces — re-runs identity matching against your registry only, with no re-detection - Re-run helmet detection - Re-run subject/livery clustering - Resume identifier OCR — picks up where a previous number-reading run halted - Derive teams — re-aggregates team labels from your cluster and number bindings
- — a toast confirms "Queued: …" and the pill refreshes to show progress.
Re-detect re-spends AI calls
Re-detect faces re-runs every enabled pipeline on all photos and re-spends AI calls (for example identifier OCR), so it pops a confirm dialog first. Your manual tags and confirmed athlete links are always preserved, and new uploads are recognised automatically — so a full re-detect is rarely needed. Greyed-out lines in the menu point you to Album settings → Recognition to enable that pipeline first.
Fixing clusters on the People tab
After a run, open the album's People tab (the tab strip above the photos has Overview and People). Recognition groups similar faces — and, when those pipelines are on, numbers, teams, helmets and vehicles — into cards you can correct.
Face clusters
Each face card shows a thumbnail, the cluster name (or Unnamed), a photo count, and a coloured status chip: named (green), unnamed (amber) or ignored (grey).
- Click a face card. — the Name this cluster window opens with three modes: New athlete, Link existing and Label only. - New athlete → type a name in Athlete name → Save. This mints a registry entry, so that person matches across every album from now on (see Athlete registry). - Link existing → pick someone from the Existing athlete dropdown → Save, to attach this cluster to a person you've already registered. - Label only → type a quick Label (e.g. "Guy in red jacket") → Save, for a name that stays inside this album.
- To hide a cluster (safety car, marshals, spectators), click the small Ignore button in the card's top-right corner. — the card dims and gains an ignored chip; the button now reads Un-ignore. Hidden clusters reappear via the "Show N hidden ↗" link.
- When recognition splits one person into two cards, click Merge ↗ in a card's corner. — the Merge into another cluster window opens; pick the target and confirm Merge, and the two collapse into one.
Number cards
When Read numbers is on, number cards (e.g. #44 · car) sit in their own section on the same People tab, below the faces. Each card carries:
- Team — pin this number to a team (type the team name).
- Fix # — for car, bib, jersey, sail and bike numbers, bulk-correct a misread number across every photo in the group.
Fix # works on the desktop now
Earlier versions sent you to the web for the Fix # editor. As of the current app, Fix # is right on the number card here — use it whenever the OCR misread a digit (e.g. read #4 as #44). It only appears on the numbered types (car, bib, jersey, sail, bike).
Helmet & vehicle cards
Helmet and vehicle/livery cards work the same way visually. Click a card to rename its cluster. Naming a helmet ties future albums to the same paint design automatically. For the richer binding flows (linking a helmet to a specific athlete, building a multi-driver vehicle line-up), use the web People page — those panels are documented in Vehicles and Helmets.
Correcting as you cull, in the loupe
The fastest way to clean up recognition is to fix it while you cull, without leaving the loupe. Open any photo (click a tile, or press Enter on a grid tile), then use these keys:
| Key | What it does | What you'll see |
|---|---|---|
| B | Toggle the recognition boxes on/off | Coloured boxes appear/disappear around each detected face or subject |
| Tab | Cycle which box is focused | The active box gets a highlighted ring; Shift+Tab steps back |
| Y | Confirm the suggested identity on the focused box | The match locks in (green) |
| N | Reject the suggested identity | The wrong suggestion is cleared |
| Enter | Confirm the photo's first pending number as-is | The number hint is accepted without opening a popover |
| T | Tag the focused box — open the identity picker for it | A picker opens so you can name that box |
| M | Enter/exit tag mode to draw a new box | Your cursor lets you drag a rectangle around a person, then name them |
| Shift+I | Ignore the focused box's cluster | That cluster is hidden from the People page |
Two passes beat one
Cull first (pick keepers and reject the rest — see Culling on the desktop), then make a second pass just confirming identities on the keepers with Y/N. You only correct the photos you're actually delivering.
Write recognised names back to Lightroom
Desktop app
By default, the desktop app bakes the people and numbers it recognised into each
raw photo's .xmp sidecar — the little companion file Lightroom reads — so
the names show up when you open the shot in Lightroom or Bridge.
You control this in the app Settings (⌘7), in the toggle list:
- Write recognised names to sidecars — on by default. Its description reads "Bake detected people/numbers into each raw's .xmp so Lightroom shows them."
Turn it off if you'd rather keep recognition results inside SnapFlow only and never touch your sidecars. When it's on, the always-running metadata worker writes names into the sidecar as recognition lands — there's nothing else to click. See Metadata (desktop) for the rest of the Lightroom round-trip.
The two "face" controls, and why they're different
You'll see two face-related settings, and they do completely different things. Both live on the Recognition tab of Album settings:
- Face culling signals (on this Mac) — runs entirely on your Mac using Apple Vision. It just counts faces and flags closed eyes to help you cull. It does not name anyone, and nothing leaves your computer. Its on/off and legal-basis status show in the lower part of the Recognition tab.
- 👤 People detection — the server pipeline. This is the one that groups faces into clusters and lets you name people across albums. It runs on SnapFlow after you push.
Counts won't always match
The on-Mac face count (per photo, for culling) and SnapFlow's People count (unique people, after grouping) are measuring different things, so they can differ — that's expected, not a bug.