Album settings & workflows
The Edit page — every toggle that powers delivery, recognition and AI.
Everything about how one album behaves — what the gallery looks like, who can see it, which AI runs, how you hand the photos off — lives on its Edit album page. This chapter walks every control on that page, one card at a time. Web
Plan-gated controls
Some toggles unlock with your plan. A locked feature shows a greyed-out Upgrade / Pro / Studio pill instead of a working switch — clicking it takes you to the upgrade page. Everything in this chapter is on the web dashboard.
Open the Edit album page
There is no plain "Edit" link — the page lives behind the More ▾ menu.
- Go to Dashboard (snap-flow.org → My Albums) and click the album you want to change. — the album detail page opens.
- Top-right, click More ▾. — a dropdown drops down.
- Click Edit album…. — the Edit album page opens (the address bar reads
/dashboard/albums/.../edit, the heading says Edit album).
The page is laid out in two columns:
- Left column — the album's identity and how the gallery looks: Album name, Description, Event date, Shoot type, Advanced AI detection, Photo metadata defaults, Agency delivery, and the Gallery block.
- Right column — the per-album feature switches: the Workflows card, then Client, Privacy & Processing and Timed Release.
A Save changes button (and a Cancel link) sit at the very bottom, below both columns. Nothing you change here takes effect until you click Save changes.
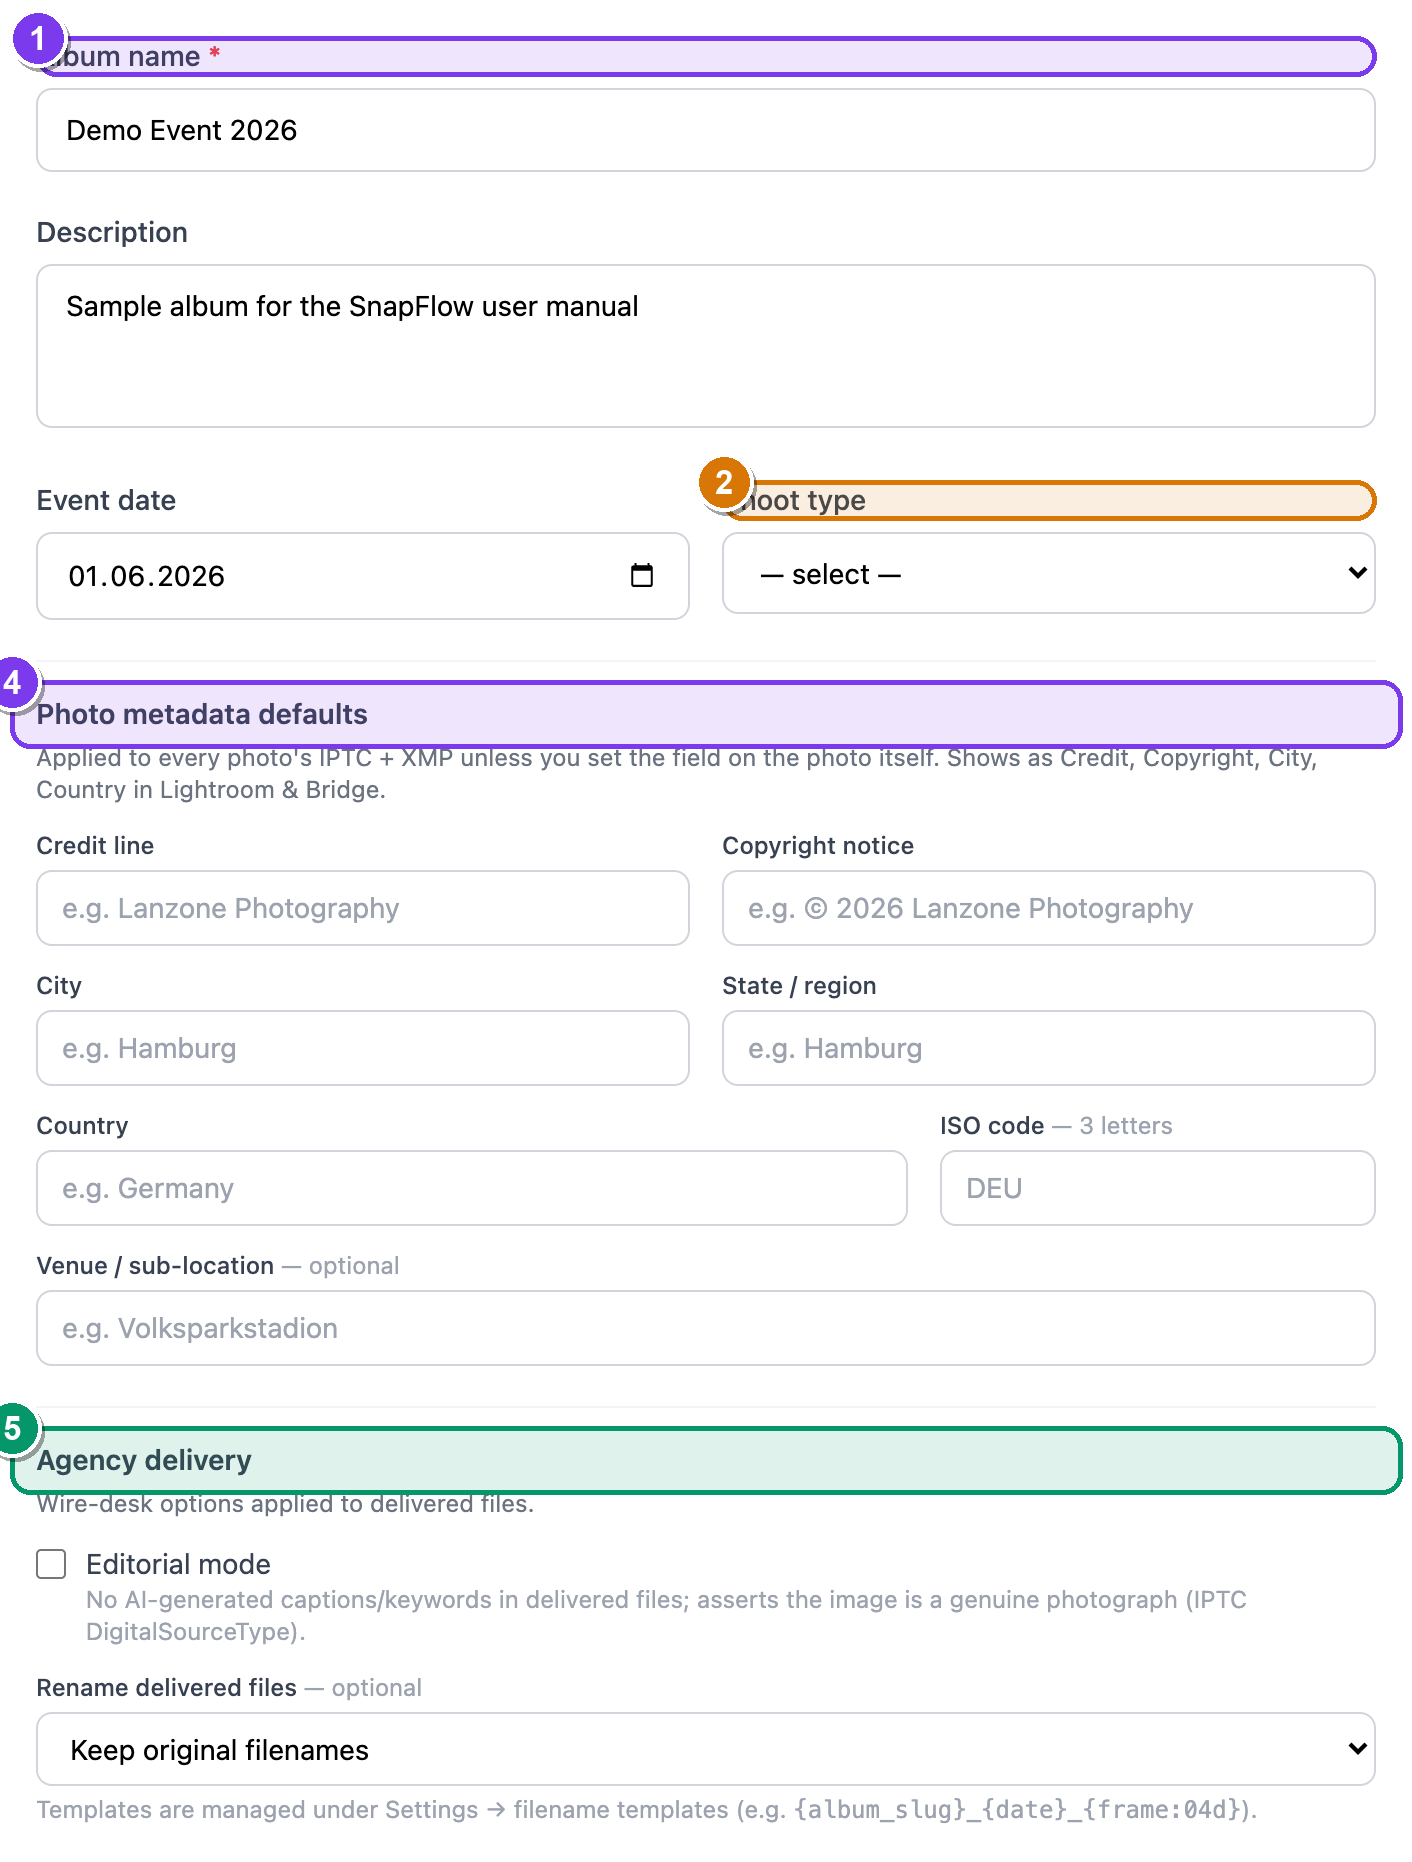 The left column from top to bottom: ① Album name (the only required field — note the red
 *), ② Shoot type dropdown, ③ the Advanced AI detection sport-chip grid (appears when Shoot type is Sports), ④ Photo metadata defaults, and ⑤ the Agency delivery card.
The left column — identity & gallery look
Album name, description, date & shoot type
- Album name — the only required field (red
*). Leaving it blank and saving bounces you back with an error. — type the event name here. - Description — optional free text shown on the gallery.
- Event date — the day of the shoot. Pick a date.
- Shoot type — choose Wedding, Portrait, Corporate, Editorial, Sports, Event or Other from the dropdown. Picking Sports reveals the next control.
Shoot type & Advanced AI detection
When you set Shoot type to Sports, an Advanced AI detection panel appears — a grid of sport chips grouped under Motorsport and Other sports.
- Tick every sport at this event (e.g. Formula 1, Sailing, Football (soccer)). — the chip fills with brand colour when selected. This tunes what the recognition AI looks for (numbers, liveries, helmets, kit).
- If your sport isn't listed, tick Other sport. — a Sport name text box appears; type the name (e.g. Padel). That label shows on the gallery instead of "Other sport."
Shoot type only tunes AI — it doesn't turn it on
Picking a sport here just tells the AI what to expect. You still switch the actual recognition pipelines on in the Workflows card (right column).
Photo metadata defaults
These seven fields are album-wide defaults. SnapFlow stamps them into every photo's IPTC + XMP unless you've typed a value on the individual photo. Set them once here instead of re-typing the venue and credit on every shot. They show up as Credit, Copyright, City and Country in Lightroom and Bridge.
| Field | What it is |
|---|---|
| Credit line | Who shot it, e.g. Lanzone Photography |
| Copyright notice | e.g. © 2026 Lanzone Photography |
| City | e.g. Hamburg |
| State / region | e.g. Hamburg |
| Country | e.g. Germany |
| ISO code | 3-letter country code, e.g. DEU |
| Venue / sub-location | optional, e.g. Volksparkstadion |
The cascade rule: a value typed on a single photo always wins; if the photo's field is blank, the album default fills in. For the full picture of how metadata travels into the downloaded file, see Metadata & IPTC.
Agency delivery
Pro The Agency delivery card holds two wire-desk options that change the delivered files (not your originals):
- Editorial mode — tick this for press/editorial jobs. — SnapFlow then puts no AI-generated captions or keywords into delivered files, and stamps the image as a genuine photograph (it writes the IPTC DigitalSourceType assertion). Use it when an agency requires that AI text is kept out.
- Rename delivered files — by default this reads Keep original
filenames. Pick a filename template here to rename every delivered file
(e.g.
{album_slug}_{date}_{frame:04d}). — templates are created under Settings → filename templates; once you've made one it appears in this dropdown.
Editorial mode and AI metadata work together
Editorial mode is the off-switch for AI text in the file you hand over. Your captions and keywords still exist inside SnapFlow — they're simply not baked into editorial deliveries. The same ZIP-export embedding is covered in Proofing & client delivery and the end-to-end round-trip in Metadata workflows.
Gallery block
The Gallery block controls the public look and access.
- Theme — pick one of four card styles:
- Classic — clean white masonry grid (any plan).
- Hero — full-width banner, then a grid (any plan).
- Dark — cinematic black background (paid plans only — shows a Pro pill on Free).
- Magazine — editorial serif headline (paid plans only — Pro pill on Free).
- Public gallery — a single checkbox. Ticked, anyone with the QR/link can view. Unticked, the gallery is private. — on the album page this same state shows as a Preview button.
- Downloads — three radio buttons:
- No downloads — guests cannot download photos.
- Web resolution (2000px) — good for sharing, not large prints.
- Original full resolution — the full-quality file (this is the default).
- Gallery expiry (optional) — pick a date/time to auto-hide the gallery.
- Gallery password (optional) — type a password to require it before the gallery opens. If one is already set, the label reads (currently set) and a Remove password checkbox appears.
Gallery look has its own designer too
The Theme picker here switches the broad style. For logo, colours, fonts and column layout, use More ▾ → Customize gallery… (the Brand Studio) — see Galleries & sharing.
The right column — the Workflows card
The Workflows card is where you switch features on for this one album. Each row is a card with a checkbox; ticking it turns the feature on the moment you Save changes.
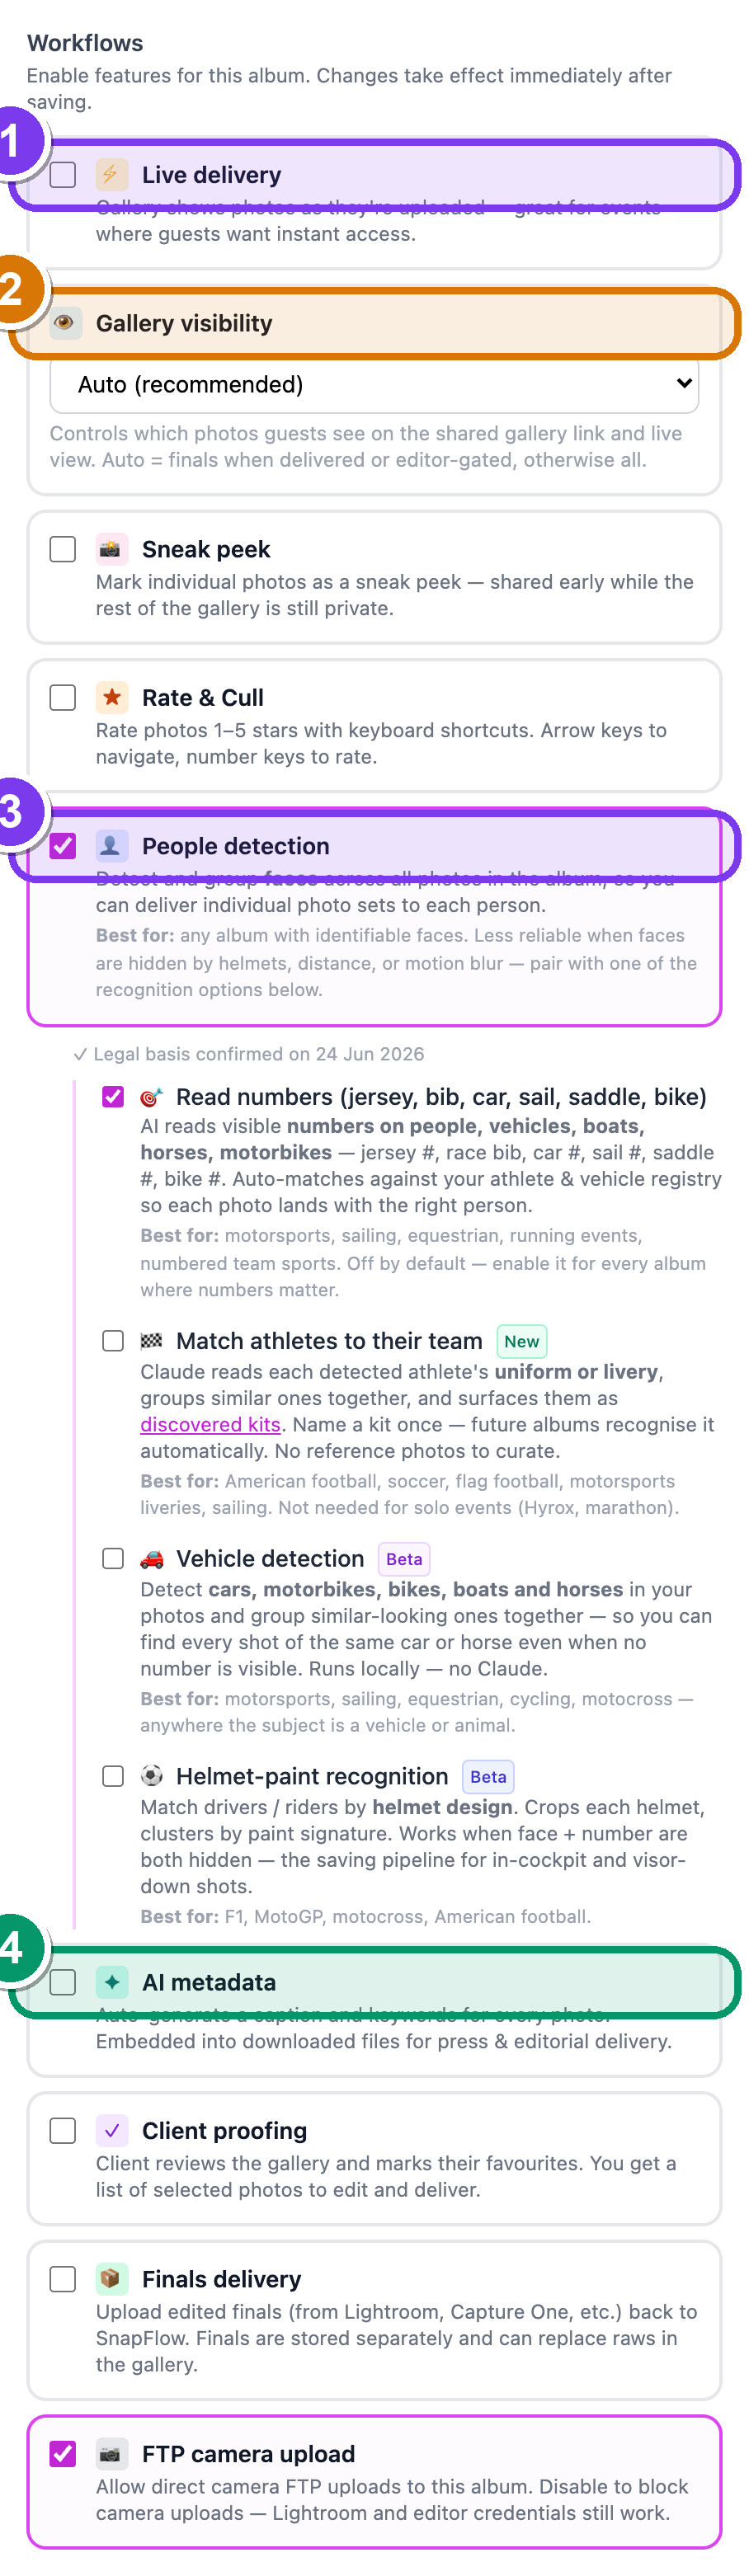 The right-hand Workflows card with everything switched on: ① Live delivery with its nested Auto Instagram and Editor gate, ② the standalone Gallery visibility dropdown, ③ People detection with the amber legal-basis box and its four nested sub-toggles, and ④ the standalone AI metadata toggle.
Live delivery
Pro Live delivery makes the gallery show photos the instant they upload — great for events where guests want instant access. Ticking it reveals two nested options:
- 📷 Auto Instagram — auto-post new photos to Instagram Stories as they upload. Ticking it reveals an account picker, a Minimum rating to post dropdown (only photos at or above that star rating go out — this is the same rating you set in culling), and a Story format choice: Original (full photo on a blurred letterbox) or Smart crop (fill the 9:16 frame using face detection). You need a connected Instagram account — see Instagram & socials.
- ✎ Editor gate — hold raw uploads back from the public gallery. An editor approves individual photos via the editor queue, and only approved shots appear live.
Live delivery is more than one switch
Ticking Live delivery here enables the feature; you still press Go live on the album page to actually start pushing frames in real time. The full two-step flow (and the Venue display) is in Live delivery & editor gate.
Gallery visibility (a standalone card)
Gallery visibility is its own top-level card — it is not nested under Live delivery. It controls which photos guests see on the shared link and the live view. Pick one from the dropdown:
- Auto (recommended) — finals when the album is delivered or editor-gated, otherwise everything. Leave it here unless you have a reason not to.
- All photos — raws + finals
- Raws only — camera uploads
- Finals only — edited photos
Sneak peek
Pro Sneak peek lets you mark individual photos as a sneak peek — shared early while the rest of the gallery stays private. You mark the photos themselves on the album grid; this toggle just enables the feature.
Rate & Cull
Pro Rate & Cull turns on the star-rating bar and the full-screen rating view (rate 1–5 with keyboard shortcuts). The full workflow is in Culling & rating.
Ratings can trigger Instagram
The star rating drives Auto Instagram above: a photo rated at or above your Minimum rating to post can queue a Story automatically. See Instagram & socials.
People detection (and its four nested options)
Studio People detection finds and groups faces across the album, so you can deliver a set to each person. It is the parent switch for the recognition sub-toggles — turn it on first.
Because face embeddings are biometric data, you must confirm a legal basis the first time you enable it:
- Tick People detection. — an amber box appears with the checkbox I have a legal basis to process biometric data in this album.
- Tick that confirmation. The amber note explains the bases: KUG § 23 (public event / person is ancillary) or explicit consent (Art. 9(2)(a) GDPR). — only now will the page save.
- Click Save changes. — face detection now runs on every photo as it uploads. Open the album's People tab to see the clusters.
Saving fails without the legal-basis tick
If you turn on People detection but skip the amber confirmation, Save
changes is rejected (422) and nothing is saved. Once you've confirmed it
once, the box is replaced by a quiet "✓ Legal basis confirmed on
Ticking People detection also reveals four nested sub-options (turning People detection off clears all four):
- 🎯 Read numbers (jersey, bib, car, sail, saddle, bike) Studio — AI reads visible numbers on people, vehicles, boats, horses and motorbikes, then matches them against your athlete and vehicle registry. See Recognition: numbers.
- 🎽 Match athletes to their team New — Claude reads each athlete's uniform or livery and groups them into discovered kits you name once and reuse. See Recognition: teams & kits.
- 🚗 Vehicle detection Studio Beta — detects cars, motorbikes, bikes, boats and horses and groups similar-looking ones. Runs locally, no Claude. See Recognition: vehicles.
- ⚽ Helmet-paint recognition Studio Beta — matches drivers/riders by helmet design when face and number are both hidden. See Recognition: helmets.
The full recognition story lives in Recognition: people & faces.
AI metadata (a standalone toggle)
Studio AI metadata is its own top-level toggle — it is independent of People detection. Ticking it auto-generates a caption and keywords for every photo, embedded into downloaded files for press and editorial delivery. (Editorial mode in the Agency delivery card overrides this for delivered files.) See Metadata & IPTC.
Client proofing
Pro Client proofing lets the client mark favourites; you get back the list of selected photos. Ticking it reveals a nested Watermarked preview option (show watermarked thumbnails during proofing so clients select without receiving full-res files). Full walkthrough in Proofing & client delivery.
Finals delivery
Studio Finals delivery lets you upload edited finals (from Lightroom, Capture One, etc.) back to SnapFlow. Finals are stored separately and can replace the raws in the gallery.
FTP camera upload
FTP camera upload allows your camera to push frames straight into this album over FTP. Turning it off blocks only camera FTP — your Lightroom and editor credentials still work. See Getting photos in.
The right column — Client, Privacy & Timed Release
Client card
- Client — link this album to a client from the dropdown (or — No client —). No clients yet? The card links you to add one.
- Client email (optional) — used for gallery-ready notifications.
- Show in client portal — let this client see the album in their portal gallery list.
Privacy & Processing
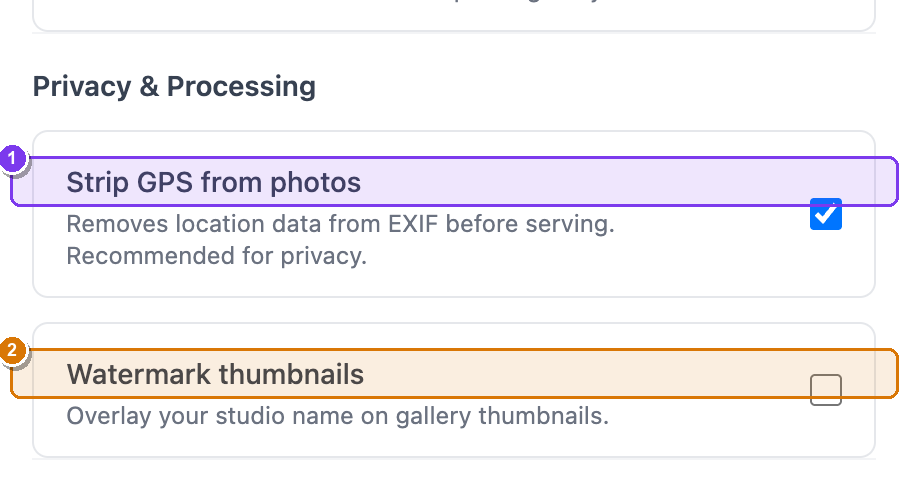 The Privacy & Processing card: ① Strip GPS from photos (on by default), ② Watermark thumbnails with its ③ Watermark text field, and ④ the Apply watermark to N existing photo(s) backfill button.
- Strip GPS from photos — removes location data from EXIF before serving. On by default, and recommended for privacy.
- Watermark thumbnails Pro — overlay your studio name on gallery thumbnails. (On Free this row shows a Pro upgrade pill instead.) Ticking it reveals a Watermark text field (e.g. © Studio Name).
- Apply watermark to N existing photo(s) — watermarking normally runs only on new uploads. This button stamps it onto photos already in the album (raw originals only). It appears once watermarking is on and there are unwatermarked raws. Clicking it asks you to confirm.
This is Watermark thumbnails, not 'watermark downloads'
The control stamps your studio name onto gallery thumbnails during browsing — it is not a separate "watermark downloads" switch.
Timed Release
Publish at (optional) — pick a future date/time. Until then the gallery shows a countdown instead of the photos. This is its own Timed Release section, separate from Gallery expiry in the Gallery block.
Save (and what's elsewhere)
When you're done, click Save changes at the bottom. To discard everything, click Cancel (it takes you back to the album page).
A few related controls live on the album detail page, not here:
- Cover photo — a picker at the top of the Edit album page; click any thumbnail to set the album cover.
- Default tag accounts (feed posts only) — the Instagram @-tagging control is on the album page's Instagram panel, not on this Edit page. It applies to feed posts and carousels only — Stories can't carry tags. See Instagram & socials.
- QR code, FTP credentials, Metadata editor, Customize gallery… and Set style are all reached from the More ▾ menu on the album page — see Create an album.
Set it once at the start
Most albums need only a handful of changes: pick a theme, set Downloads, and for sport turn on People detection + Read numbers. The defaults are sensible for everything else.