SD-card import
Card → album, filename templates and ingest profiles.
This page is about getting photos off your camera card and into a SnapFlow album on your Mac, using the desktop SnapFlow Sync app. Desktop app
The short version: plug a card into your Mac, a sheet pops up, you pick an album, you click a button. SnapFlow does the copying. Nothing is uploaded to the internet yet — the photos just land in a folder on your Mac so you can cull them first.
Don't have the app yet? Start at Install & sign in.
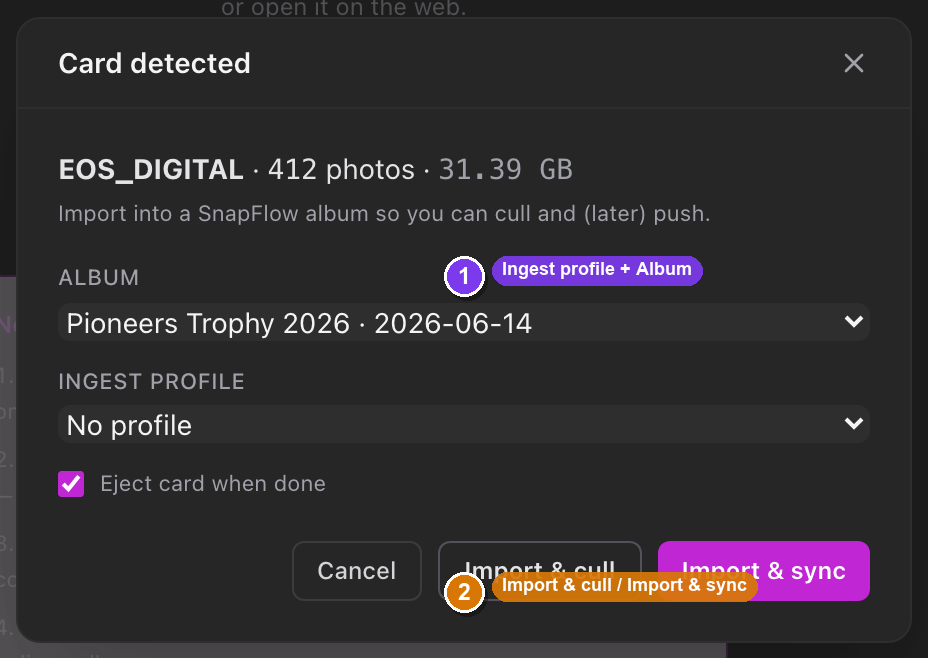 The import sheet the moment a card is detected. ① the Ingest profile dropdown (one-click recipe), ② the Album picker — open it to find ➕ New album…, ③ the Rename pattern… disclosure with its live preview, ④ the Eject card when done checkbox, ⑤ the two buttons: Import & cull (local only) and Import & sync (local and push).
Importing from a camera card
SnapFlow Sync watches for camera cards in the background. The moment you slot a card into your Mac (or a card reader), it spots it and shows you a sheet.
- Plug your camera card into your Mac. — within a couple of seconds a sheet titled Card detected slides in, showing the card's name, a photo count, and the total size (e.g. EOS_R5 · 412 photos · 18.4 GB).
- Open the Album dropdown and choose where the photos should go. — the selected album name appears in the field. (To make a brand-new album right here, see Other ways to import below.)
- Leave Eject card when done ticked if you'd like the Mac to pop the card out for you after the copy. — untick it if you want to keep the card mounted.
- Decide how to import. You have two buttons (more on each below): - Import & cull — copies the files onto your Mac only. - Import & sync — copies onto your Mac and pushes to SnapFlow straight away.
- Click your chosen button. — the sheet switches to a progress view reading Importing to <album>… with a moving bar and a live counter.
When it finishes you'll see a success message ("Imported N photo(s)") and the
photos appear in the album grid, ready to cull. The files land on your Mac in
~/SnapFlow Sync/<album>/raws/.
It's effectively instant on a modern Mac
When the card and your sync folder are on the same drive, SnapFlow uses an APFS clone instead of a byte-by-byte copy — so a full card lands almost immediately, no matter how big it is. Re-inserting the same card later only brings in the frames that aren't already there.
The two import buttons
These two buttons do the same copy — the difference is whether SnapFlow also pushes the photos up to the cloud.
- Import & cull (its tooltip reads "Copy files locally only — cull first, push later") — the everyday shoot-day choice. Photos copy onto your Mac and nothing leaves it. You can rate, reject and cull in peace, then push only your keepers later. See Culling on the desktop.
- Import & sync (tooltip "Copy files locally AND push to SnapFlow immediately") — copies onto your Mac and uploads to SnapFlow at once. Use this when speed of delivery beats culling — a live event where the gallery needs filling fast. How the push works is covered in Sync: receive & send.
Your originals are never touched
Import only ever copies files. The originals stay on the card exactly as they were until you choose to format the card in your camera.
Other ways to import
A camera card is the common case, but it isn't the only way photos get in.
Import from a folder or a drive
The card watcher only fires for a freshly-inserted camera card (one with a
DCIM folder). If your photos are already on your Mac, on a USB drive, or on a
card that's already mounted, pull them in by hand.
- In the top toolbar of the app, click the Import button (the down-arrow icon, tooltip "Import photos from a folder or drive…"). — a native macOS folder picker opens.
- Choose the folder (or drive) that holds your photos and confirm. — the same import sheet appears, but its title now reads Import from folder instead of Card detected.
- Pick an album and click Import & cull or Import & sync, exactly as for a card. — the Eject card when done option is hidden, since there's no card to eject.
SnapFlow walks the whole folder tree, so nested sub-folders are all picked up.
Import straight into a brand-new album
You don't have to create the album first.
- In the import sheet, open the Album dropdown and choose ➕ New album… (the last option in the list). — a small New album name text field appears just below the dropdown.
- Type a name for the album. — for example, Hyrox Hamburg.
- Click Import & cull or Import & sync. — SnapFlow creates the local album on the fly and imports straight into it. (If you chose Import & sync, it also publishes the new album to SnapFlow so there's somewhere to push to.)
Watch the free-space line
When you're copying from a card or drive onto a different disk, SnapFlow checks there's room first. If there isn't, a red line appears under the card info — "Not enough space — needs X, only Y free. Free up space or pick another destination." — and both import buttons go grey until you free up space or pick a roomier destination. A safe import shows a quiet grey line instead: "Needs X · Y free on the destination." (Same-drive clone imports skip this check, since they barely use any space.)
Ingest profiles
An ingest profile is a one-click recipe that bundles three things — a filename template, an IPTC metadata preset, and a photographer profile — so the same kind of shoot is always processed the same way. Pick one from the Ingest profile dropdown near the top of the import sheet and all three apply at once.
Hidden until you make one
The Ingest profile dropdown only appears in the import sheet after you've created at least one profile. Until then, the sheet stays simple.
To create or edit profiles, go to the ⌘7 Settings stage → Ingest profiles card → Manage ingest profiles…. — the Ingest profiles window opens, where you can name a profile and pick its template, IPTC preset, and photographer profile. Mark one as the default and it's pre-selected on every import.
Profiles can copy to a backup at the same time
Each ingest profile has an optional Backup target (optional) field — a
second folder path (an external drive or a NAS, e.g. /Volumes/NAS/2026-finals).
When set, every imported file is also copied there during the import. The
helper line reads "Originals also copied here during SD ingest." If the
backup copy fails it never aborts the main import — it just shows up as a
note in the summary.
Renaming files as they import
Camera filenames like IMG_0042.CR3 are fine, but most photographers prefer
something descriptive. Expand Rename pattern… in the import sheet to rename
files as they land, with a live preview of how the first file will look.
- In the import sheet, click Rename pattern…. — the section expands to show a dropdown and a Preview: line.
- Pick a saved template, or choose Custom (compose with tokens…) to build one on the spot. — choosing Keep original filenames (the default) leaves names exactly as the camera wrote them.
- If you chose Custom, click the little token buttons (or type) to compose a
pattern. — the Preview: line updates as you go (e.g.
IMG_0042.CR3becomes2026-05-25_monaco-gp_0412.CR3).
The token buttons in the import sheet's Custom picker are:
| Token button | Inserts | Expands to |
|---|---|---|
| album | {album_slug} |
the album's slug |
| event | {event_slug} |
the album's event slug |
| date | {taken_date} |
the capture date |
| year | {taken_year} |
the capture year |
| frame# | {frame:04} |
a zero-padded sequence number |
| orig | {original_filename} |
the original camera name |
| _ / - | _ / - |
literal separators |
The source extension (.ARW, .CR3, …) is added automatically, so RAW files
always keep their type.
Your originals are safe, whatever you type
An unknown token simply resolves to nothing, and a broken template falls
back to the original filename — a rename can never destroy or overwrite a
file. If your pattern has no per-file token (like frame# or orig), every
file would collide, so SnapFlow shows an amber warning before you import.
Two places compose names — and they don't share a token list
The Custom picker inside the import sheet (the table above) is a quick,
cut-down set for one-off renames. The full token language — every strftime
date format, camera/lens/ISO/shutter tokens, and more — lives in Settings
→ Filename templates → Manage filename templates…, where you author and
save reusable templates. For anything beyond a quick tweak, save a
template there and pick it from the dropdown rather than typing tokens in
the import sheet. (A footnote for the curious: the {aperture} token has no
effect during import — it resolves to nothing.)
To manage saved templates, go to the ⌘7 Settings stage → Filename templates card → Manage filename templates…. Mark one as the default and it auto-loads in the import sheet every time.
How duplicates are handled
SnapFlow never silently throws away a photo. When a file with the same name is already in the album, it decides what to do by looking at the actual contents:
- Byte-identical — the file already in the album is exactly the same photo. SnapFlow skips it (this is what makes re-inserting the same card safe — it only brings in what's new). It counts as skipped in the summary.
- Same name, different photo — for example
100CANON/IMG_0001.CR3and101CANON/IMG_0001.CR3are two different shots that happen to share a frame number. SnapFlow keeps both by adding a numbered suffix to the newcomer (IMG_0001_1.CR3,IMG_0001_2.CR3, …). It counts as renamed.
Content-aware, not just name-and-size
Older versions matched on name and size, which could mistake two different shots of identical byte length for the same file and drop one. SnapFlow now compares the actual bytes, so a real duplicate is skipped and a genuinely different photo is always kept.
You can watch this happen live: while a card imports, the progress sheet shows a running copied N · skipped N counter under the Importing to <album>… line, plus the filename currently being copied.
Where to go next
- Now that the photos are on your Mac, cull them — rate, reject, and pick your keepers.
- When you're ready to deliver, push your keepers up to SnapFlow.
- To stamp captions, keywords and credit onto your shots, see Metadata on the desktop.