Favourites & notes
Hearting picks and leaving per-photo retouching notes.
When the photographer turns on Client proofing for an album, you (the client) get a simple job: tap a heart on every photo you want, and — if you like — type a short retouching note next to each pick. That exact list of hearts and notes is what lands on the photographer's desk as your brief.
This chapter is for the person browsing the gallery. If you're the photographer and you want to switch proofing on, see Proofing & delivery.
You only see hearts when proofing is on
The heart buttons appear only when the photographer has switched on Client proofing for the album. That's a separate setting from the album's status badge — an album can say "Proofing" without hearts, and an album in another status can still show hearts. If you don't see any hearts, proofing isn't on for that album; nothing you can do from your side will turn them on.
Heart the photos you want
When proofing is on, every photo in the album grid has a little heart in its top-right corner. An outline heart means "not picked yet"; a solid purple heart means "picked". A short banner at the top of the page reminds you what to do.
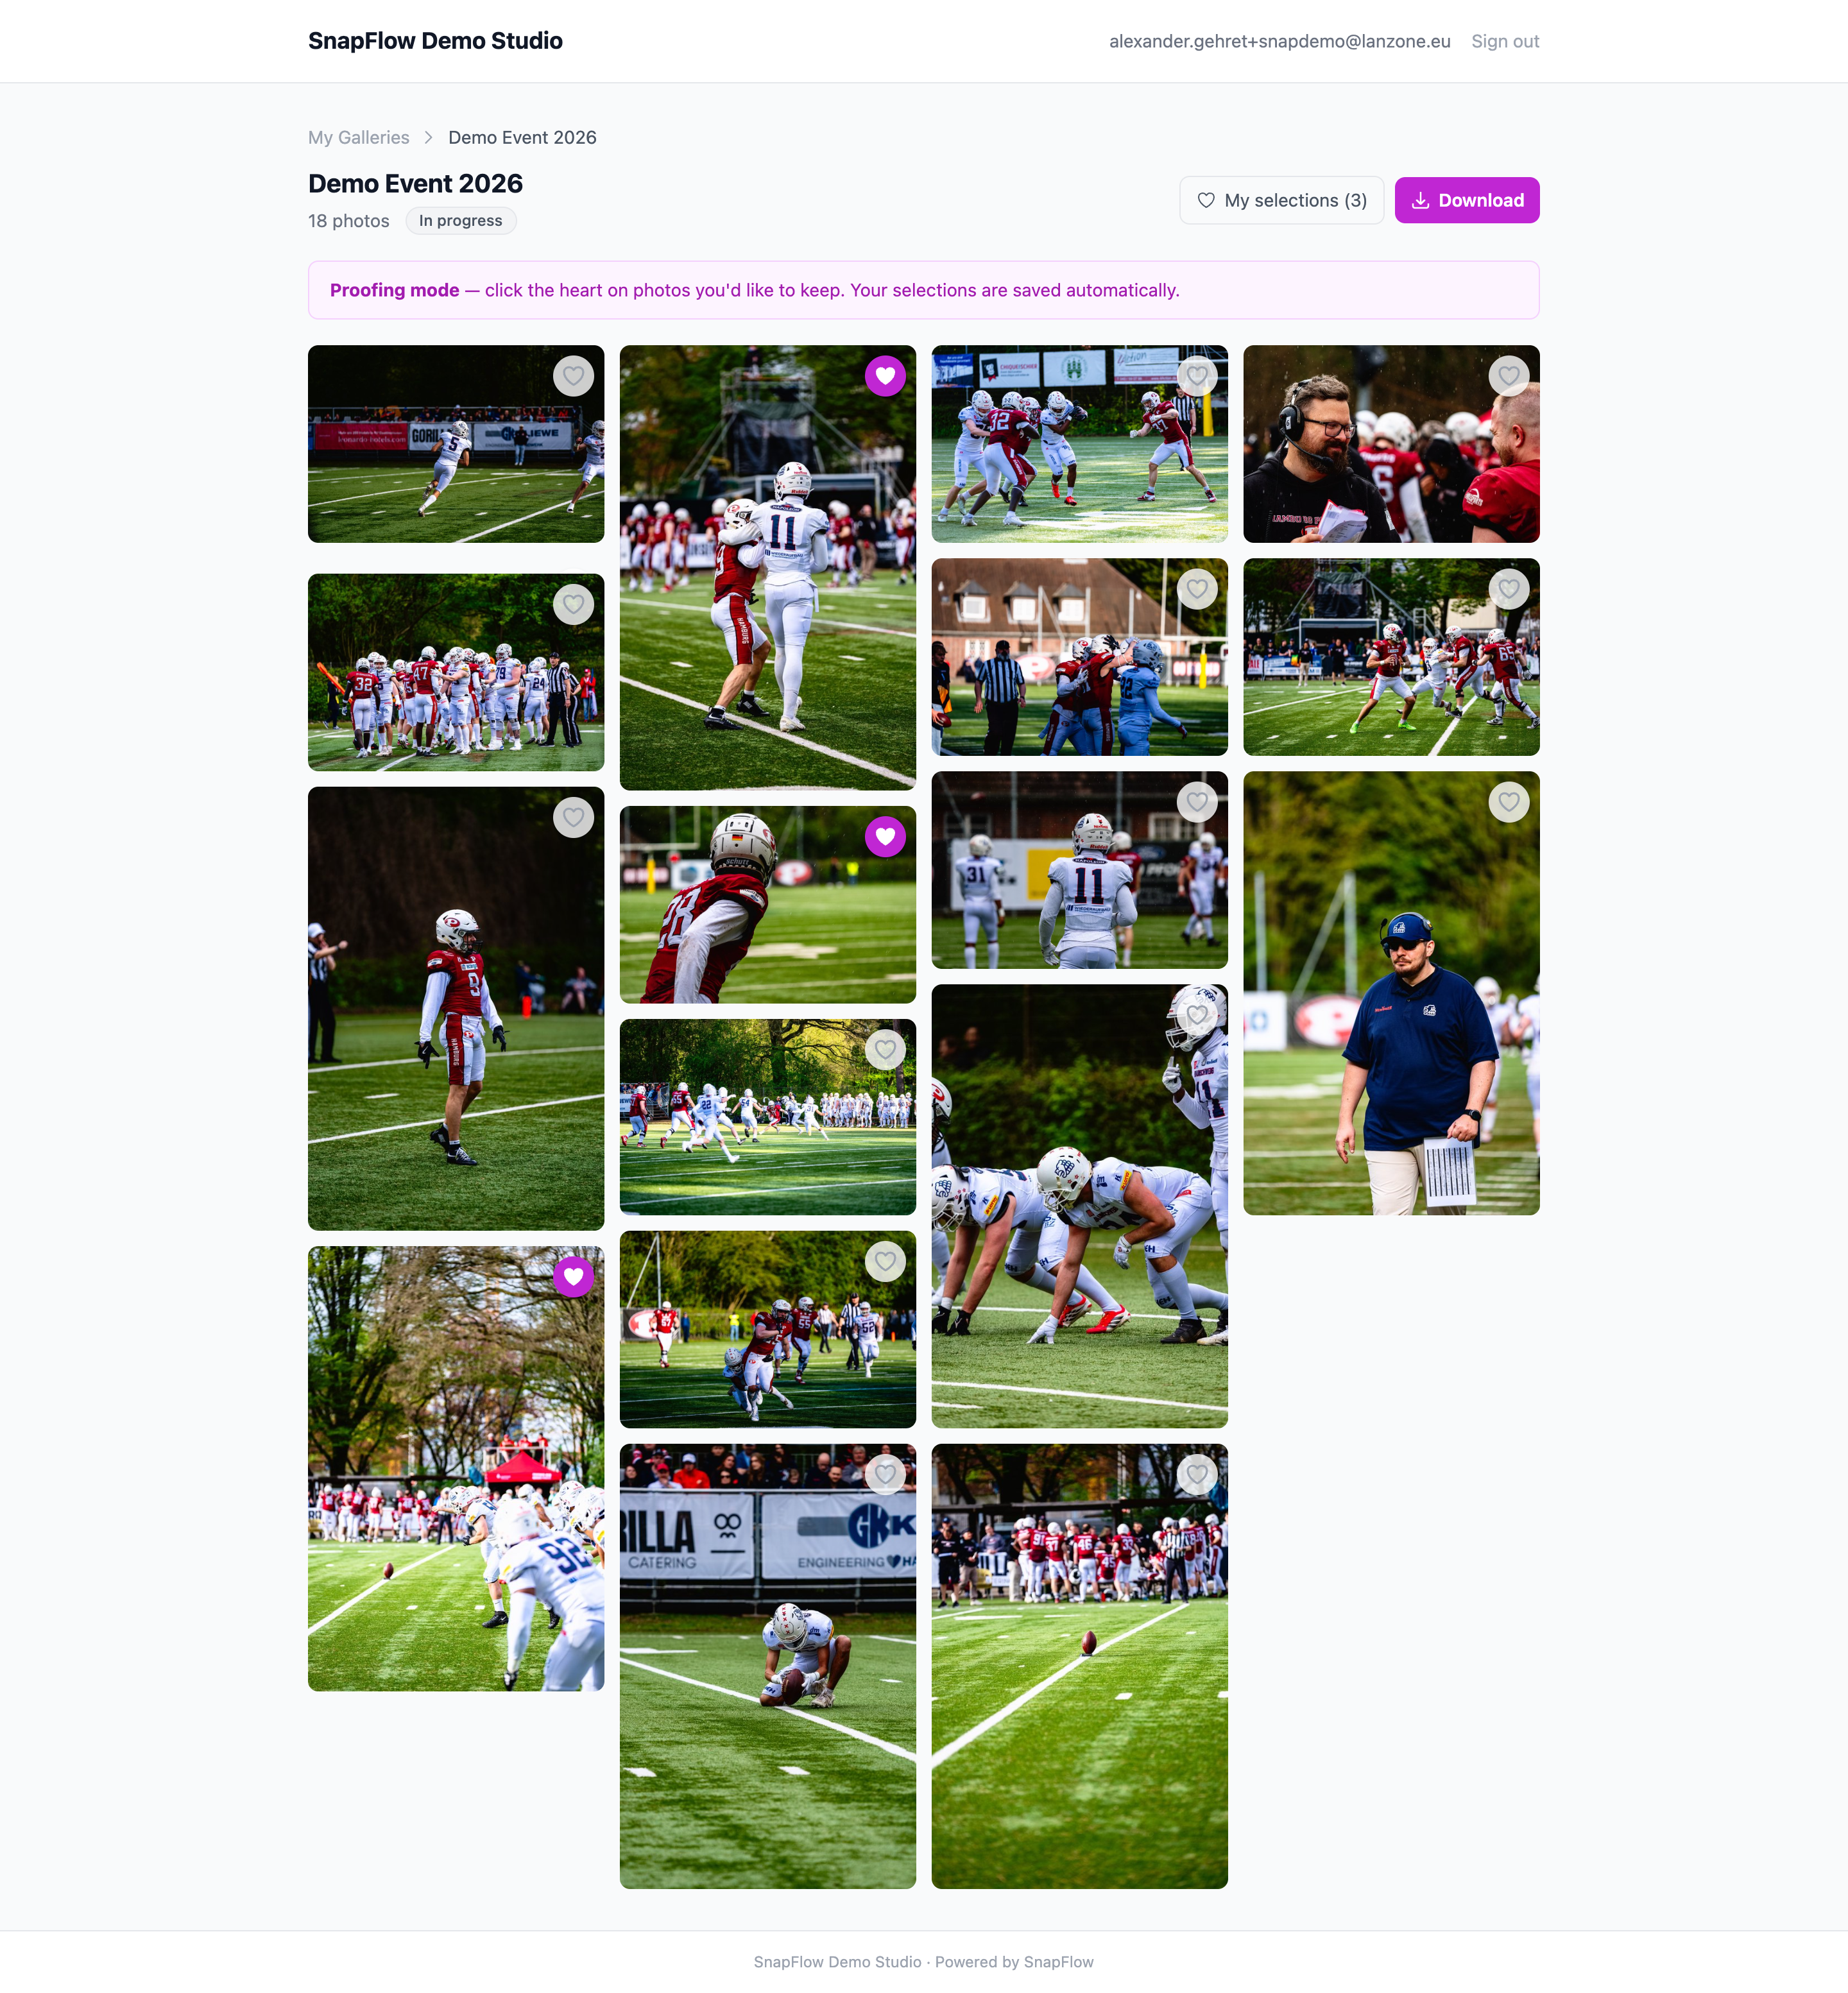 The proofing gallery. ① the Proofing mode banner — "click the heart on photos you'd like to keep"; ② an outline (white) heart = not picked; ③ a solid purple heart = picked; ④ the My selections (N) link, top-right, which jumps to your picks-and-notes page.
Here's the whole thing, step by step:
- Sign in to the portal and open the album. — you'll land on the photo grid. If proofing is on, a blue banner sits across the top: "Proofing mode — click the heart on photos you'd like to keep. Your selections are saved automatically."
- Find a photo you like and click its heart (top-right corner of the photo). — the heart fills in solid purple straight away. That photo is now picked.
- Changed your mind? Click the same heart again. — it goes back to a white outline. The photo is no longer picked.
- Repeat for every photo you want. — the My selections (N) link at the top keeps a running count, so "My selections (12)" means twelve picks so far.
There is no Submit button — picks save the instant you click
Each click saves on its own, right then. You don't need to press Save or Submit for your hearts. You can close the tab and come back later; your picks will still be there. (Typed notes, on the next page, do have a Save button — see below.)
Your picks are private to you
Picks are tied to the email you signed in with. If two different people open the same gallery with different logins, each keeps their own separate list of favourites — your hearts won't show up for anyone else, and theirs won't show up for you.
Why some proofing photos look stamped 'Preview'
During proofing the photographer may show you watermarked previews — each photo carries a faint "Preview" stamp across it. That's normal: it just stops low-res proofs being passed around as finished images. The clean, unstamped versions arrive when the photographer delivers the final gallery — see Downloading your photos.
Add a retouching note to a pick
Hearts say which photos you want. Notes say what you'd like changed on each one — "crop tighter", "make it black and white", "lose the person in the background". You add notes on the My selections page.
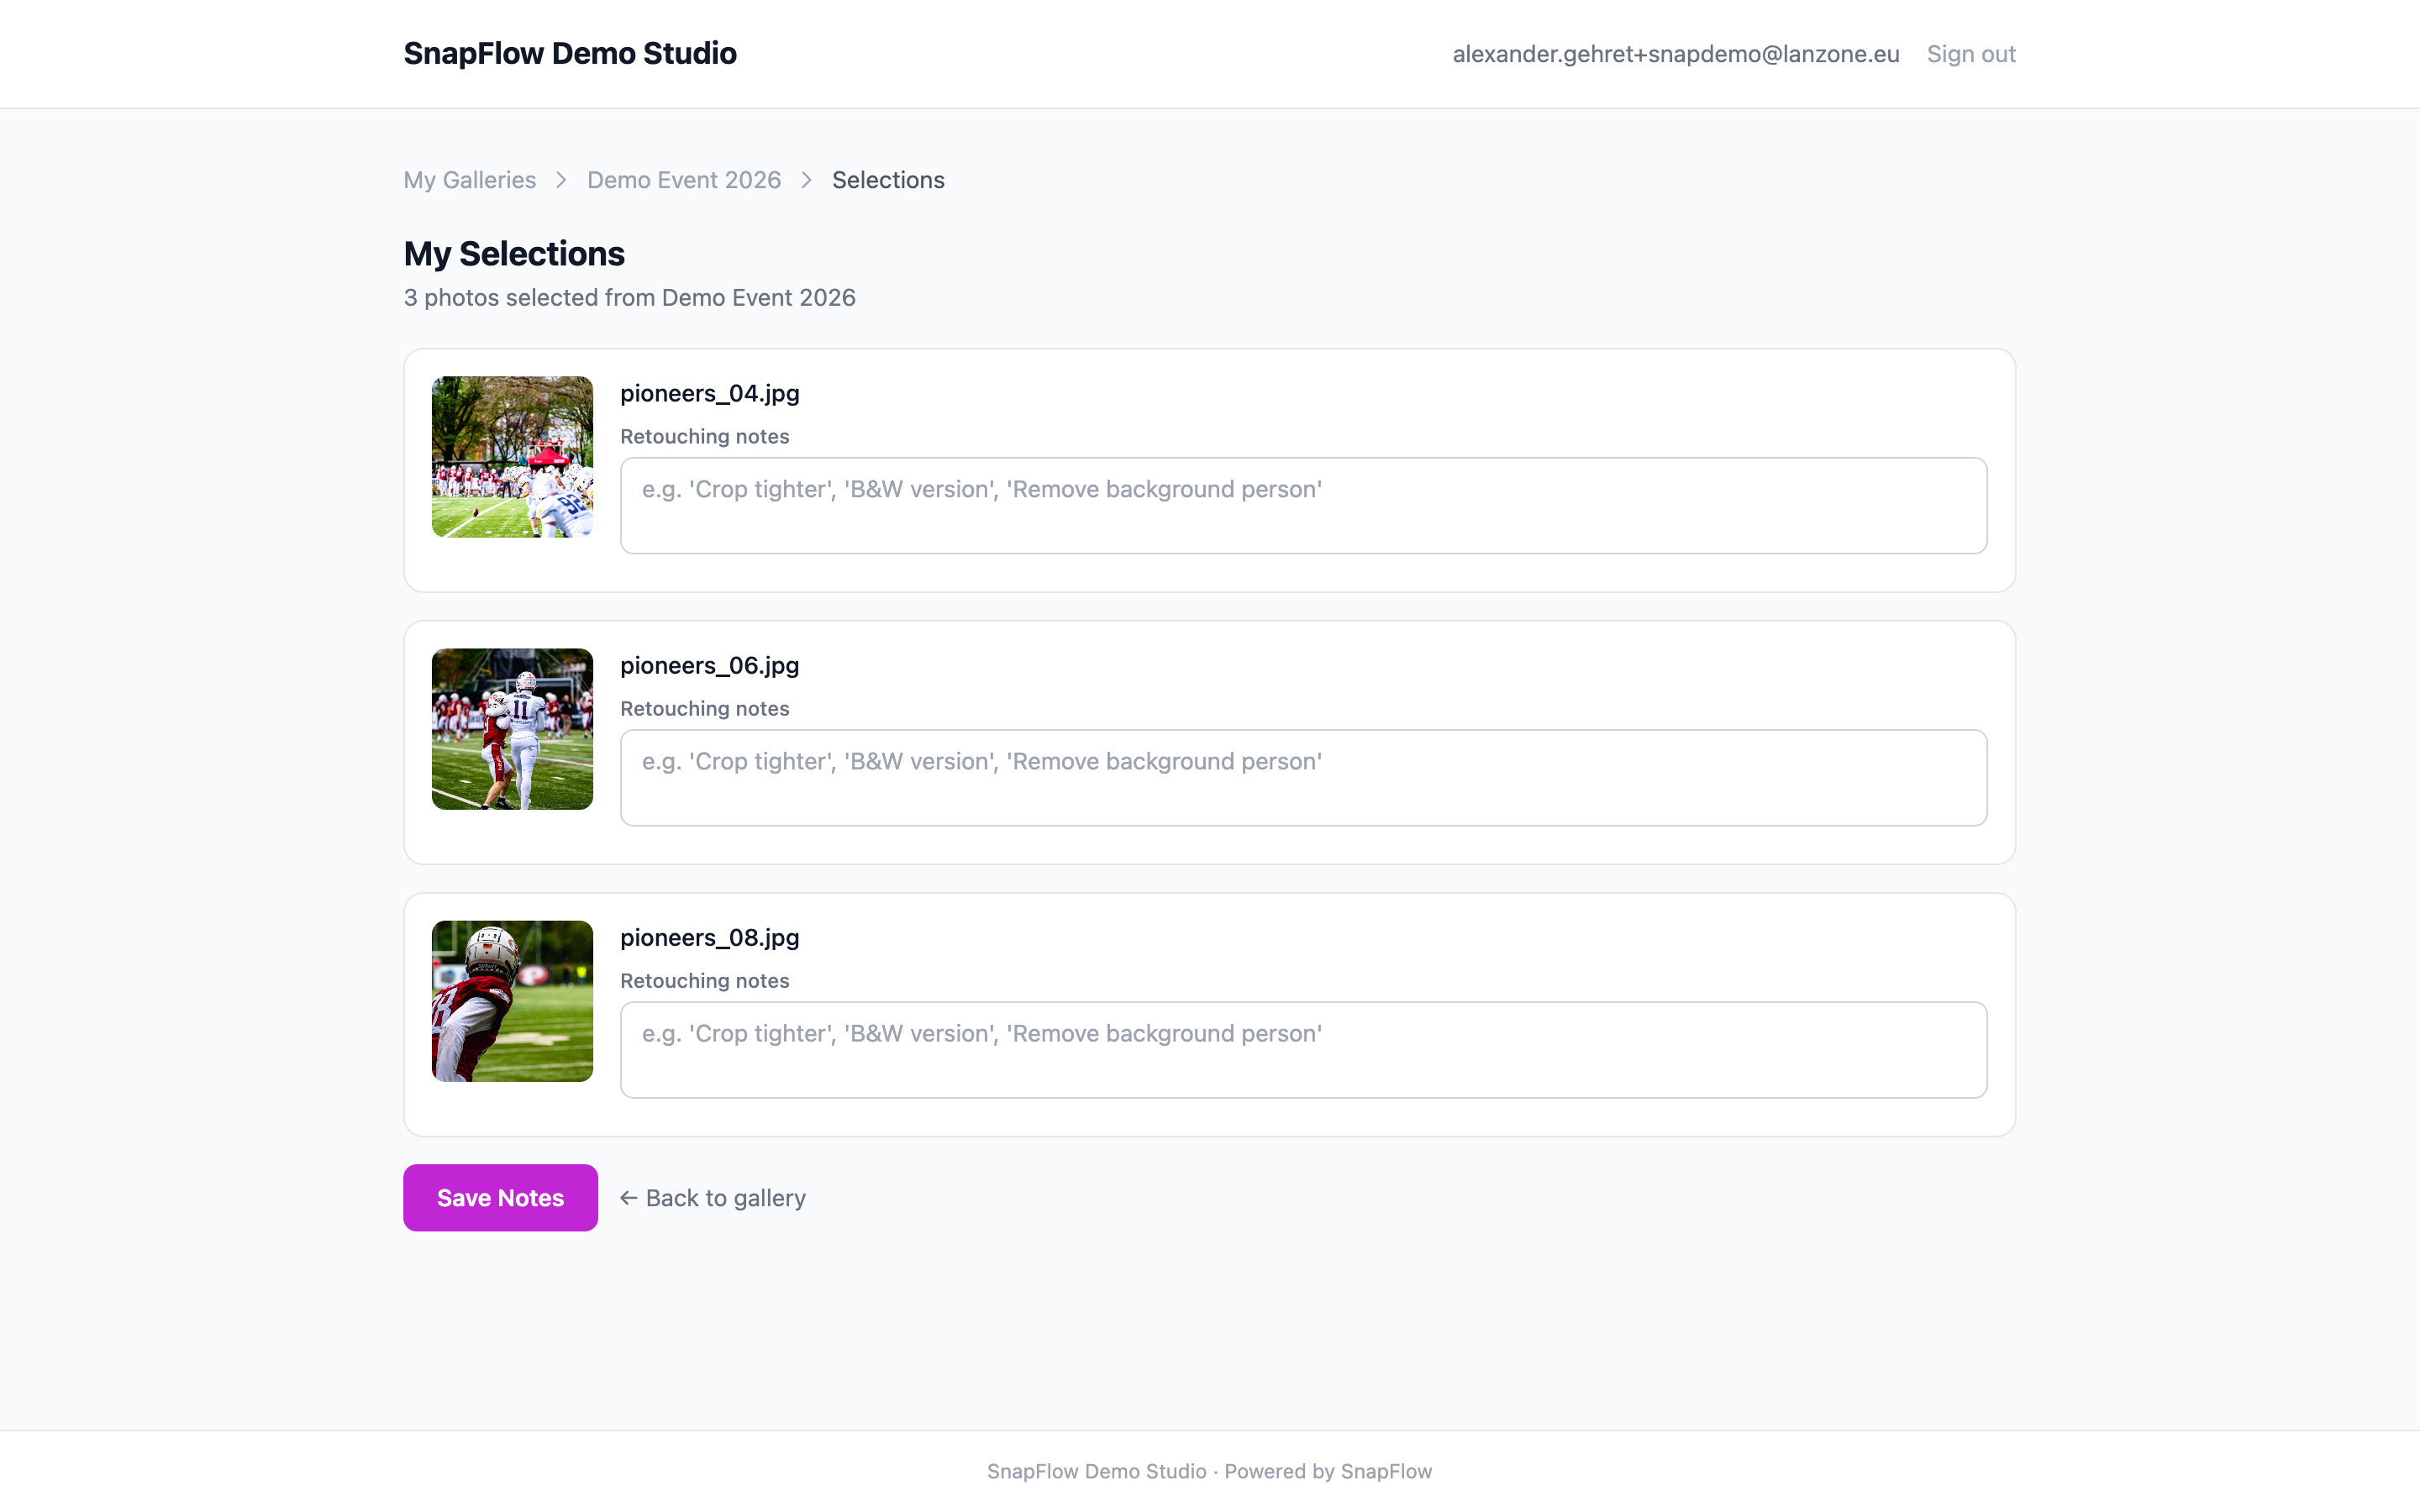 The My Selections page. ① the photo's thumbnail and filename; ② the Retouching notes box (placeholder examples: "Crop tighter", "B&W version", "Remove background person"); ③ the purple Save Notes button at the bottom — click it once to save every note on the page.
- From the album grid, click My selections (N) at the top-right. — the My Selections page opens. It lists every photo you've hearted, newest filenames in order, each with its own little note box.
- In the Retouching notes box under a photo, type what you'd like done — for example "Crop tighter", "B&W version" or "Remove background person". — the box shows those same examples as faint placeholder text until you start typing.
- Do that for as many photos as you want. You can leave a box empty if a photo needs no changes. — empty boxes are fine; only the ones you fill in get sent.
- Click the purple Save Notes button at the bottom. — a green bar appears: "Retouching notes saved." That's your confirmation it worked.
- To go back to picking more photos, click ← Back to gallery. — you return to the album grid, hearts and all.
Notes need the Save Notes button — hearts don't
This is the one place the two behave differently. Your hearts save the instant you click them. Your typed notes do not save until you press Save Notes. If you type a note and then close the tab without pressing it, that note is lost. Hearts are always safe; notes need the button.
Nothing hearted yet?
If you open My Selections before you've hearted anything, you'll see "No photos selected yet." and a Browse photos → link. Click it, heart a few photos, then come back — they'll be waiting here with note boxes.
What the photographer sees
Once you've hearted your favourites and saved any notes, your whole brief shows up on the photographer's side against this album: the exact set of photos you picked, and the note you wrote on each one. They edit precisely what you asked for — no guessing, no long email thread.
You can keep adjusting after you've saved. Add a heart, remove one, change a note and press Save Notes again — the photographer always sees your latest version. Treat the set you've got at delivery time as your final brief.
When the edits are done, the finished gallery comes back to you to download — see Downloading your photos.