Posts & Reels
Compose Instagram posts, tips carousels, Stories and reels.
The Posts and Reels tabs turn the day's photos into Instagram content without leaving the field. You build a draft (a post that isn't published yet), review it, then publish now or schedule it for later. iOS
Your iPhone app has four tabs along the bottom: Albums, Edit, Posts, and Reels. This chapter covers the last two. (For the on-device photo editor, see Editing on iPhone. For everything Instagram on the big screen, see Posting to social.)
You need Pro or Studio for the AI and Story tools
The Story card, the Suggestions strip, every Reels mode, and TikTok cross-posting all need a Pro or Studio plan. On a Free plan you'll still see the Standard post, Tips carousel, AI Auto and AI Tips cards on the Posts tab — but the Reels tab shows an upgrade banner instead of the composers. You upgrade on the web dashboard, not in the app.
Posts
Tap Posts in the bottom tab bar. — the screen header reads Posts, and you see (top to bottom): an Ideas for you suggestions strip (Pro/Studio only), a Pick a format card grid, and a Recent drafts list.
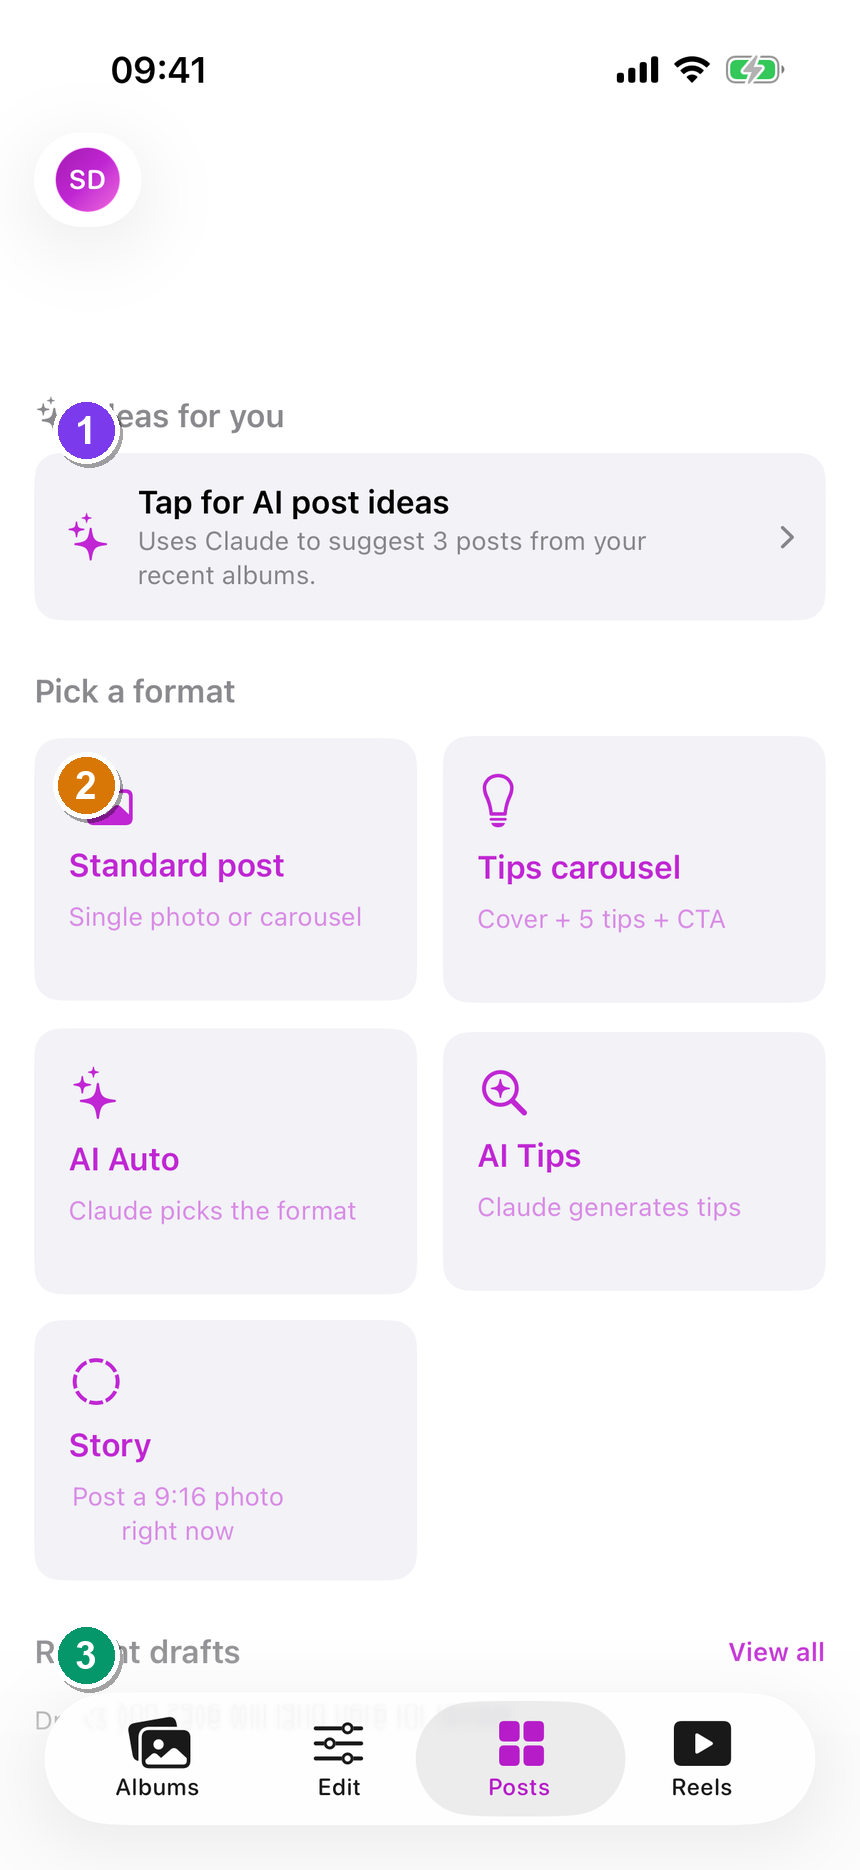 The Posts tab. ① the Ideas for you suggestions strip (Pro/Studio); ② the Pick a format grid with the five cards — Standard post, Tips carousel, AI Auto, AI Tips and Story; ③ the Recent drafts list with a View all link.
The five "Pick a format" cards
Each card opens a different composer. Tap one to start.
- Standard post — "Single photo or carousel." Build a normal feed post from one album photo or several. This is the workhorse — its full steps are below.
- Tips carousel — "Cover + 5 tips + CTA." A swipeable tips post: a cover slide, five tip slides, and a call-to-action.
- AI Auto — "Claude picks the format." Studio SnapFlow's AI writes a whole post from your photos and chooses single-vs-carousel for you.
- AI Tips — "Claude generates tips." Studio An AI-written tips carousel — you pick the photos, the AI writes the tip text.
- Story — "Post a 9:16 photo right now." Pro Studio Posts straight to your Instagram Story immediately. No draft, no scheduling. This card only appears on Pro/Studio.
Ideas for you (Pro/Studio)
The Ideas for you strip at the very top is optional. The first time, tap Tap for AI post ideas — it asks Claude to suggest three posts from your recent albums. Each idea card has a Build button that pre-fills the composer so you don't start from a blank screen. Tap the refresh (↻) icon to get fresh ideas, or the ✕ icon to hide the strip on this device.
Build a standard post (numbered)
This is the main flow. It saves a draft at the end — nothing posts yet.
- On the Posts tab, tap Standard post. — a sheet titled New Post opens with a top-left Cancel button.
- Under Instagram account, use the Post as picker to choose which account you're posting from. — if you have no connected accounts you'll see "No connected accounts."; connect one on the web dashboard first, then come back.
- Under Album, use the Source picker to choose the album. — changing the album clears any photos you'd already picked.
- In the Photos section, tap the + tile to add photos. — a picker opens; tap the ones you want, then confirm. The header shows Single photo for one, or Carousel · N · drag to reorder for several. Drag the thumbnails to set the carousel order, or tap the small ✕ on a thumbnail to drop it.
- In the Style section, pick a Cover slide — None, Centred, Bold or Magazine. — the chosen card gets a purple tick. If you pick any cover other than None, a Cover headline field appears — type your headline there.
- Still in Style, pick a Photo style — Colour or B&W. — the preview tints to match. (If you picked exactly nine photos, a Layout row also appears: Carousel or 3×3 grid.)
- In the Caption section, type your caption (the placeholder reads "Write your caption…"). — a counter shows N/2200; it turns red if you go over Instagram's 2,200-character limit.
- (Optional) Tap AI captions to get help. — a sheet titled AI Captions drafts three options; tap one to drop it into the caption box. A small AI badge appears on the Caption header to show it came from AI (it becomes AI · edited once you change the text).
- (Optional) Open Post details and fill in Hook (a scroll-stopping first line), Hashtags, Tag accounts (handles like @venue), and First comment. — the footer reminds you tagged accounts and the first comment publish with the post, while hashtags here feed your performance insights.
- Tap Continue to review (the purple button at the bottom). — the draft saves and the app jumps straight into the draft review screen. The footer says "You'll be able to schedule or post-now after reviewing."
Tips carousel, AI Auto and AI Tips work the same way
The other three composers open their own sheets but follow the same idea: pick an account, pick the photos, let the AI (or you) write the words, then save a draft. The AI cards are Studio-only and need your AI-processing consent turned on — see AI processing & account.
Review, schedule or publish a draft
Every draft you save lands in Recent drafts on the Posts tab (newest first, with a View all link to the full list).
- Tap a draft. — the draft review screen opens, showing the photos, caption and details exactly as they'll post.
- To go live straight away, tap Post now. — the post is sent to Instagram.
- To send it later, tap Schedule…. — a Schedule sheet opens with a date-and-time picker; set the moment, then tap Schedule. You'll see "Scheduled for …" and the draft is marked Scheduled.
- To throw it away, tap Discard draft (or Discard). — the draft is deleted.
Drafts are the safety net
Because the field composer always saves a draft first, you can build a stack of posts during the event and review them all later — on the phone or on the web. A draft started on iOS shows up on the web dashboard too.
Reels
Tap Reels in the bottom tab bar. — the screen header reads Reels, with a Pick a reel format list of cards below it.
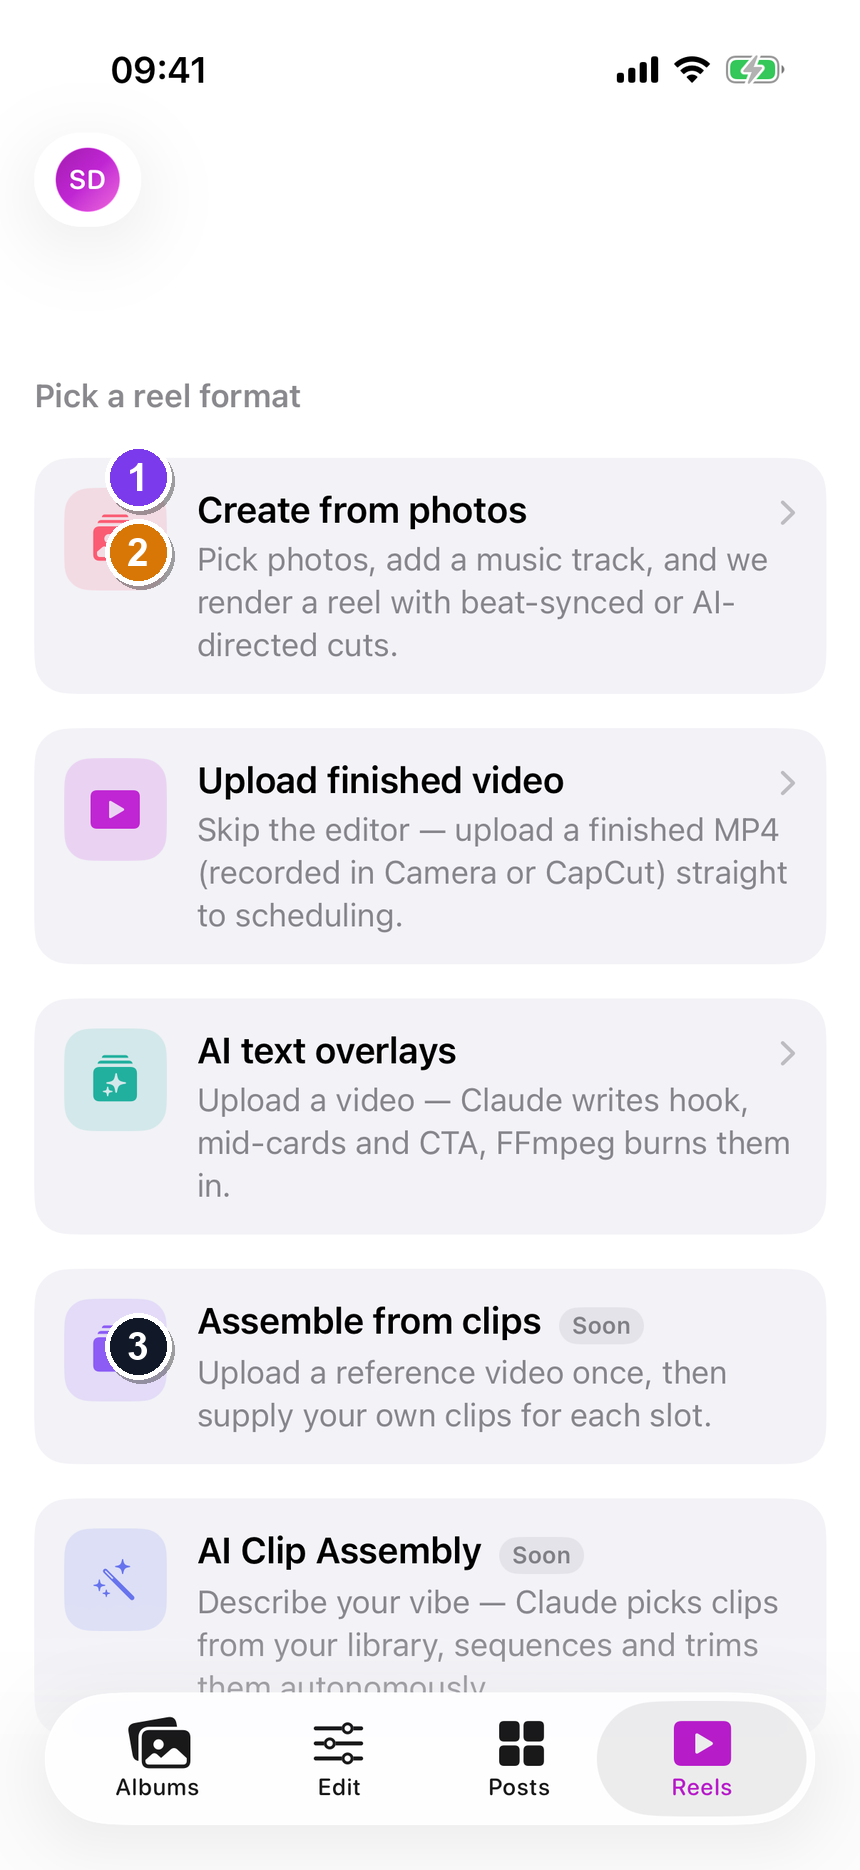 The Reels tab. ① the Pick a reel format heading; ② the three working modes — Create from photos, Upload finished video, AI text overlays — each a tappable row; ③ the two Soon modes (Assemble from clips, AI Clip Assembly) with a grey Soon badge; on a Free plan a purple Reels are a Pro feature banner sits at the top instead.
The five reel modes
Three are wired up on iOS today; two are marked Soon (tapping them shows a short "coming to mobile shortly" note and doesn't open a composer).
- Create from photos — pick photos, add a music track, and SnapFlow renders a reel with beat-synced or AI-directed cuts.
- Upload finished video — skip the editor and upload a finished MP4 you recorded in the iOS Camera (or edited in CapCut/Splice) straight to scheduling.
- AI text overlays — upload a video and let Claude write the hook, mid-cards and call-to-action, then burn them into the clip.
- Assemble from clips — Soon. Supply your own clips for each slot of a reference video.
- AI Clip Assembly — Soon. Describe a vibe and Claude sequences clips from your library automatically.
Free plan: Reels are locked
On a Free plan the Reels tab shows a purple banner reading "Reels are a Pro feature" with "Upgrade your plan on the web dashboard to unlock all reel modes." — and the mode cards are dimmed. Upgrade to Pro or Studio on the web to use them.
Upload a finished video (numbered)
The simplest reel: a clip you already made.
- On the Reels tab, tap Upload finished video. — a sheet titled New Reel opens with a top-left Cancel button.
- Under Instagram account, use the Post as picker to choose your account.
- In the Video section, tap the dashed Pick a video tile. — your photo library opens filtered to videos; choose one. The tile then shows the filename and size with "tap to change". The footer notes "MP4 or MOV up to 200 MB."
- In the Caption section, type your caption (placeholder "Caption…").
- In the Style section, optionally pick a Cover slide (None, Centred, Bold, Magazine) and a Photo style (Colour or B&W). — picking a cover slide renders a title card ahead of the video.
- Tap Save reel as draft. — the button reads Uploading… while the clip transfers, then drops you into the draft review screen where you can Post now or Schedule… just like a post.
Also post to TikTok (Pro/Studio)
In the reel Style section there's an Also post row with a TikTok chip. Tap it to cross-post the same reel to your connected TikTok account. A note appears: "Reel cross-posts to your connected TikTok ~30s after IG publish lands." — so the reel publishes to Instagram first, then TikTok about thirty seconds later. You connect TikTok on the web dashboard. See Posting to social for the full TikTok setup.
Heavier reel editing lives on the web
The iOS reel modes are deliberately quick. For richer server-side rendering (longer music timelines, advanced cutting modes, the full clip library), use the web Reels tools. A reel drafted on iOS appears in your drafts on the web too, so you can finish it on either screen.