Culling & rating
Rate, reject and pick your keepers fast.
Once your photos are in, the next job is sorting the keepers from the rest. That job is called culling: you give your best shots a star rating and mark the duds as rejects, so you only deliver the good ones.
SnapFlow gives you two places to do this on the web, and they are not the same screen:
- The album grid — the page you land on when you open an album. Here you hover a photo and click its stars, and a Filter bar at the top lets you narrow the grid down to one rating tier (5★, 4★+ …) or your rejects.
- The full-screen Rate & cull view — a calm, one-photo-at-a-time review you open from the More menu. It loads every photo and is built for keyboard use. This view is a Pro feature.
There's also a faster pro setup in the desktop app, covered at the bottom.
Two surfaces, two jobs
The Filter bar (with the rating chips and the red Culls chip) lives on the album grid only. The full-screen Rate & cull view has no filter — it always loads every photo and shows a static All photos pill. Don't go looking for filter chips inside the full-screen view; they aren't there.
Rate and reject in the grid Web
Every photo card in the album grid has a hidden rating strip. You won't see it until you hover the card.
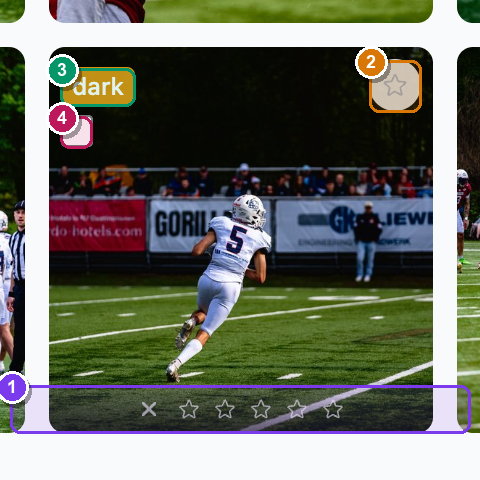 A single grid card with the mouse hovering it. ① the bottom rating strip — a ✗ reject button on the left, then five ☆ stars. ② the top-right ☆ Set as album cover button (separate from rating). ③ the top-left amber auto-cull flag pill. ④ the top-left bulk-select checkbox that appears on hover.
To rate and reject:
- Open your album from Dashboard → Albums → (your album). — the album grid fills the page.
- Hover any photo. — a faint rating strip fades in along the bottom of the card: a ✗ on the left, then five ☆ stars.
- Click a star (1 to 5). — the stars up to the one you clicked turn yellow and the strip stays visible, so you can see at a glance which photos are rated.
- To clear a rating, click the same star again. — the stars go back to empty and the strip fades out on un-hover.
- To reject a photo, click the ✗ on the left of the strip. — the ✗ turns red. A reject is just a rating of −1; it groups under the Culls filter (see below).
Grid stars are click-only
The number keys 1–5, 0 and X do nothing on the album grid — it
reacts to clicks only. Keyboard rating works exclusively in the full-screen
Rate & cull view (next section).
Set the album cover (not a rating)
The single ☆ in the top-right corner of a card is a different button: it's Set as album cover, not a rating. Click it to make that photo the cover shown on the album list and the public gallery. It's separate from the rating strip and does not appear in the full-screen cull view.
The Filter bar — show one tier at a time
At the top of the grid sits the Filter bar. It narrows the grid down so you can focus on one group of photos.
 The Filter bar. ① the Filter label. ② the rating chips ★★★★★ / ★★★★+ / ★★★+ (five-star only, four-or-more, three-or-more). ③ the red Culls chip — your rejects. ④ the From / To date inputs. ⑤ the Clear filters link, which only appears once a filter is active.
- In the Filter bar, click a rating chip, e.g. ★★★★+. — the grid reloads showing only photos rated four stars or more.
- To see your rejects, click the red Culls chip. — the grid shows only the photos you rejected (rating −1).
- To go back to everything, click Clear filters (it appears on the right once a filter is on). — the full grid returns.
One tier at a time
The rating chips are radio buttons: clicking one replaces the last. You see 5★ only, or 4★ and up, or 3★ and up, or Culls — never two at once. The From / To boxes filter by capture date and can be combined with a rating chip.
The full-screen Rate & cull view Web Pro
When you have a whole take to get through, the grid's one-card-at-a-time hovering is slow. The Rate & cull view shows one big photo at a time and is driven entirely from the keyboard, so you can fly through a shoot.
This view is a Pro feature, and the toggle must be on
The full-screen Rate & cull view needs the culling capability (Pro plan and up) and the album's Rate & Cull workflow toggle switched on. The Rate & cull menu item only appears once the album has at least one photo and the toggle is on. On Free — or with the toggle off — you still get the grid stars and the Filter bar, just not this page. To turn it on: More → Edit album… → right-hand Workflows card → tick Rate & Cull → Save changes. (On Free the toggle shows a Pro pill and is greyed out.)
 The full-screen cull view. ① the back arrow + album name (top-left) returns to the grid. ② the static All photos pill — this view never filters. ③ the N / total counter (top-right). ④ the centred photo. ⑤ the bottom bar: Reject | Clear | five ★ stars. ⑥ the keyboard-hint row underneath. ⑦ an amber flag pill under the photo when auto-cull flagged it.
To cull a whole take:
- On the album page, click More (top-right) → Rate & cull. — a dark full-screen view opens with your first photo centred, the album name top-left, the All photos pill, and a 1 / N counter top-right.
- Press
1to5to give the photo that many stars. — the stars in the bottom bar fill in, a small toast (e.g. ★★★★) flashes, and SnapFlow auto-advances to the next photo. One keypress rates and moves on. - Press
Xto reject the photo. — the Reject button turns red, a Rejected toast flashes, and it auto-advances to the next shot. - Press
0to clear a rating you set by mistake. — the stars empty and a Cleared toast flashes. Clearing does not auto-advance, so you can re-rate the same photo right away. - Step through photos with
←/→, or pressSpaceto jump to the next one. — the counter updates and the photo swaps. - When you're done, click the back arrow + album name (top-left). — you return to the album grid, where every rating you just set is already showing.
You can also click the on-screen buttons instead of the keys: Reject, Clear, and the five ★ stars in the bottom bar all do the same thing.
Auto-advance is the trick
Rating (1–5) and rejecting (X) move you forward automatically; clearing (0) stays put. So the fast rhythm is: glance, press a number or X, glance, press again — you can cull a hundred frames without touching the mouse.
Auto-cull: the head start
As photos finish processing, SnapFlow scores each one and flags the likely throwaways for you. There are four flags, and the word you see on the pill is exactly the problem it spotted:
- blurry — soft focus or motion blur.
- overexposed — too bright, highlights blown out.
- dark — the whole frame is very dark.
- underexposed — too little light, shadows crushed.
The flag shows as an amber pill in the top-left of the grid card, and also under the photo in the full-screen cull view.
While you're still uploading, an advisory banner also appears at the top of the album:
N photos flagged by auto-cull — These may be blurry, over/underexposed, or dark. Review them before advancing the workflow. Review in cull mode →
Click Review in cull mode → to jump straight into the full-screen view, or click the ✗ on the right of the banner to dismiss it.
A head start, not a verdict
The flags only help you find the obvious duds quickly. They never reject or hide anything on their own — the call is always yours. A flagged photo is still rated normally; the pill just nudges you to take a closer look.
Clean up your rejects
Rejecting a photo is a rating, not a delete and not a hide. A rejected photo still sits in the album and still shows in a public gallery — it just collects under the Culls filter so you can find every reject in one place. When you're ready to actually get rid of them:
- On the album grid, click the red Culls chip in the Filter bar. — the grid narrows to only your rejected photos.
- Hover each one and tick the checkbox in its top-left corner. — a bulk toolbar slides in at the top showing N selected.
- In that toolbar, click Delete selected (the red button). — a confirm prompt asks "Delete selected photos? This cannot be undone."
- Confirm. — the photos are removed and their storage is freed.
Rejecting isn't hiding or deleting
A reject is stored as the rating −1. It does not pull the photo from a public gallery by itself. To remove rejects from delivery you must delete them (the steps above), or simply leave them rated −1 and they stay out of your starred selections.
The bulk toolbar also offers Deselect all to clear your selection, and — if you've connected Instagram — Post to Stories to queue the selected photos. There is no bulk-rate button on the web; to rate many photos at once, use the keyboard in the full-screen view, or the desktop / iOS apps.
Your stars can trigger Instagram
The star rating isn't just for sorting. If an album has Instagram auto-posting set up, any photo you rate at or above the album's minimum rating can be queued automatically as a Story as it comes in. So a 5★ in the cull view can become a published post. See Instagram & socials and Album settings & workflows to set the threshold.
Faster culling on the desktop app Desktop app
For big shoots, the SnapFlow Sync desktop app is the fastest way to cull. It
adds a proper loupe (a full-size single-photo view) with 1:1 zoom for
checking critical focus, a side-by-side Compare for judging two frames from a
burst, multi-select to rate a whole batch at once, and extra keys like P
to flag a pick. The full keyboard map and the loupe toolset are covered in the
desktop chapter.
→ See Culling & rating (desktop) for the complete desktop workflow.
Ratings sync both ways
A star or reject you set in the desktop app shows up on the web, and a rating you set on the web shows up in the desktop app. They're the same rating, kept in sync.