Projects & event phases
Group shoots into projects; the upload → review → proofing → delivered lifecycle.
Organizations keep work tidy with two simple containers: a project is the whole job ("Acme Annual Conference"), and an event is a single shoot inside it ("Keynote & Awards Night"). One client, one project, as many events as the job needs — a multi-day or multi-shoot engagement stays together instead of scattering across loose albums. Web
Where this lives
Projects and events are an organization feature. You reach them from the org top bar (Albums · People · Clients · Socials · Styles · Reports), not the solo photographer dashboard. A solo photographer just makes albums — see Albums. An org event is an album under the hood, so everything you learn in Album settings & workflows applies, with one extra step (internal review) layered on top.
Create a project
A project is just a labelled folder for one client's job. Make it first, then hang events off it.
- In the org top bar, open the Projects page, then click New project (top-right). — the New project form opens with a Projects › breadcrumb.
- In Project name (the only field with a red
*), type the job name, e.g. Annual Conference 2026. — leaving it blank stops the form; everything else is optional. - Pick a Client from the dropdown (defaults to — No client —). — linking a client now is what later lets you deliver galleries and track the relationship. You can also leave it unlinked and add it later. See Clients.
- Choose a Shoot type (defaults to — Select type —): Wedding, Corporate, Portrait, Event, Commercial, or Other. — this is a label for your own sorting; it doesn't change any AI behaviour.
- Add an optional Description for internal notes.
- Click Create project (bottom-right). — the project's detail page opens.
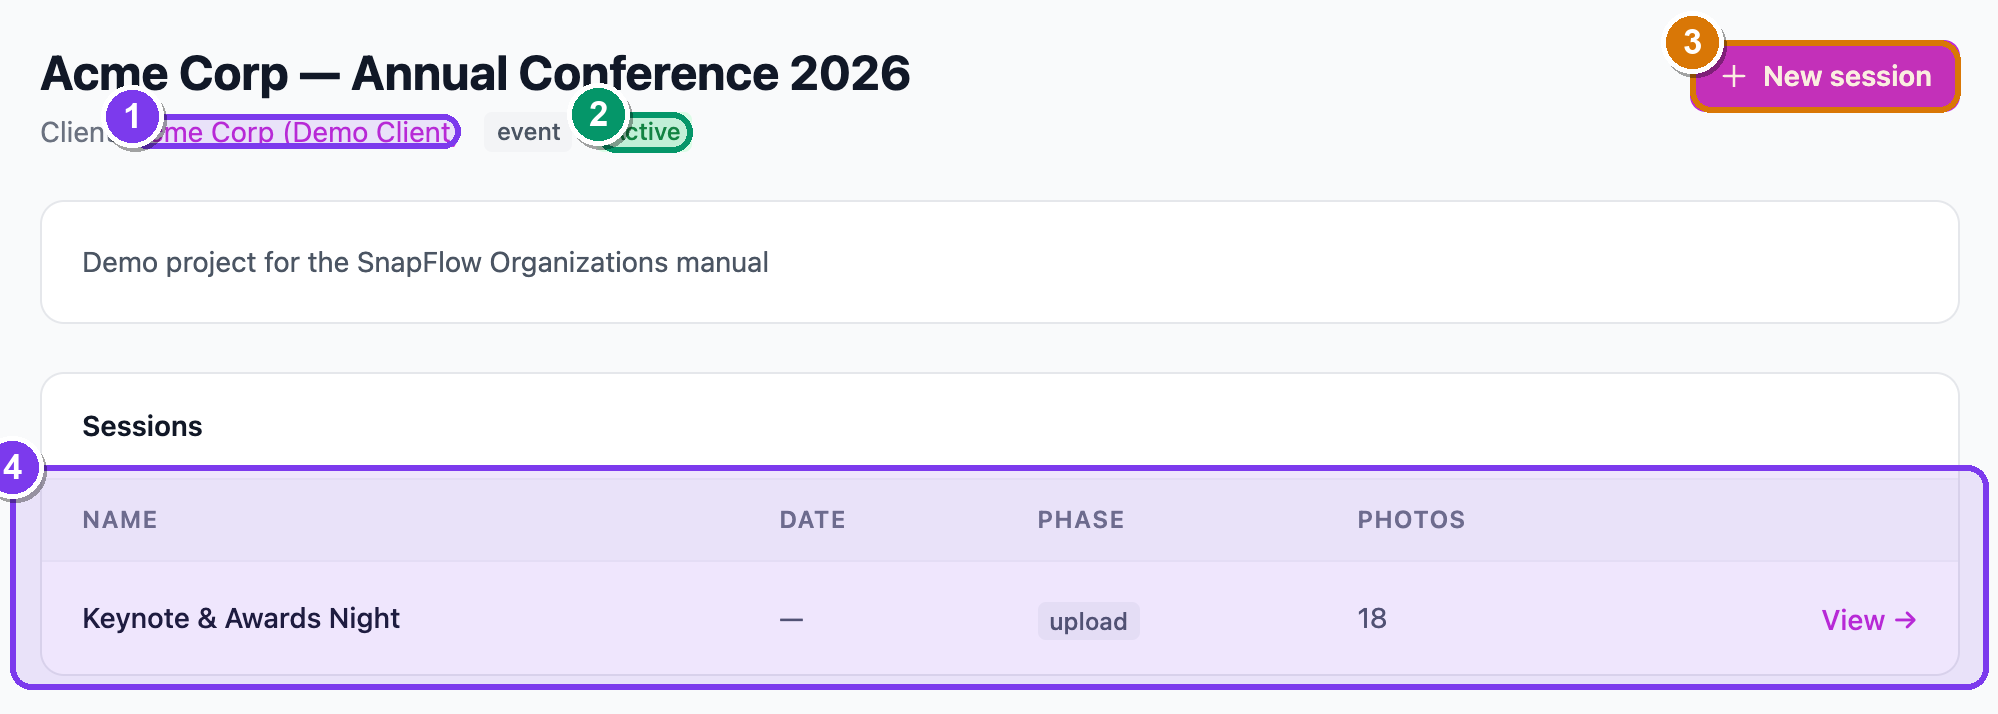 The project detail page. ① the Client link (jumps to the client record), ② the green Active status pill, ③ the New session button (top-right), ④ the Sessions table — one row per event with Name · Date · Phase · Photos columns and a View → link.
The Sessions table shows every event under this project with its current Phase at a glance, so you can see across a multi-day job where each shoot stands. Click View → on any row to open that event.
Add an event (a "session")
On the project page, an event is called a session — same thing, two words. Each session is where you choose what this particular shoot needs, all up front.
- On the project page, click New session (top-right). — the New event
form opens with an Events › breadcrumb and a blue banner "New session for
." - Set the Workflows card first (the big card at the top). These switches decide which phases your event will have — see the next section.
- Scroll to the Event details card and fill Event name (the red-
*required field), then optional Event date, Delivery deadline, Shoot type, Target photo count, Client, Description, Client email (for gallery-ready emails) and Gallery password. - Click Create event (bottom-left). — the event opens, and a new row appears in the project's Sessions table.
An event is an album
Once created, the event behaves exactly like an album: upload, cull, share a gallery, deliver. The Workflows toggles here are the same switches you'd find on an album's Edit page — documented in full in Album settings & workflows. Setting them at create time just saves you a trip back to Edit.
The Workflows card — every switch explained
The Workflows card is grouped into delivery switches and AI-recognition switches. You can turn on as many as the job needs; greyed-out cards with an Upgrade / Pro / Enterprise pill need a higher plan. Here is every control in order.
Delivery & gallery workflow
- Live delivery — real-time gallery updates; photos appear seconds after
upload. Ticking it reveals two sub-options:
- 📷 Auto Instagram — auto-post new photos to Instagram Stories. Reveals an account picker, a Minimum rating to post dropdown, and a Crop landscape photos to 9:16 checkbox. See Instagram & socials.
- ✏️ Editor gate — hold raw uploads back from the public gallery until an editor approves each one. See Live delivery & editor gate.
- Sneak peek — mark individual photos to share early while the rest of the gallery stays private. (Pro.)
- Rate & Cull — rate photos 1–5 stars with keyboard shortcuts for fast triage. See Culling & ratings. (Pro.)
- Gallery visibility — a dropdown, not a toggle. Choose Auto (recommended), All photos — raws + finals, Raws only — camera uploads, or Finals only — edited photos. This controls which photos guests see on the share link.
- Client proofing — the client picks their favourites; you get the list to
edit and deliver. Ticking it reveals two indented sub-options:
- Internal review — your team (manager) approves or rejects photos before the client ever sees them.
- Watermarked preview — show watermarked thumbnails during proofing so clients select without getting full-res files. See Internal review, proofing & delivery.
- Finals delivery — upload edited finals (from Lightroom, Capture One, etc.) back into SnapFlow; finals are stored separately and can replace raws in the gallery.
- FTP camera upload — allow cameras to push frames straight in over FTP. This one is ticked by default. Untick it to block camera FTP only — Lightroom and editor credentials keep working. See Uploading photos.
AI recognition (these appear when your plan family includes them)
- People detection — detect and group faces so you can deliver a set to
each person. Ticking it does two things: it shows an amber legal-basis box you
must confirm (below), and it unlocks four nested sub-pipelines:
- 🎯 Read numbers (jersey, bib, car, sail, saddle, bike) — AI reads visible numbers and matches them to your athlete/vehicle registry. See Reading numbers.
- 🎽 Match athletes to their team New — groups athletes by uniform/livery. See Teams & kits.
- 🚗 Vehicle detection Beta — finds cars, motorbikes, bikes, boats and horses. See Vehicles.
- ⚽ Helmet-paint recognition Beta — matches drivers/riders by helmet design. See Helmet recognition.
- AI metadata Studio — auto-generate a caption and keywords for every photo, embedded into downloaded files for press and editorial delivery. This is a standalone toggle, separate from People detection. See Metadata workflows.
People detection needs a legal basis
The moment you tick People detection, an amber box appears: "I have a legal basis to process biometric data at this event." You must tick it, or saving fails — face embeddings are special-category data under Art. 9 GDPR. Typical bases are KUG § 23 (public event) or explicit consent. See Marketing consent and People & recognition.
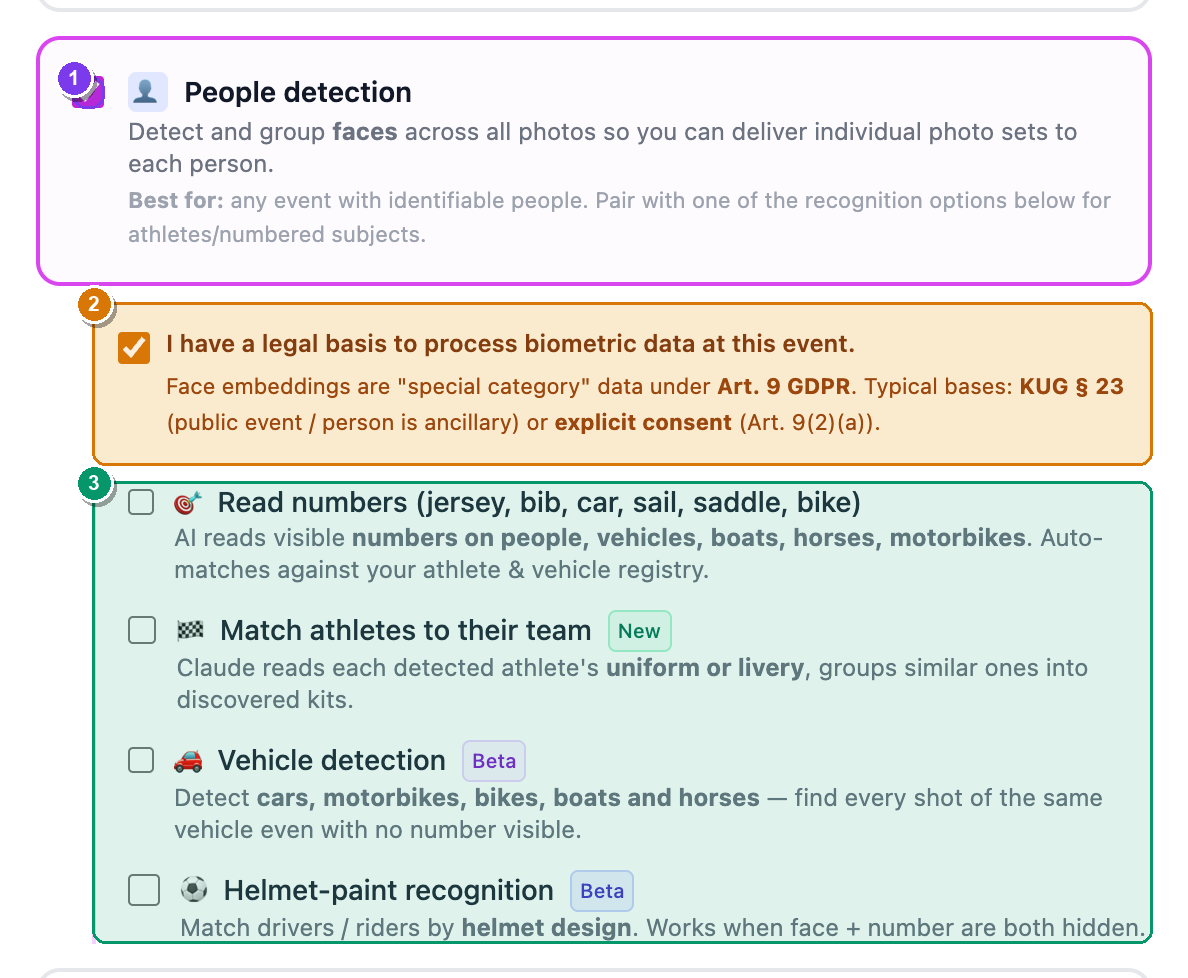 The Workflows card on the New event form, mid-setup. ① the People detection toggle, ② the amber "I have a legal basis to process biometric data at this event." box you must tick, ③ the four nested recognition sub-options (Read numbers, Match athletes to their team, Vehicle detection, Helmet-paint recognition).
The event lifecycle: phases
An org event moves through an ordered sequence of phases, and the phase decides what your team and the client can see. The big idea: a half-finished edit never reaches the client early, because the gallery obeys the phase.
The phases are built from the toggles you turned on. SnapFlow assembles the ladder for you:
- Uploading — always present. Photographers are pushing frames in.
- Internal review — added only when Internal review is ticked (which itself only exists when Client proofing is on). Your team approves or rejects before anyone outside sees the photos.
- Client proofing — added only when Client proofing is on. The client picks favourites.
- Finals upload — added only when Finals delivery is on. You upload the edited set.
- Delivered — added when either Client proofing or Finals delivery is on. The gallery is officially handed over.
The minimum is just one phase
If you turn on none of those delivery toggles, the event has a single phase — Uploading — and no stepper appears. Delivered never shows on its own; it only appears once you've enabled proofing or finals. And Internal review can't exist without Client proofing, because it's a sub-option of it.
Moving between phases
The phase strip sits near the top of the event page: numbered dots, the current phase label, and one button to step forward (and ← Back to step back). The forward button is labelled for the next step:
| Next phase | Button label |
|---|---|
| Internal review | Start review → |
| Client proofing | Open for proofing → |
| Finals upload | Upload finals → |
| Delivered | Mark delivered → (green) |
- On the event page, find the phase strip (numbered dots + current-phase label). — the active dot is filled brand-blue; completed dots show a ✓.
- Click the forward button (e.g. Open for proofing →). — the event advances one phase and the share gallery updates to match.
- Made a mistake? Click ← Back (left of the forward button). — the event drops back one phase.
Confirming delivery
When Client proofing is on and you reach the Delivered phase, a green Ready to deliver card appears (for owners and managers).
- Reach the Delivered phase. — a green Ready to deliver card appears above the gallery.
- (Optional) Type the client's address in the client@company.com (optional) box. — leave it blank to skip the email and just mark it delivered.
- Click Send & mark delivered. — the client gets a link to their finished gallery, and the event is stamped as officially delivered. This is a deliberate "it's ready" moment, not the client watching edits trickle in.
Phases vs. the solo gallery
For a solo photographer the gallery just shows finals as soon as they exist. For an org event the gallery obeys the phase — finals only go public once you reach Delivered — so a client never sees a half-edited set early.
What to do next
- Put photographers on the event so their uploads are attributed — Team & roles.
- Link or create the client you'll deliver to — Clients.
- Run the review → proofing → delivery loop — Internal review, proofing & delivery.
- Understand how captions and keywords travel into the delivered files (the AI metadata value for press/editorial) — Metadata workflows.